1/24 scale Crawler course :page 2
Index: this page
1st Changes again...laying out river bed to finish mountain arch, extend table
2nd Finish the arch, add some details, paint disaster
3rd Planning second mountain alternatives
4th Making rope bridge
5th Painting the second mountain
6th Joining the mountains
7th Twin Arches
8th Bridge lights
9th Cathedral Rock, Twin arches and rope bridge mounted to layout
All pages of this build
Part 1 the start, layout table, Miniscule Mtn. w/ Schmidts Mine & 3 hill climbs
Part 2 This page build Cathedral Rock, rope bridge and Twin Arches
Part 3 Start river, expand table, small arch bridge, detailing east of the river
Part 4 Miniscule Mtn fence rock spire w/Wile E coyote, greenery and small details
Part 5 Painting walls-Nothing to do with layout progress
Part 6 Start West of riveradd small balance rocks
Part 7 Layout basically done add dynamite shack, minor changes, future plans, 3/2024
Start carving river, extend table
After finally getting mountain to layout discovered didn't quite work as it did in the shop. Some changes were made but still hadn't reached a point to start laying out rest of course. So picking up where previous page left off...
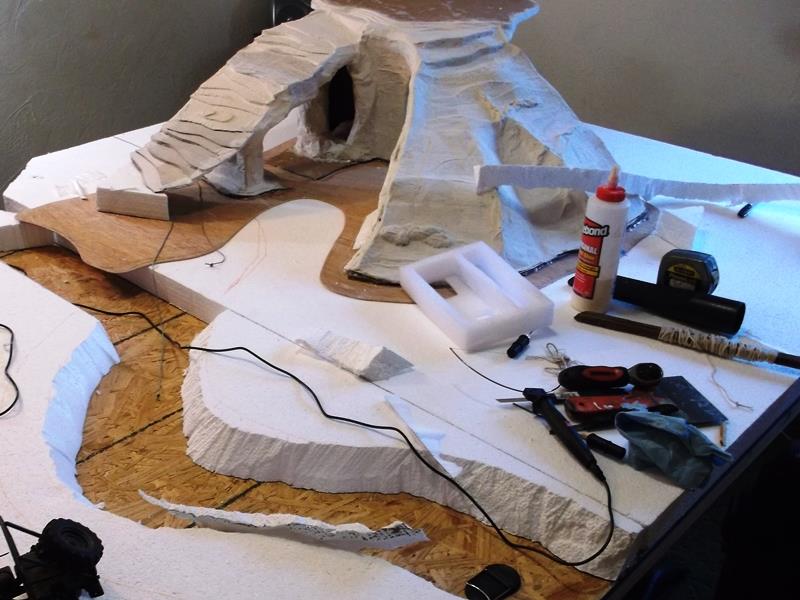
Started carving the river bed . As mountain extends a lot further than planned, thought river would now go under end of arch to give more room at other end of layout.
Base of layout is a 2" sheet of styrofoam.. I thought would be easier to carve for elevation changes, allowing to build up but also down like for river. 4x8' sheet was cut to a 4x5' with remaining 4x3' at other end of table. After initial cutting at edge of smaller piece to start river realized I could simply pull sheet back to create opposite bank, saving material instead of cutting opposite bank. Pushes other end off table, give me an extra 4' x 6" piece of foam to use else where.
But walking around table noted I can still easily get by. If I extended table 6" would increase driving area. A good thing as the mountain took up so much room. So I stopped on the river and added sub structure extending table to 7'-6"

For my reference-extended table. I extended original 45° instead of re clipping to aid in walking by.

Cool got back some area mountain took. Also can put river back in front of arch. Wanted to be able to drive its full course. Back on track I can finalize the arch.
Back to top of this page
Finish arch, paint fiasco
And then it turned to pooh.

Finish carving river bed decided to prime bottom (OS B/chip board) but also hit banks to see what it will look like painted. Ump if you've done any research or know- spray paint and styrofoam DO NOT MIX. I tried dusting and seemed to be OK but 5 minuets later noted foam was melting. Got the fan on it and re coated with plaster. Have a lot of foam, base and some of the carved 'rock' walls and planned more, so easily rattle can spray painting isn't an option.
Picked up a quart of latex/acrylic primer and had it tinted bit lighter than the rusty red rattle can primer. Areas of foam at minimum will be painted with the primer then I 'could' use rattle cans. Live no learn...at least discovered early,
Still need to break the edges of banks but liking it. This will be filled with small lava rock with a few large boulders.
Now I can finish arch.

Made another paper rock to catch end of arch. A few rock outcroppings to add some detail if driving around instead of under arch. My thoughts are where a choice can be made the obvious 'easy' route will offer its own surprising challenge. Which is one reason this is taking so long. I'm constantly checking with truck to ensure obstacles doable, truck fits and leads somewhere else. But mostly its waiting on paper /plaster to dry.

Blended underside of arch to end support rock and base. Also blended perimeter of mountain to base.
Really happy with the way this turned out but...
This is where realized the cheap easy paper/plaster to create larger obstacles just taking way to long. Ordered some plaster cloth so I can just stack stuff and drape. Im less than a quarter on layout, have a few ideas but would take forever continuing with paper. Thought expensive cloth simply faster for large areas. On smaller objects, adding details, because the paper/plaster allows individual shaping and exact detailing objects for fit will continue using. Should be here in a couple of days and see how it works. I will be plastering on top of cloth, I've not seen one layout where the cloth didn't show. It will only be used for large areas and as a base to span open areas. Due to expense, $30 for 8 rolls of 4"x15' likely wont be ordering more. Back to it...
Back to top of this page
Planning second mountain
Planned was rope bridge to another mountain but no room. Another mountain would block existing mountain climbs and the whole corner of layout. Pondering how to do this corner, still drive it while incorporating rope bridge.
What I came up with was elevating entire second mountain where I can drive under. Spent literally couple of hours eye balling this. Have some heavy cardboard tubes, playing with options, driving, moving. Using the tubes wont block view behind, can still drive corner and access hill climbs. Some more thought required. but a direction.

Plan changed, nixing second mountain. Elevating a landing. Rope bridge from 1 pair of tubes to mountain, 2 arches (or another rope bridge) from second pair of tubes down with a platform (table top plateau) between. Details. This would keep open access hill climbs, corner of table while allowing to keep a rope bridge and getting back down. Sounds cool and what I envision would be awesome feature but executing seriously questionable.
All I can do is fail.
Top of existing mountain is about 12", Ill cut tubes to about 14-16".

Cut holes in base foam to insert tubes.

Top of tubes slit and insert 6" pieces of cardboard spanning between tubes, lots of hot glue.

Top of spans folded over to attach top platform

Cut the top spans to resemble arches. Glued on first layer of cardboard. Trace this on a piece of 1/8" luan plywood then layer more cardboard. Debating how to cover. Carving foam to cover arches blending to top a lot easier (and looks more realistic) but no way I can match tubes which thinking paper/ plaster is only way to cover. 2 different looks. But a ways off. Want the tubes to look like rock pillars but this really looks like end table, not sure whatever I use will change that. Serves its purpose.
Several hours later...

Went with carving foam for the arches to top. Got 2 of the legs wrapped with brown packing paper. Hold its shape better when wet. I glued some paper disks to mark insertion point on layout. Sort of worked, sure some adjustment will be needed.

Add paper to back legs, recoat front legs. Do some detail blending with newspaper. Once happy with legs recoat with stiffer coat of plaster. Got the luan plywood added, will add some more cardboard on top to layer. Crude but looking better that I thought.
All the while plotting the rope bridge. And getting off other end. Thinking out loud while stuff drys, the rope bridge I'm inserting 6-8" dowels into features. Attach bridge to bottoms and run a rope between tops. Run a ropes from middle of upper ropes to middle of bridge ropes. Does 2 things, allows bridge to flex instead of just droop and offers safety so you cant easily drive off.
Which brings up the get down (or up) side. I really am seeing 2 arches, probably joined top & bottom but otherwise open between. Outside arch is right at edge of table, almost 6' to floor. All I can imagine is camber arches toward center of layout, with ridges at outer edges to help 'guide 'vehicle.
Getting ahead of my self as I have at least a day finishing the 'cathedral'. Once its done tackle the arches, need its landing to place rest of layout.
This will be the last complex detailed feature. Rest of layout will be just stacking objects, rock piles etc. Possibly another mountain but it will be just a stack of random ledges and faces with no defined route.
Back to it...

Watching plaster dry started rope bridge anchor supports. Had some 3/4" square so used that. Insert 2 pieces of 3/16" dowel to insert into top. These eventually will be glued.

Need to move right side anchor over an inch, 6" between but cant make the turn. Drill for the ropes, paint
Should have made the top more of a half circle. When I laid out shape of top it worked, now that its built it doesn't. But not redoing. Need to widen & build up outer edge of top, taper to inside of turn causing truck to pitch, help with turning. Details...

Extending side of top. Glue on strip of cardboard higher than top to edge, glaceing new piece to it with inside edge to top will tilt. Cut new piece about 6" wide for top. Placed but too much angle and wanting to 'thicken/stiffen' extension added a few pieces of cardboard underneath with each one a bit wider. Banded outside edge, extension about 1/2" thick. Cut a few angles, not supports but to glue thin piece of cardboard to, from outer edge of extension to arch. Covers bottom of extension and blends to arch.

Bit later, but bottom of extension covered and plastered. Folded some cardboard into Vs further trying to blend overhang.

Starting plaster. Adding the layers to fix the too steep extension angle actually made top look like layered rock.

I had checked before plastering this would fix and allow ability to turn. More than enough room and the camber other than adding interest does help.
Few more coats of plaster and begin rope bridge.
Back to top of this page
Rope bridge
Decided to make the rope bridge between the 2 hills as I can do in the shop. Once done add to layout then tackle the down arch.
Had made 2 of the anchors earlier, need to make 2 more. On the rope using sisal/jute. Didn't care for the color so dyed some black. It came out black, was hoping it'd turn more of a dark gray, go figure but its too dark. Scraped and start over Coiled and lightly dusted with khaki and gray to 'dirty'.

Cut bridge planks from a piece of 1/4"x1 1/4" lattice. Spent couple of hours ageing and painting. Going to use hot glue to place.

Ropes inserted thru anchor supports, folded up then secured with some old brown insulated staples. Planned was this mountain and bridge to be removable but discovered car on bridge just pulls mountain out of the base. Leverage... So I'll have to glue mountain down to layout. Supports also need to be glued so folding the ropes and securing with stable, bridge could be removed.
After hot gluing planks in place stapled ropes. Went back and applied wood glue to inside where ropes meet planks, sprinkle with some ashes so not shiny and color matches.

Short but token rope bridge..
Back to top of this page
Painting the elevated table top mountain

Decided to prepaint the mountain. As covered earlier, priming the styrofoam so it can be spray painted. Primer I had tinted ended up light, kind of dirty rose/pink, looks like pooh. Final painting will be spray paint red primer as base, khaki and the pink primer for 'highlighting'. I'll have to play with colors- likely where this project turns to crap. Sprayed underneath with red primer then highlights- not the look I want. The small plaster rocks I painted turned out well but this is too large for that technique...
You can also see all the pin holes from spray paint on the foam. And that was just over spray.
Mixed some plaster and smeared over most of the foam to plug all the pin holes, smooth gaps etc. Recoat with acrylic primer then sprayed the whole thing with red oxide primer.
Spent a good 4 hours painting. Several different colors back and forth, highlighting, trying for a natural red rock look. Total failure in my opinion.

Sat it outside to air out. Frustrated I decided next time I go to hardware get some paint. Repaint, change direction on whole layout and go bilge, tan and sandstone look. Matching red rock colors not that easy, at least with off the shelf or what I have. Think simply a lighter base coat would have worked,
Meantime while documenting this the wifed unit showed up. She saw the mountain and was like "That looks so good!". I'm like really? Told her I was going to repaint but didn't have any thing on hand. She says Im glad you didn't, I wouldn't change it. Wow, a second pair of eyes. Debated for a few, for the moment continuing on. I'll try to tone down some of the areas I dislike, specifically the columns. Can always repaint later when layout done if it doesn't grow on me.
Back to top of this page
Joining of the mountains
Was going to place new mountain and start painting the first but forgot I still had a lot of plastering to do.

So placed new mountain (need to name them), verified rope bridge works and finished plastering. Start painting tomorrow, maybe.

The rope bridge is fun, its short and just allows crossing between mountains so didn't expect much. But it cant be taken lightly. Climbing isn't too bad but going down when the front wheels get to 2nd/3rd plank all the slack is pulled and decent becomes quite vertical. If taken at any speed it'll thrown you off. Hard to explain, guess because attachment points are different heights but slack travels with you. Interesting. So that's a win.

Needed to move one of the upper anchor posts. Had colored some lighter twine to make safety catch on outside but too much movement. Thinking wire that I can shape, TBD.
Seriously thinking of adding lights to top of rope bridge anchors. Have some leds but its coming up with lamp...

Now I can plan and build twin arches off new mountain. Once its done I can start actual carving elevation changes, add features/obstacles on main deck up to the river.
Names: Cave:Tom and Hucks HideOut. The mine: as it serves no real purpose other than get to view on other side like Burro Schmidt’s Tunnel, I'm thinking Schmidts Mine. Mountains other than first second new...Cathedral Rock for the elevated platue with Twin Arches off. For the hill climb mountain debating, Mount Minuscule, Holy or Holey mountain.. Due to several backups are required to get off when accessing top from hill climb maybe Death in Reverse., simply Hazard Hill. Something finished

I had taken this picture just looking thru at eye level but what i saw was the unfinished rock in right bottom foreground with the screwdriver in river. What I thought I saw looking at picture was an arch over river. So Im considering cutting out section of river bottom, dropping 2", make a short arch over. So when driving river bottom you'll drop under an arch. From the V between mountain climbs you can drive straight across over river or go around and cross thru river. Ump possibly. Sounds cool but not sure, dont need to be adding more right now.
Back to top of this page
Twin arches
In progress. Plan is 2 arches with slight challenge. Cant decide on material. Cardboard would be stronger but the foam looks better. Leaning toward cardboard to easily cut profile then add foam to sides like hill climb. Or cardboard profile and wrap with craft paper. That's easy but the Cathedral Rock let me know painting not easy.

Arches kit-some assembly required...
Using cardboard cut profile for sides and piece for top. 16" height at top 30" travel length at 24" extension or about 35°. Arches joined at top to blend to Cathedral rock and at bottom as approach blending to base. Got main pieces glue and already having issue.

venting and whinnying..
First is appearance. If I painted sunshine yellow with some bright blue accents and red balls for decoration and I could hang a Mattel sign on it "for ages 3-5".
It just doesn't look like arches, looks like a slip and slide. Or it looks like crap. I think due to the pinch at outer edges. Done to help keep vehicles on arch, visually what gives it a kids slide look.Started to fill in, make single arch, made it worse. I could fill in deleting the outer pinch when layering surface-not sure
Second it's structurally not sound. Even with the temporary webs between arches they want to roll. Course its barley assembled but concerning. I plan on adding foam to sides to carve and add sides to inside of arches. Joining sides of each arch at bottom 'should' resist the roll of arches. I see need for a lot of internal gusseting. Problem is I wont I actually know until complete (time) if it stabilizes to point plaster wont crack.
Bottom line committed as I need access to top. Knowing it looks really bad, doesn't even vaguely reassemble what I wanted, may not work, I'll continue with the idea of alternate access, rope/fixed bridge. I could add arches from mid of twin arches back to middle of Cathedral legs. That likely would help a lot. Even legs straight down but that would cut into driving area. Possibly a center leg blended to both arches- hmm minimize layout intrusion, definitely stabilize arches. So with options if needed, continue with this self afflicted source of frustration.
First thing is full cut out between arches and add sides to individual arches then gusset and add bottoms. Ignore appearance and just make it work.

Cut out center webs. Banded the inside edges to give arches some thickness though half of outside edges. Left long thru surface instead of trying to match undulation, Ill trim top afterwards. This seriously stiffened arch. The bottom edge of banding cut with some curves. Add gussets trimming to match height of outside to inside edge of arches. These both support sides of arches but spaced to glue bottom cover strips to.

Bottom of arches covered. The thin Cardboard (cereal box) easily conformed to the curves. As each strip was added the arch became more ridged. When complete its as stiff as a board. Zero twist or rotation of individual arches. Between the banding gussets and covering completely eliminated structure concerns.

Flipped over to trim the banding flush. Looks completely different? Re-thinking- is that what changed its appearance? Blending the band to surface it would look like grooves on top of arches.

Need to eyeball this for a while. I had removed the layering started earlier to cover some of the opening so you couldn't see inside the base. Once added to layout the base will get covered in a lot of wadded paper to look like a large rock. But I could blend the banding to bottom base, also at top then blend sides of banding to surface.
Eliminate the layering like done on other arch
Also eliminate covering sides with foam, may add paper but I think just plaster with long serrations. Um completely different feature, not what was planned but interesting. Yep that's the direction, salvaged disaster.
Need to get on layout to actually finish as there will be some blending joining to Cathedral Rock and the base to layout but the bulk can be done at work bench.

Glued 1/4" sisal rope to outside edge to get rid of the sharp sides to top ridge. Started plastering blending edges. Need to place on layout to get basic shape converting base to a rock. Look at top where it will join mountain to see how far I can plaster.

Twin arches plastered, need to prime, join to Cathedral Rock, blend and paint.
Going to end this page. I need to remove Cathedral Rock and clear coat (used tempera paint for highlights). Then glue to base as crossing rope bridge pulls Cathedral rock out of base. Once Twin Arches attached and blended go back prime and paint Minuscule Mtn. At some point get to start actual main base of layout, at least this side of river. I've decided to focus on the this half of layout, finish up east of the river before starting other side. Then can utilized and drive while planning the west side.
Back to top of this page
Bridge Lights
One last picture...Lights

Not sure why, something I've seen since I started rope bridge-adding lights. Won't add to driving experience, won't add enough light to see anything, but. Looked around didn't find anything so just made some.
Cut a small cone out of stiff cardboard. Cut piece of dowel rounded one end then drill from bottom and side to create path for wire. Short piece of 3/16 aluminum tube to insert into dowel and bridge anchor. Drilled the bridge anchors for wire to pass, that was fun. Insert pre-wired flickering led, passing wire thru dowel then tube into bridge anchor. Lights crude but like. Painted.
On layout drill thru top of Cathedral Rock to inside of leg. Wires will run thru leg to underside to table. Removed cathedral rock to drill thru table. Which is why I decided it was now or never so stopped to add lights. On the Minuscule Mtn side there's already a pass thru for wires at base, just need to get from top to space above tunnel/mine. Issue is the overhang, I dont think i can drill at enough angle to get over tunnel. I may end up cutting a trench in top layer of cardboard to run wire over then drill down. However that will be last. I need to install the rope bridge to Cathedral Rock as I'll need to pass wires thru table when fixing the Mtv to layout.
That's where were at. Need to permanently secure Cathedral Rock to layout then Twin Arches to it and base, attach rope bridge to Minuscule Mtn.Sounds simple but a lot detail, plastering and painting.
To be continued...
Back to top of this page
Cathedral Rock, Twin Arches and rope bridge mounted on layout

Got Twin Arches painted, Mounted/glued bridge to Cathedral Rock. Ran light wire thru and down to under table. Hot glued the rock to base. Was able to drill at angle on Minuscule Mt to run wires down to tunnel where they then pass under table. Glued that end of bridge. Clear matte coated rock set colors & to plaster Twin Arches to it.
Once Cathedral rock was secure mounted Twin Arches to it using 3 dowels to join tops and hot glue bottom to base. Paper/plastered gap between arches sort of blending. Colors aren't quite the same so that should be fun?

But plaster wouldn't dry- raining so humidity pretty high.

So primed foam and climbing surfaces. By that time, though not fully dry, drove the elevated loop.
Tomorrow try to blend the colors then clear coat twin arches. Then on to painting Minuscule Mt. Debating, as Im using red oxide spray primer if I should coat or mask foam base. Probably mask as likely be carving base and adding some obstacles.
Speaking of lights really need to add something to room its pretty dark and shadowed.

Got the plaster between Twin Arches and Cathedral Rock painted. Added some layering to top of Minuscule Mt. to give a bit more detail. Playing with balance rocks though not using. Will be adding a couple of barriers so you cant back off top which is required unless driving straight across between rope bridge and layered arch.

Not starting over but found a color I wished I had started with as base, rustoleum caramel, kinda orangish brown. Reference for future. If I decide to repaint at some point, when layout is completed will be a lot easier than piece mealing.
Did try some of the plaster cloth. Made a rock joining base of Cathedral Rock to ridge on the base of hill climb. Likely will join at least 1 maybe 2 of the legs to Minuscule Mt, so it doesn't look like such an independent feature. Area is to be filled with rock features any way, joining some will help it look like. Blend in the legs instead of just ending at flat base.

The plaster cloth I wont say easier but way faster than the paper. Sets up in minuets verses hours.
Have to admit Im finally getting a bit excited as I'm seeing this starting to tie together.

Started blending legs of Cathedral Rock to Minuscule Mtn. Two ridges from base of inside legs. Prospective doesn't really show them.

Added some patches of glue & sand to Twin arches for traction. After painting just too slick, bumping or gooseing throttle to overcome end up launching off edge.
Started adding some foam scraps at back corner.

Plan is to add perimeter wall where driving off layout highly likely or visibility limited. Especially under arches where backing up if coming from behind Minuscule Mtn. needed to line up and do hill climbs. Or around Minuscule Mtn as it blocks line of sight if driving around.
When laying out trying to make approaches doable found coming from different unseen angle or direction impossible. Watching others drive, coming up with lines I hadn't seen opens up more possibilities with minor changes. Anyway just modifying/tweaking where needed. Will be joining outside legs to each other and to Twin arch base at layout edge. Started wall in this back corner but wont continue until this looks ok. Functional to keep rigs on track but some 'refinement' needed, looks funny. Entire layout requires edge trim to protect foam (and cover ugly edge) but only adding barriers where adds to ability to tackle line without risk of falling 5'.

Things to do, continue adding rocks/blending, do need a terminal block to connect light wires. Figure out what to add to base.
Next installment, part 3, to this page will be when layout is further along. For now just adding plaster and foam, painting as we go.
Nuff for now- Merry Christmas!
All pages of this build
Part 1 the start, layout table, Miniscule Mtn. w/ Schmidts Mine & 3 hill climbs
Part 2 (This page) build Cathedral Rock, rope bridge and Twin Arches
Part 3 Start river, expand table, small arch bridge, detailing east of the river
Part 4 Miniscule Mtn fence rock spire w/Wile E coyote, greenery and small details
Part 5 Painting walls-Nothing to do with layout progress
Part 6 Start West of river add small balance rocks
Part 7 Layout basically done add dynamite shack, minor changes, future plans, 3/2024
Back to RC crawler index page
Back to Ourelkhorn Camper Modifications page
139