- 9/2021- roof sheet metal replaced, no cab light so these are gone, possibly re-add cab lights later. For now- added ID lights to grill
UPDATE 01/22- 3 months later... Might be legal but driving around without roof mounted lights just bugged me. Bit the bullet to install ID lights on roof using wireless solar lights from CabOverAmerica.com, expensive but no drilling into new roof. See COA cab light install page..
UPDATE: Bummer. Originall Recon light install 05/2010, new lights on order 06/2013.
Yup got 3 years on em. Had one light completly fail. Could replace just the one but will be replacing all. Only thing I can say is the lights continously are full of condensation. They dont leak into cab-but the lights themselves usually have water in them. Kinda annoying to see the condenstaion, finally took its toll, I assume shorted or corroded the circut board inside. Apperantly its the lense seam to base. Bottom line- failure. WONT be buying any more Recon products.-just FYI-left original install in place as there may be some info you could use.Found some Vision lights , look all but identical to the recons $35 cheaper. Ill try to seal the seam somehow, maybe plastic glue. Continue on this page for install-but to see what I did to seal the lense you might look at this before installing yours. Also if you have some and want to try to fix, either replacing dead leds or sealing. See LED cablight fix...
Cab LED ID lights
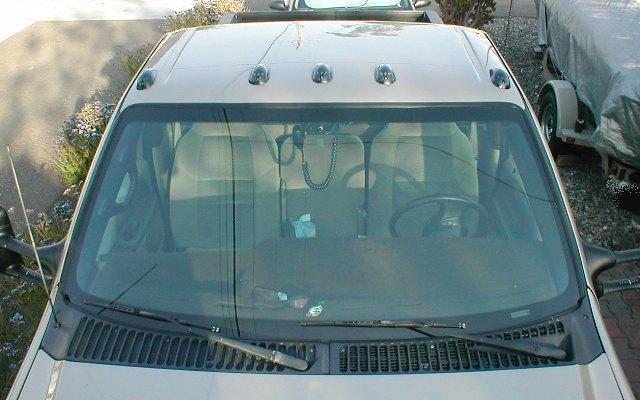
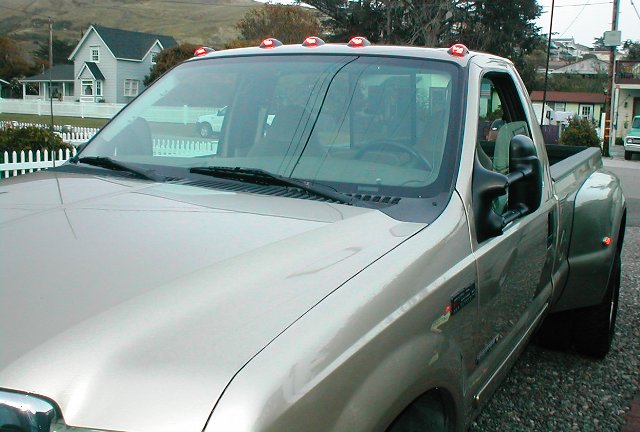
As our truck, 2001 Ford F250, is now over 80" wide due to dually conversion it legally is required to have cab ID & clearance lights. When I did the DRW conversion I had added fender clearance lights and ID lights to rear. Just a bit more involved installing cab lights. As the stock/aftermarket Ford cab lights are rather tall Im using gen3 Dodge cab lights. They are a lower profile than the Ford lights so hopefully a bit more room from camper nose. They are supposed to fit .As this install will vary from the norm I decided to document. One is Im going to place as close to the windshield as possible to maximize camper clearance. Second Im installing a switch so I can turn them off when campers on. Third Dodge lights on a Ford. Forth Im widening the spacing, installing the outer lights where they belong, at the outer edges. Ford at least sets them inside the roof structure, which is 8" inboard.
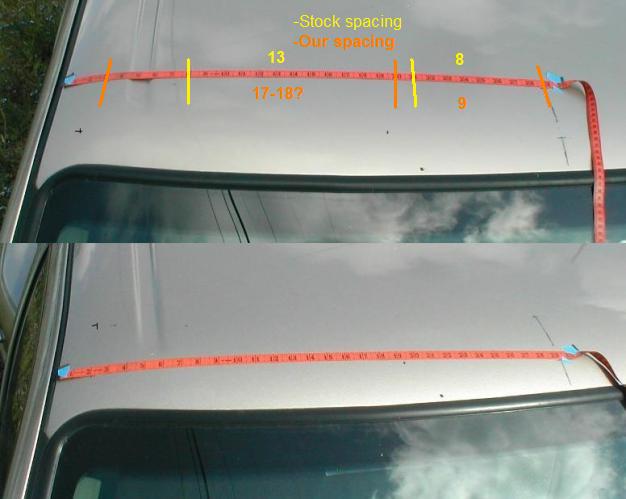
Well using the Dodge lights on a Ford isn't that uncommon but I found no real installs & numbers. I also found no one that installed a switch. But if you search the web there are TONS of installs. As switch will be on drivers side means the light harness will need to come down drivers side, so wont be using the factory installed connection at passenger kick panel (pre'09/08?) brown wire. This requires identifying parking light source. Most cab lights are installed about 5 1/2" from windshield following curve, Im going to put in a straight line as much as I can. There is a sub structure/box at front of roof. Hopefully I can bridge the wall to move lights closer, that s to be determined.
Lastly spacing wider because newer pickups are using a fairly small spacing on a small roof, makes them look almost evenly spaced. I want to see 3 center ID lights an 2 outer clearance lights-period, not 5 evenly spaced lights. I can easily put the outer ones bout 3" inboard, increasing the distance to center id lights by 4", and still increase the center ID light spacing to 9" from 8". I'll record here what I come up with. Roof sub structure & bottom of light & roof curve will dictate what I can do.
Not sure why most are so intent on matching factory spacing, most do. If that's what you want, it varies with body style,
Center to center spacing measured from center light at center of roof is; 0=light

Stock 99-200? Ford; 5 1/2" set back to center wire hole for ALL lights, following windshield curve.

Our 2001 F250; ID lights at 6 1/2" setback, clearance lights at 5 1/2"

77-78 ford, 8 7/8" set back to center wire hole for center light, lights do not follow windshield curve-straight across
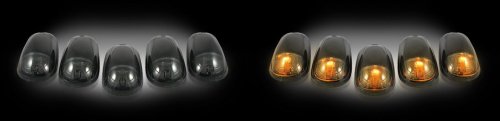
Amber ___________________ Smoke (off) __________________ Smoke (on)
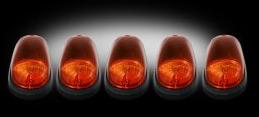
Im using smoke lens, black base w/ LED bulbs from Recon - Part # 264146BK - SMOKED. Wanted to use the amber lens, I like the look but they now come with chrome base-maybe- got conflicting details-but don't want chrome. I think though smoke lens w/ black base might actually look better, less noticeable as everything on our truck that isn't painted is black other than bumpers. Im hoping the color is more orange when on than the pics shows, to be close to truck parking lights color.
I'm documenting what I do and how, on std cab, no center ceiling stuff, though I do have a cb. I've chosen to completely remove headliner, not that much more work-will allow easier access to wiring, plus I want to remove foam and install reflectex foil bubble wrap. Helps with radiated heat.
You don't need to remove headliner, just drop front enough to access under lights, just be careful not to bend the top while working round it. If your not adding switch, up to 08 I think Ford, there's a plug behind passenger kick panel that cab lights are wired to. If you don't have a camper or not concerned with space, mount as mfg recommends. Actually if none of what Im doing applies there are better resources to help you install.
Lastly before beginning Ill mention what the lights mean. Yes the 5 cab lights have a purpose and state something. Like when a rear light comes on means vehicle is braking. The 3 center (ID) lights mean presence of wide vehicle (80" or more), the 2 outer (clearance) lights show width
Excerpt from Federal NHTSA light codes;
Front Clearance Lamps: Required for vehicles (80") 2032mm wide or wider- Show vehicle's width- Minimum 2 yellow at widest point - symmetrical - on the front or near the front - facing forward as high as practicable
Front Identification Lamps (ID): Indicate presence of a wide vehicle- Exactly 3 yellow on the front - center - horizontally spaced 150 mm (6 in.) to 300 mm (12 in.) apart as high as practicable or on top of cab
Which is why I find when folks install ID/clearance cab lights on a less than 80" wide truck just funny. But I don't think most know what the 5 lights mean. Like a flat chested adolescent wearing a sign the says D cup-. Personally I don't like cab lights on a pickup, but its required if 80"or wider. I do though like lights and like the look at night but I don't see the attraction adding them to a Ranger-
Where to start.
Remove (or lower) headliner. Lay a towel over defroster vents. Note screws for clips, visors etc are different- note which are which when removing. Wiggle any push clips while pulling to remove, hate those things. Unscrew visors and visor clips, remove. Remove the screw covers on grab bars, unbolt (8mm) bars. Remove front pillar covers by starting at top pulling toward opposite side, 3 clips, bottom kinda works out/up from behind dash. (When reinstalling coat clips with anti seize or grease). If your only dropping enough to access your done after un tucking the head liner from under the door rubber a bit.If your removing top, continue by removing coat hanger clips, push clips and light. My light is wired with added switches to control bed light and brake light. So it doesn't come off any more with out rewiring-yours will just unscrew (3). Untuck top from door rubber at top, slide top forward and front downward until it clears rear pillar covers. Don't bend the top. Put in a safe place. (to reinstall the rear of top goes in up).
If you've ever thought about painting now's the time. Fusion plastic paint works great. DON'T use on grab bar, use vinyl paint. I painted all mine stuff black. The headliner I had painted brown but have since cover in vinyl. just options.

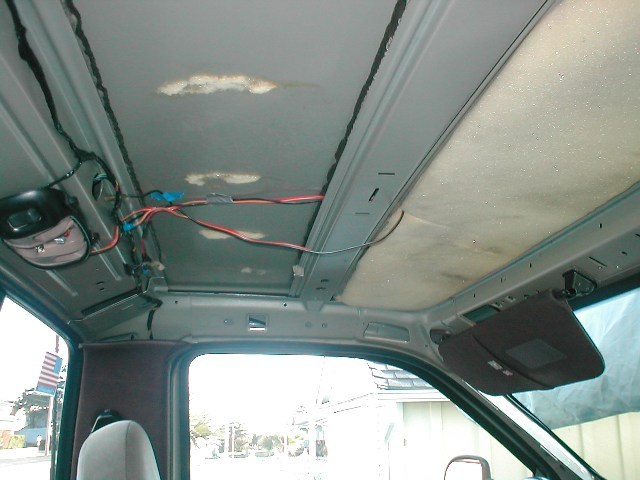
I've already dropped head liner. I reinstalled the visors as my lights wont arrive for a few days. I had added 1" foam previously that was too thick in back, cant be more than 1/4 thick or so, the front section is 1" thick its just tucked in supports, this time Ill put some reflex on the back before reinstalling headliner, helps with radiated heat. The wires are power leads for CB, coax runs inside the box over door and tucked into front of head liner (not show). Ill remove foam and tape up newspaper under to catch shavings. The new LED lights use screws, was thinking of using bolts and nuts but that would mean if there's a problem you'd need to drop head liner again.
Wiring prep
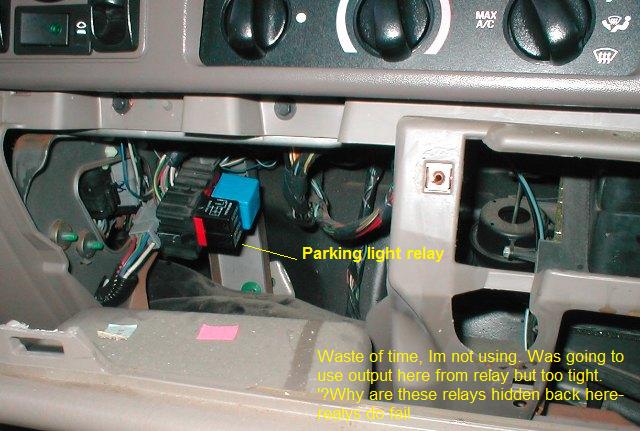
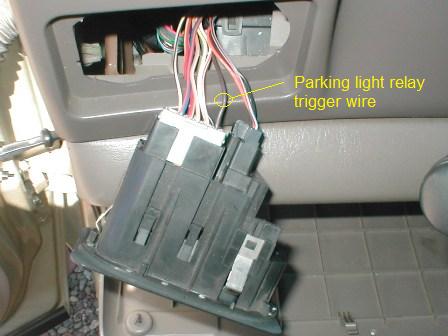
You can disregard this section-didn't work but left FYI or you need to replace factory relay or want to try and accessMy lights are on order so Ill prep wiring. Im adding a on/off switch. Stock there is a place under passenger kick panel (pre 08) that harness connects to (brown wire) or if you have center stuff there may be a connection there. But that s not what Im doing. Was going to grab power off light switch, (just place a screwdriver in bottom slot of square switch face, pry out a bit, should be abel to grab the whole assembly and pull out easily). But the switch does not turn on lights. It sends power to a relay. Im looking to see if I can access that relay.
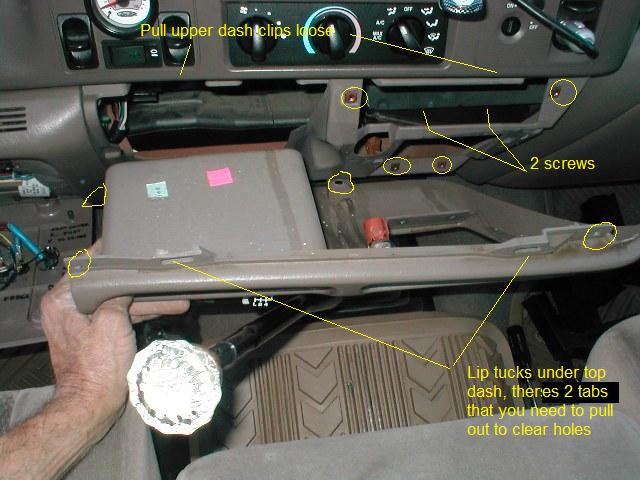
Well I did access and Im not using, back to plan A, put it all back together. Still tight, too much going on back there. However im including in case you ever need to get to the running light relay. To remove lower center section of dash remove (10) 7mm screws. Remove 2 screws to pull the hook panel, reach up inside to remove 2 screws in bottom of ashtray/cupholder, remove 2 front screws pull out ashtray/cupholder assy. Remove 2 screws at bottom of panel. You'll need to pop/pull loose the upper dash to access the 2 top screws and pull out its 2 clips that go thru lower section see pic..
Just FYI.
Wiring plan A
After trying to access stock relay which didn't work I'm back to my original plan. Im running an on/off switch on the cab lights so my install will be reverse from stock in that the cab light harness will run down the drivers side pillar. It will go to an added relay that is controlled by stock headlight switch with a toggle switch that can turn off cab lights.Simply stick small screwdriver in slot on bottom of square light switch panel and pop out a bit, grab switch assy and pull out.
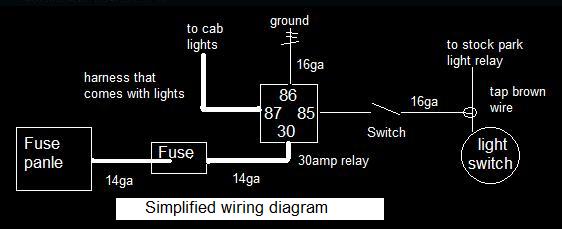
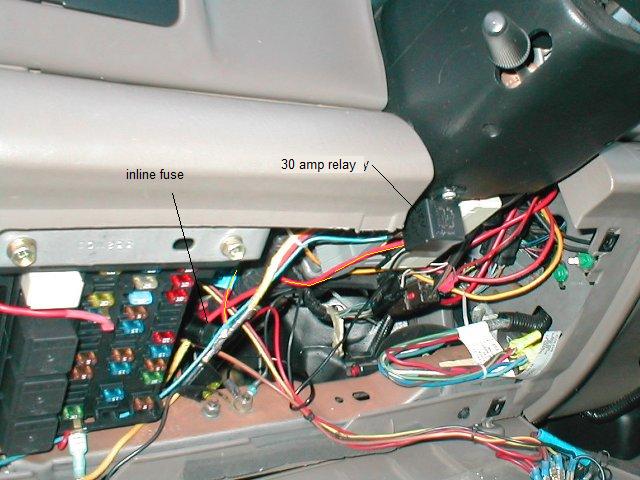
Recommend using a relay, especially if your not using LED bulbs. The light switch isn't designed to carry load. First I tapped into the stock light switch brown wire (I determined by jumping until park lights came on) with a splice connector to trigger the new relay. The new 16ga wire I ran to rocker switch I installed on dash fuse panel cover, From toggle switch it goes to terminal 85 on new 30amp relay. Ran a chassis ground from terminal 86 to ground screw on dash. Power for the relay/lights I tapped into stock fuse panel with a fuse tap (grabs power from hot side of fuse) using a 14ga inline fuse holder. This is connected to terminal; 30 of the really. The hot lead of the cab light harness will plug into Terminal 87 of the relay. The relay I installed on bottom of steering column plastic cover behind fuse panel cover.
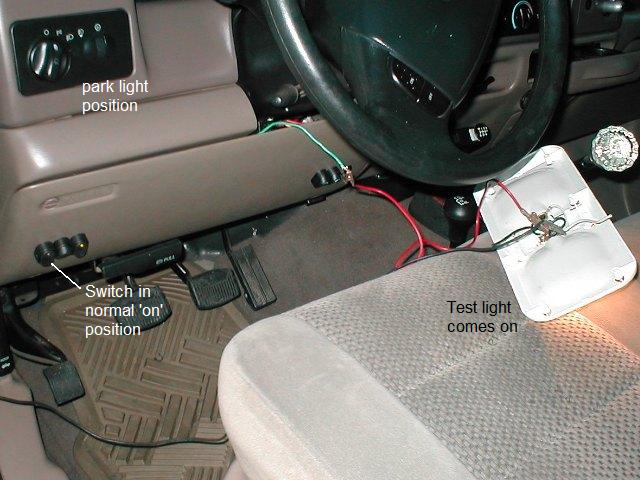
It works! Stooooked. My pre wire gives me a power source for cab lights on drivers side, that is controlled by stock headlight switch yet power is supplied thru a separate relay that has its own inline fuse. So its isolated from stock wiring. I can manually turn off cab lights with the added rocker switch that's on the trigger wire to new relay
....now patiently waiting for arrival of lights.Then we start the fun part-laying out the lights to drill holes thru my roof.
Light position layout
First, if it matters, you should wash your truck, your going to be crawling all over it.Second, most critical, is finding the center of your roof. Everything will be measured from the center. I used a plastic (cloth) tape and a grease pencil for writing on the roof. Some use dry markers, just insure its the non permanent type. When Im confidant of center Ill record number & mask off roof then remark. Some use 2 metal tapes measures, then Id mask first-Ill double check after measuring and masking with a metal tape. Im measuring from edges in to find center.
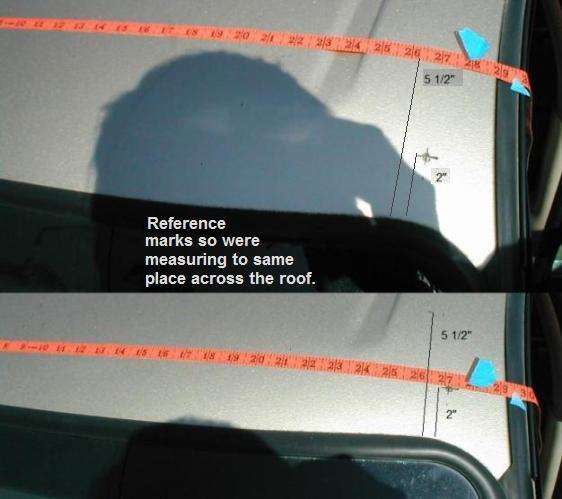
All you need to do is use reference points on top that you can duplicate on other side.You need to measure twice across the roof top so you can scribe a centerline. I measured 2" & 5 1/2" up (from windshield rubber) at 2" in (from door edge) at front corners, making reference marks. These are just so you start a the same places for door edges. Then made marks at approx center of roof 2" up and 5 1/2" up. Laid tape from door edge in line with 2"x2" and measured to center, noted number, then measured from other side, noted number then marked center so numbers would be same. At 2" up bottom of my center line is 29 1/4 from door edges. Repeated for the 5 1/2" offset, I got 28 7/8" measured from door edge with tape crossing mark. Drew a line from the 2" and 5 1/2"center marks. Remeasured again several times from new centerline to door edges (crossing the 2" & 5 1/2" outer marks at door edges) verifying the same distance side to side.
To check my line was parallel to centerline of roof I did this same procedure at rear of roof. Laid tape from front center line to rear center mark, tape ended up dead in the middle of rear bed light. Im calling it good. You can also sight from the bed the center line against the hood dimple. Stand in front a few feet and visually check. This is the most difficult part in my opinion, getting happy Im centered. Once you feel you've got a good center line, extend it using a stiff straight edge/cardboard 2" from windshield rubber back about 9". Now you have a nice centerline.
Once you have a centered and parallel to truck centerline you can measure for the other lights center lines from it. From center line measure over toward a door 9", twice (8" stock). Draw another line approx 2" to 9" long. Repeat toward other door. Again, I used a stiff piece of paper/card stock to draw lines. Now you have 3 nice lines. Double check they look straight, remeasure till your happy. My center lights are parallel to each other, perpendicular to windshield, not arced. If using stock spacing for outer clearance lights measure over 13" from 8" lines. I've set mine up to be farther out. so a bit more difficult. Using lights & placing between door edge and roof dimple they are just a tad out of parallel. Centerline bottom is 2 1/2" in from door at 3 3/8" up from windshield, 2 1/8" in from door at 7 1/2" up from windshield. Which places them about 17 3/8 form ID lights.

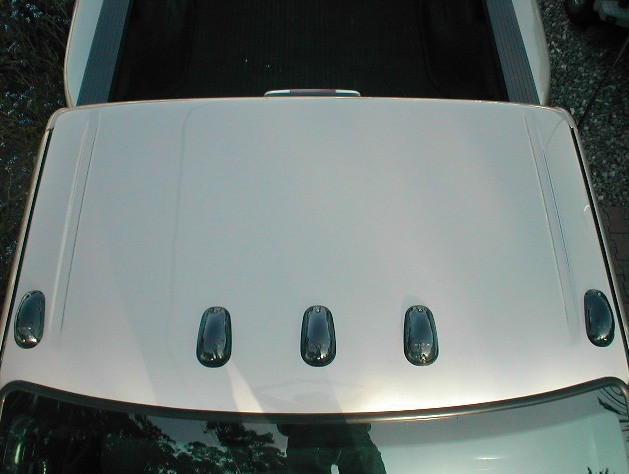
Now all center lines are marked- on to hole spacing. Using a piece of tape at back of light so they didn't slide off roof I checked what looked good. I wanted 5 /12" to center but was too much curve for center 3 Dodge lights. At 6 1/2" the gap is close enough for screws to pull tight. So I set outer center lights at 6 1/2" to center, marking rear holes at 8 1/2" from windshield rubber, then marked front holes 4 1/8" and center wire holes 2" from rear hole. This put the forward screw just before the lip structure box, (see pic). An in progress adjustment, when marking the center light I decided not to use same spacings, I made line straight across between the 2 outers and marked holes for center light. So my 3 center lights are straight across.
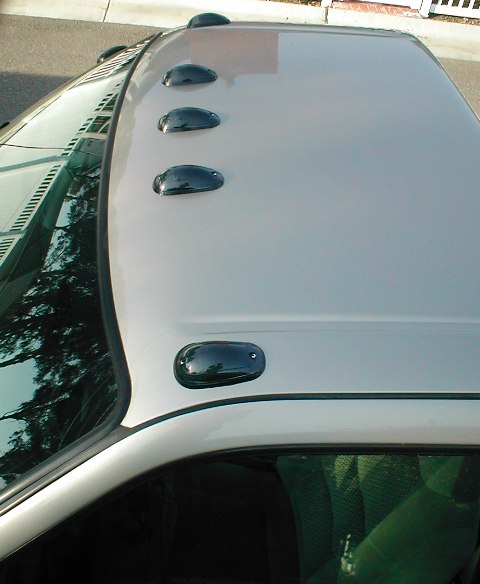
For outer lights I was able to set at 5 1/2" to center. Another on-the fly change. I had marked to use the 6 1/2" offset to center. But I sat on the wrong lines-started to move - hey that looks better. Because the curve of window, using the 6 1/2" just set them way back so I remarked. As this is a compound curve I modified both lights to insure they sat on perimeter edges of base and not pivot in middle of base. Removed the gaskets, there are webs across light bottom. I shaved bout an 1/8" arc from center out so it doesn't pivot on middle of light. The screw holes are the same as I used to make the center lines. Bottom hole is 2 1/2" in from door at 3 3/8" up from windshield, 2 1/8" in from door at 7 1/2" up from windshield. Adjust rear hole is so its 4 1/8 from front hole, wire hole 2".
Now HAPPY DRILLING time.
Our truck is standard cab so I was able to drill center lights from bed, the outers from a ladder. All screw holes I used 7/64" bit, 1/8" is ok. Center wire hole, as Im using supplied plugs, I used a 1/2" bit. I draped a sheet across dash, another taped to windshield. NOTE on outer lights if putting outboard of stock (like Im doing), you will also be drilling thru inner sheet metal panel. Insure you drill the screw holes perpendicular to top so inner holes aligns with outer and follows path of screw. Then go inside and open up inner hole to 3/16". When attaching lights insure the screw goes thru the inner panel hole before tightening-otherwise it will lift the light and roof up....don't ask me how I know.I pre screwed the screws into all holes before actually attaching lights. Cleaned the roof mounting surfaces with alcohol. With lots of paper towels on hand I used a liberal amount of Black RTV silicon around the screw and wire holes on roof, then a bead around the perimeter of light gasket and around its holes. Then put a dab on screw & under head put screws in siliconed light. I put the washers on the BOTTOM of lights. Feed wire thru center hole, align & start screws into holes, start pushing down light and tightening screws. The screws should easily pull light down and make a good contact around the base. Once it gets snug tighten carefully. DON'T over tighten. Luckily I didn't strip any. . Did the 5 times. WALA! We have cab lights.
As it was late I was focused on getting lights installed before dark so didn't get any pictures of holes drilled. I finished install just before dusk.
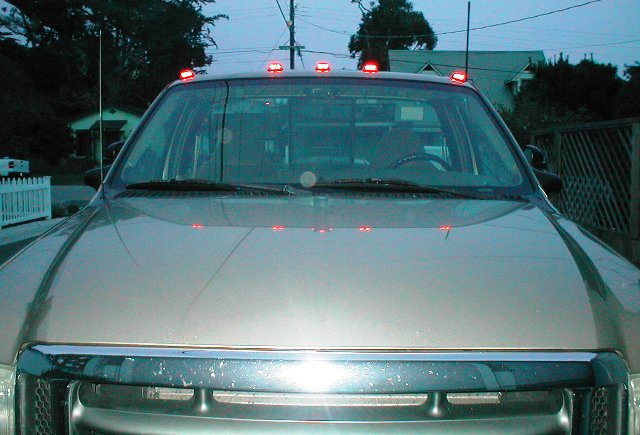
Deciding to fish wiring next morning but wanting to 'see' the lights I temporally hooked up light harness and draped across dash. Turned on park lights. One at a time I plugged in lights to check polarity. (If backwards wont come on). I marked a line on the plugs with magic marker which way they go. Proceeded to next light etc until I had all lights on. The I walked around and admired my cab lights. As it was dusk, I got to enjoy the LEDs. Way cool. The color IS amber. Looks really good.
Day 2
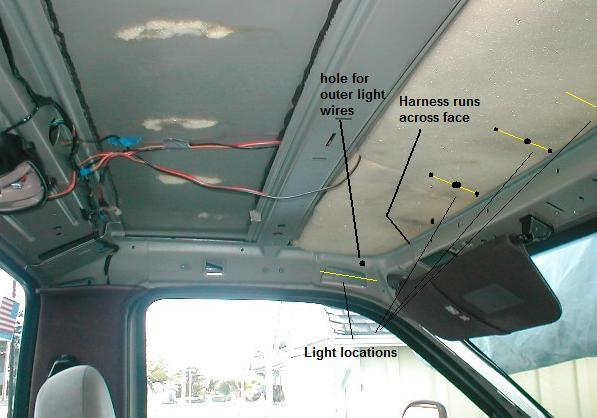
Today I finished the wiring, silconed from the inside of roof screws and thru roof wiring. I had to drill thru support structure and reroute outer light wires because basically the outer lights enter truck inside roof structure box. I ended up cutting off the supplied plug on outer clearance lights to run wire thru box wall. Re soldered together. Kinda wished I had removed all the supplied plugs to begin with. They don't want to stay together, simply fall out, ? I think because the female plugs on harness are a very soft rubber, meant to be installed in a housing, so loose there's no tension on male plug when inserted, So I used a small zip tie around to squeeze base on the 3 center light which worked but I also added one that goes between the wires on each end so they physically cant come apart.
Took the opportunity to rewire my CB. Disconnected wires from light, ran a new key on & constant power wires up from fuse block thru pillar, across box, drilled another hole to get toward front where CB will be. This radio only uses a single power (key access. on) wire, but some need a constant power wire for memory. Ran a ground lead to added cab light ground screw.
Tidied up the wiring harness & zipped tied it to roof box. Routed power wire down pillar to the added relay. The supplied harness had a ground wire & lug in middle of it, drilled a small hole in roof box and used a self tapping lag bolt. Added some reflectex (foil covered bubble wrap) to rear part of roof.
My plan was to take more pics to document this install but as I got closer to finishing just didn't stop to take pics. Other than the spacing described and the location I laid out, others have shown more detail as far as removal, drilling etc. One of those projects the more you see the easier it is. The factory Ford "Beehive" lights use a rather large wire hole, they are quite tall which might be an issue if hauling a camper- especially off road. Though they have a smaller foot print, might be possible to retrofit the Dodge lights. Recon does make the Ford style in clear, amber & smoke if you just want to change to LED.
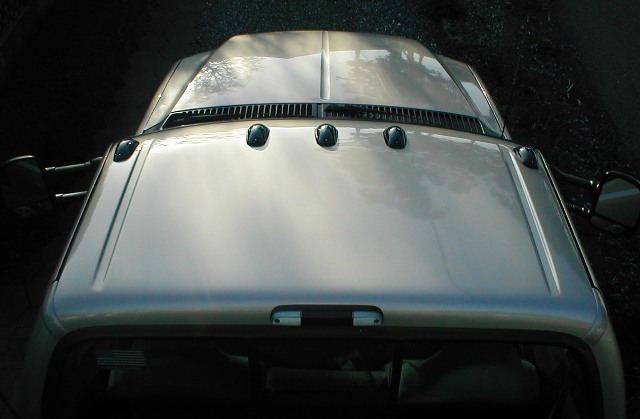
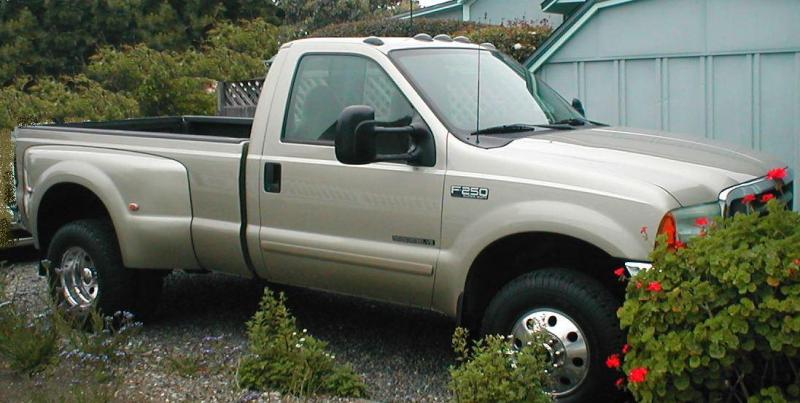
Reinstall the headliner and related hardware, visors etc. Vacuumed out the interior and took some more pics. Hopefully camper clears these, which is why I went the Dodge style lights, there a bit shorter. Though I made a bit more work for myself Im happy with the results and think it was worth the extra effort. The only thing I might do different might be change the center light spacing. 8" apart stock spacing is too close in my eye, but 9" looks a bit wide. Im thinking 8 1/2" might be a better number with outboard lights in same wide location I used. Still looks better to me than what the manufactures are doing with the big round roofs.
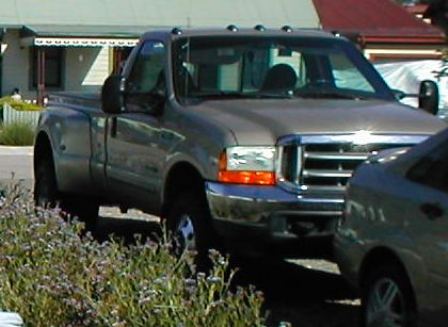
Im really liking the center ID lights in line, sometimes changing plans in midstream works, unlike switching to the smoke lens. Having the outer clearance lights all the way outboard just seems like that's where they should have been in the 1st place. My other mid stream change, moving the outer lights forward was luck that really made my install what I wanted to see. It's funny to me how sometimes on a project allowing a on-the-fly change or modification to a plan can actually make (or break) a project. Im a happy camper, got my ID & clearance lights on so now I'm legal, ended up with a custom install that to me looks way better than factory.
Just some finsihed pictures...
Other installs
Install on Motoman's Madnesse, Gregs install on 01 F250 w/stock lights
thread on ford-truck forum Install with sunroof
Recon site link to gorecon.com removed. They sell direct but also many retailers carry.
On to cab light fix3 years later
Back to our F250 truck page
Back to Ourelkhorn Camper Modifications page