Broke Camper Bath Faucet
-
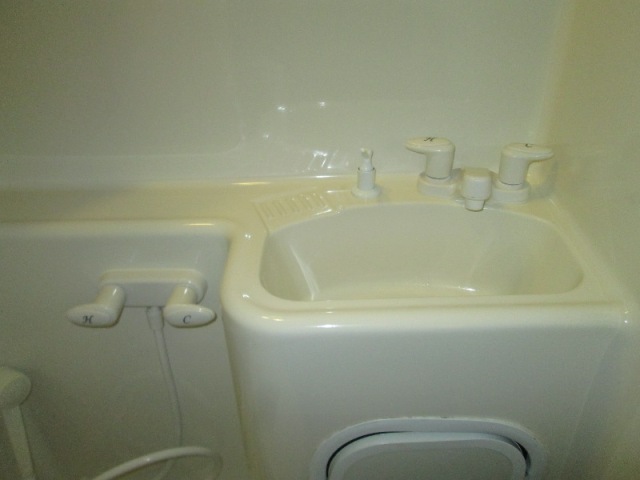
Same as most, our camper has this cheezy plastic faucet that also serves as shower valve. Well its lasted 14 years, but I broke it. The little rod (piece with spring around it) that shower diverter handle screws onto snapped. I took it apart to see what was what.
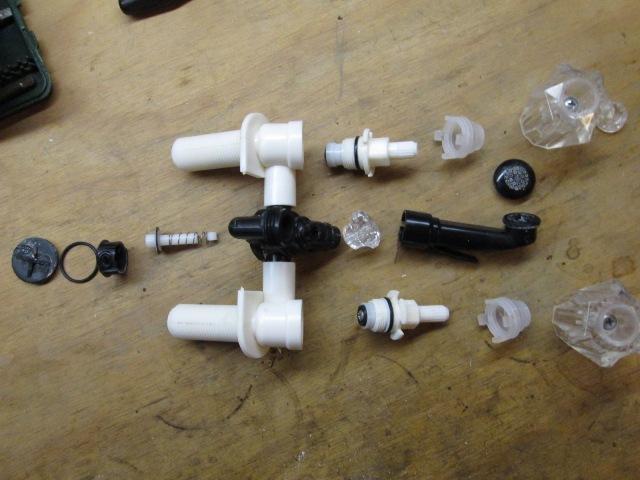
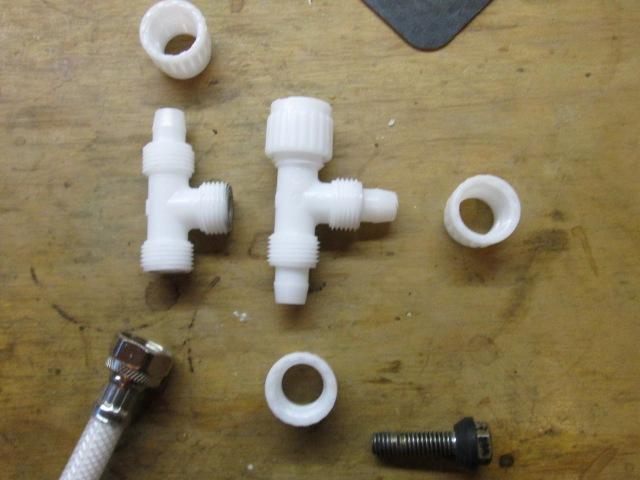
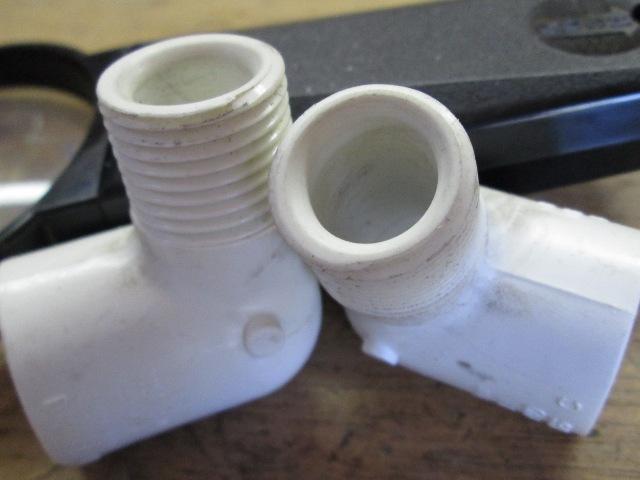
I actually was able to fix the rod by drilling thru the section that broke off. Ran a brass screw thru it into stem. Works-but don't know for how long. Bottom line since out, not worth reinstalling. As its so old, cone washers need replacing. The faucet body itself is 4 pieces that are simply inserted into each other and use o rings to seal. Bizarre thing.
At any rate for several reasons, I'd like to replace since its out. We've always disliked it- a pain to use. Sink is only about 12" deep, with the faucet siting into it, can barely get your hands under it. Cant, say, splash water on your face easily because you cant raise your hand straight up, always whacking it. Other reason is the diverter for the shower, works half the time, either cant get to turn, or falls down while showering. Last is that coiled up hose and hand held head hanging on the wall. Nuff said- Simple replacements are inexpensive..but as I'm finally replacing I want to address some of these issues if I can.
Several folks have replaced the faucet with standard faucet or bar faucet, added a separate controller for the shower. Always thought a bar faucet, or an extended tall spout would be nice. Having a separate shower control would also be nice, getting hose off wall, but not mandatory. Mostly I'd like to raise the height of faucet. They do make similar inexpensive faucets without the diverter for sink, and faucets (or valve less the spout)for the shower, and of coarse similar all-in-one as we have for $10-20 each. Due to having to re plumb for separate shower valve, my first choice was another all in one but with a taller spout or a bar type faucet. However I wasn't able find one made with the shower diverter, least not within my budget. Going with separate valve opens a lot of options as far as faucets.
Flipping and Flopping
-
I must have changed my mind a dozen times how I might proceed. In this case too many options. I narrowed down the shower valve to a similar 2 handel, primarily because mounting low on wall I saw a single handle too easily getting hit or knocked on, also mounting location requires it to be on back wall. Most install on side off sink cabinet. Simply not enough room on ours. Found a few nice faucets. Bar type because our bath is so shallow might be hard bending over the sink without hitting. Round and round.
Considering I will need to re plumb if adding valve decided my 1st constructive endeavor would be to price out fittings. Camper is plumbed with PEX tubing-and plumbing can get expensive to rework. Need to tee off lines run behind cabinet. Which brought up another issue, only 5" behind wall to make the turn. Add flex lines to connect faucets-so off to the hardware.
What I found is short of buying special tool to use pex fittings which aren't to bad in price is the commonly recommended brass 'Sharkbite' fittings. They are ridiculously priced. I could warrant if plumbing in area that I could not easily get to for a permanent fix, but found "Flair-it' fittings for about 1/4 the cost. Still its adding up. Decided 'screw this', Went home with couple of 12˘ cone washers to replace existing ones, reinstall fixed faucet, order a simple replacement and be done.
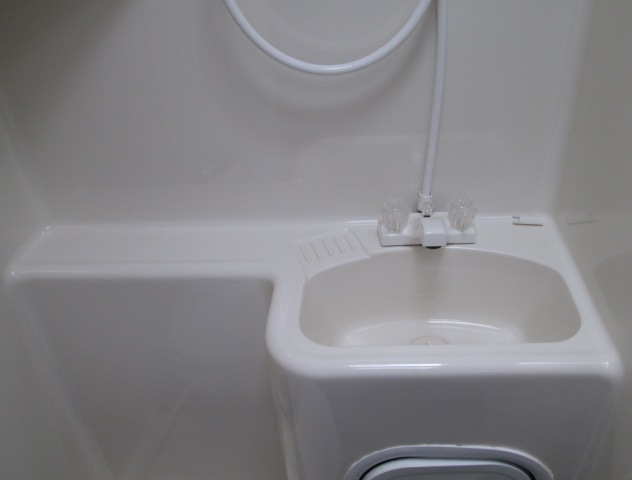
Sat the faucet on sink, reached under sink to pull the water lines out to replace washers. Pex tubing is fairly rigid, not the easiest task but got them facing cabinet door enough to replace washers. Went to shop get sealant for faucet base, when I walked back in I saw the faucet setting there as shown and caused me to pause...wow.
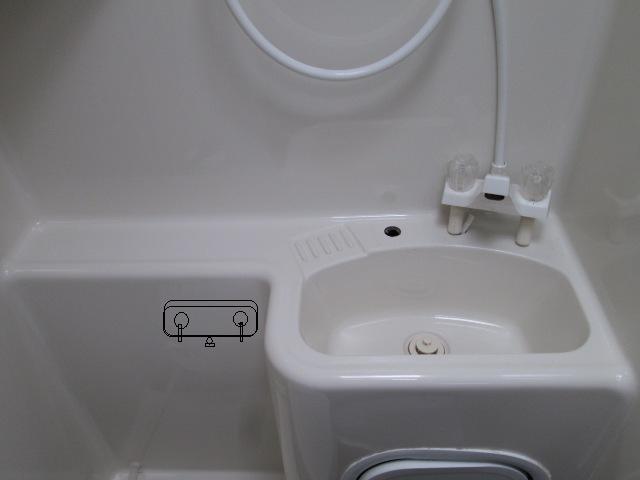
It occurred to my if it were installed over to the side might be more practical. So I played with it a while. This would be a MUCH better location even with this or similar faucet. Only need to drill another hole- move over 4". Use a plug on exposed hole-OR add a soap dispenser. However does require redoing the water lines-pex wont reach. Simply cut off pex fitting and few inches of tube, add adapter and run a flex lines. So off to the hardware. Returning I got online to looked to see if soap dispenser available in white, looked at faucets to insure drilling hole for old faucet would not preclude base of replacement. Because the bases are more rounded compared to our square base decided to wait on drilling hole as placing hole with square base might not be optimum for the round base.
And back to square one.
Going to all this effort and still have the all in one style faucet just seemed silly. Would be more useable but a few more fittings since I'm redoing the pex lines anyway I could add any faucet I want and add separate shower valve, get the lines off the wall. So I'm going separate valves again. I've laid out where new faucet might go. Ill go ahead and pre plumb, faucets on order. For now I'm going cheap faucets to offset cost of plumbing. It will be easy(er) to change out the sink faucet if I decided to get a nicer one or justify spending what they cost later.
Ordered Phoenixfaucets.com faucets and LDR soap dispenser (2014 links&prices) also under Dura faucets & Valterra
Phoenix R0477 White 4" Shower Valve $12.80 thru Amazon
Phoenix R4077 White 4" Lavatory Faucet $13.05 thru Amazon
LDR 501 P1050WT Soap Dispenser, White $13.72 thru Amazon
And back to the hardware again to plumb this...
Whaddaya mean I cant do that...
-
Seems you cant get where I want to go from here, least from local hardware. Ended up remanufacturing fittings. Primarily is adding the tees to existing water lines. Second is the shower valve inlets need to turn 90°, not enough room for lines to connect behind wall.
-
I want to go from the pex water lines to two 1/2" ipsa outlets for direct connection of new flex lines.
To accomplish (in store) need a pex tee #16820, then use 2 Pex to IPS adapters #16842. Other than added room needed-just extra fittings. So I reworked the Flair-It tees. The outlets use a 1/2" IPS cap, the barb goes inside the pex.Cutting off the barb allows direct threading of 1/2" flex line. Ill use a flat washer verse cone washer.
Shown online, Flair-it does make a tee with two 1/2 IPS outlets. One source to see available fittings completmobilehomesupply.com. Access to a larger store or ordering would make for a cleaner install, no machining required. I've noted most retailers use ther own inventory part numbers.
MFG Flair-It.com no longer show any fittings for sale-now sends to retailer.Catalog of part https://flairit.com/wp-content/uploads/2020/01/PEXLock-2020-Catalog.pdf. Most hardware stores carry Flair-it fittings
UPDATE there is a Flair-it storefront on amazon-listing most of thier producs
https://www.amazon.com/s?k=Flair-It&ref=bl_dp_s_web_0t
At any rate- $3 dollar trial- With great precision stuck one of the tees outlets to face of disk sander. The tee sets on table flat because all 3 ends are the same so fairly easy to ensure face ends up square. Then did the center outlet. Surprised it cut so well. Machines nice, usually plastics like to fuzz. So proceeded to do other tee.
Because the nut on flex line is pretty shallow need thinner washers to get more thread engagement. Instead of going back to hardware for washers (and washers have a recess for inside flange of flex fitting though I don't believe affects sealing) decided to cut existing washers. hey 17˘ is 17˘
Slipped washer over a shoulder bolt, chucked in the drill press and used razor to slowly slice. Held at slight downward angle but blade flat to cut. That'll work.
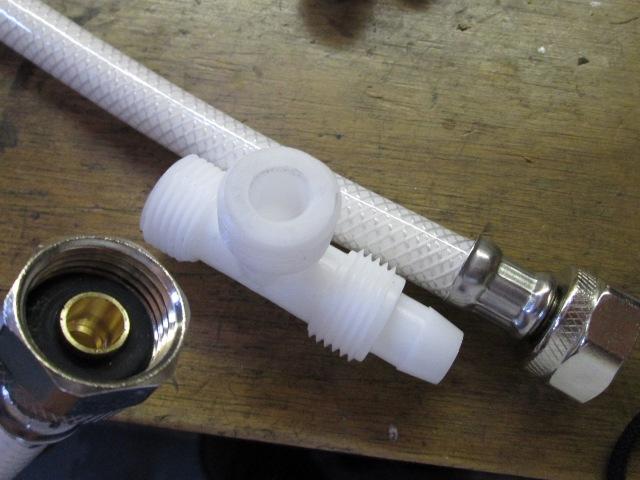
Just showing face of tee and end of flex line. The brass end just enters the end of tee so added a slight camper to tee. This is to make sure it enters and I'm not tightening brass against plastic. Though I'm confident these will seal and done, a little more time and tee could be chamfered deeper to use a cone washer. Not sure if mfg. ones are or not.
-
I have only 5" behind wall, shank of faucet is 2" protrusion , 3" isn't enough to turn the flex line. If it didn't eventually fold, likely, it might wear thru as it would be against back wall. (If using faucet with soldered on copper tubes shouldn't be a problem, but then its holding while tightening flex line nuts.
Solving should be as simple as flex lines with a 90° end like a washing machine hose or dishwasher connection hose, apparently they are not made for faucet installations. Unsure why, or a simple fitting to do this. Issue primarily is faucet threaded shanks are 1/2" IPS STRAIGHT thread- plumbing fittings are 1/2" IPS (or more accurately NPT) TAPERED thread. Looking online all I found was "how do I"?. Not as common now as back in the day but there are occasions where faucet is mounted thru splash of sink. Or interference/clearance requires a 90° connection. Though these type of faucets usually provided for connecting at right angles-. regardless
My solve is simple. Using 1/2" pvc thread x thread street ells, threading onto faucet. Male part of ell is useable to attach flex lines, rubber washer should seal. The female side though relies on the tapered thread to seal. Which threading female taper onto a straight thread generally wont work. Male thread engages to quickly & tightly entering tapered female hole. My fix will be to run a pipe die and re cut the faucet male threads to a taper.
Only problem is threading them on as access limited. Only part of this I'm considering iffy-Ideally they would be installed on faucet before hand, but no way to then attache faucet to wall
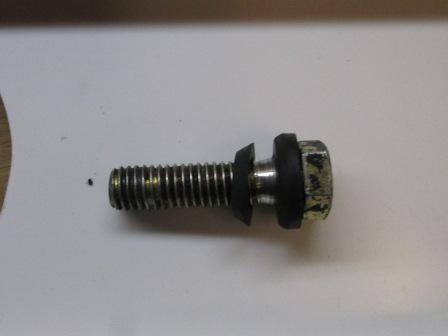
Because I may have redo the ells if I don't get sealed 1st time, did a little rework on the ells. Mostly to chamfer id so flex line cone washers can reseal if removed. They would seal as is but likely not twice if removed. Plus I only got 1 1/2 thread engagement before cone washer was contacted.
Faced off end of ell, counter bored id, then polished. Now I get 3-4 turns finger tight before washer contacted and more sealing area. Should be removable & reseal at least once if needed.
Manufacturing plumbing fittings...
Seem to be at a point of doing everything except drilling the holes in our shower and cutting the lines...
The Install
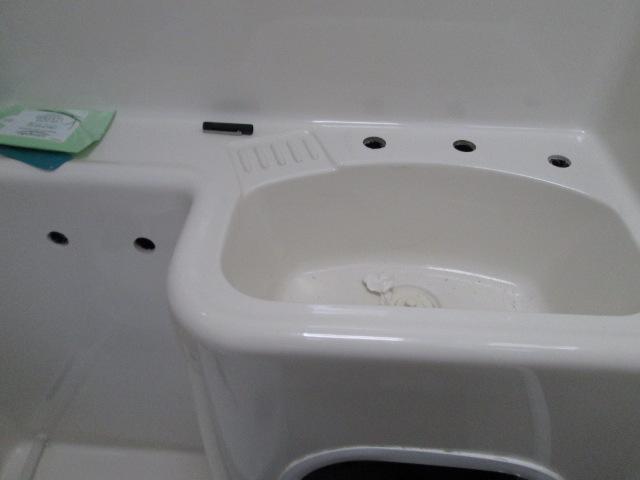
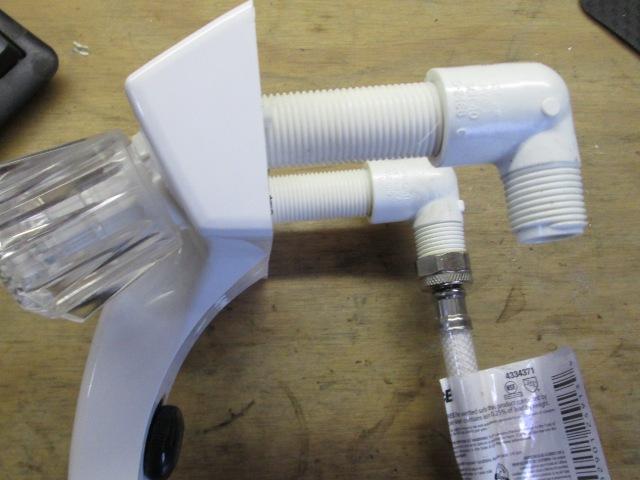
Cant think off anything else to stall the inevitable. Cut the holes for shower valve and 3rd hole to move sink faucet. I think of all the things I've ever done to camper this is probably the scariest , ha. Inserted old faucet, attached flex lines to get height to cut pex lines for new tees.
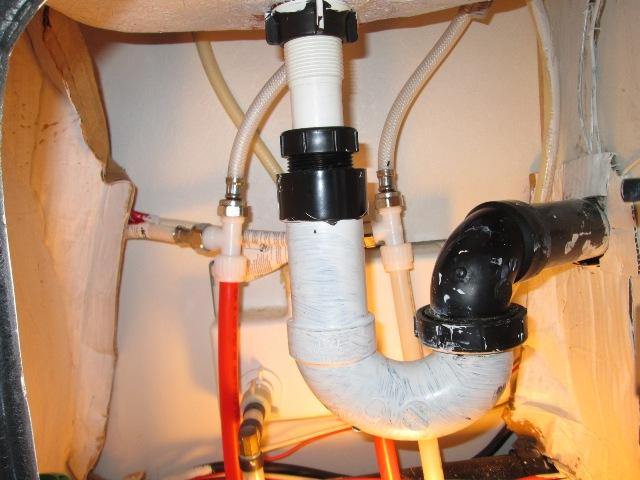
New tees installed, the lines are loose until faucets arrive. Had the lines in place that will run to shower valve. Its not going to be fun installing the street ells...
In progress-waiting on parts
Done!
-
Installed- faucets arrived in 2 days. Because camper was down for this, decided to start the passenger side skirt rebuild. Then faucets arrived, were not supposed to be here until next week. Cool I was at a standstill on the skirt rebuild- so I'll go ahead and install faucets so I can clean up inside.
A little sealant on the base & installed the shower valve. My ells, threading them on was not bad, which I was dreading. Used some Rectorseal #5. threaded them on hand tight-but with all the strength I could muster. I was more concerned with deforming the plastic threads than leaking from not tight enough.
But threading on the flex lines, at least the hot water because its further back & simply cant see it, became an hour ordeal trying to start the threads. Kept cross threading. Had I an idea aligning would such a task I could have threaded on the ell with flex attached. Which I was ready to unthread and redo when it finally caught correctly spun on about 4 turns. Wow. Cold went on like butter.
Ran the lines to the tees and loosely threaded on.
A little more sealant on the faucet base & installed it. Same deal-simple cant see. Fortunately I had dry assembled this stuff before install so had an idea how much nuts should turn before becoming snug. Several tries before I got them started. Ran faucet lines to tees and then snugged everything up.
Partially opened the drain lines, turned on pump. Let it run a bit while removing all the faucet screens, then bled the air from the system. Removed the shower head form hose, ran to sink and flushed it. Once I had air out let system set a minute. Using a piece of toilet paper checked for leaks.
Whoo whoo uremia!. My confidence in not having at least one leak in 10 connections was pretty low.
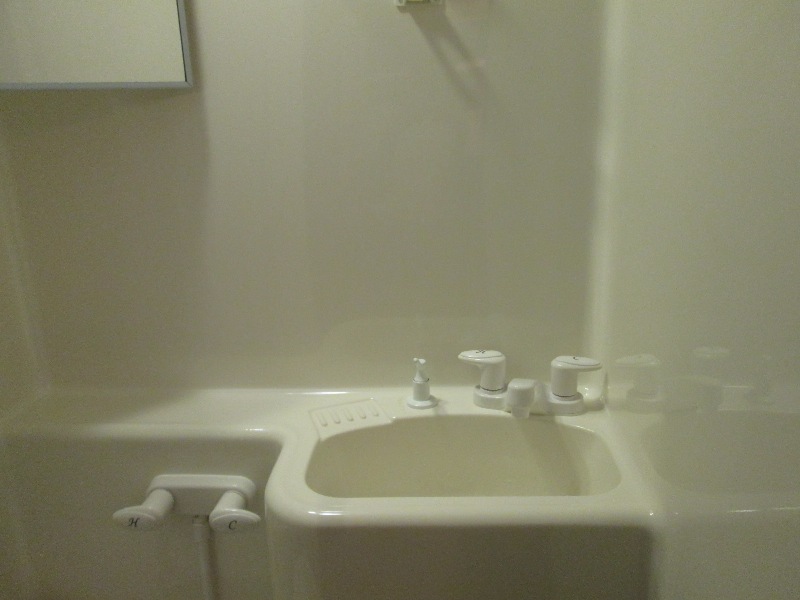
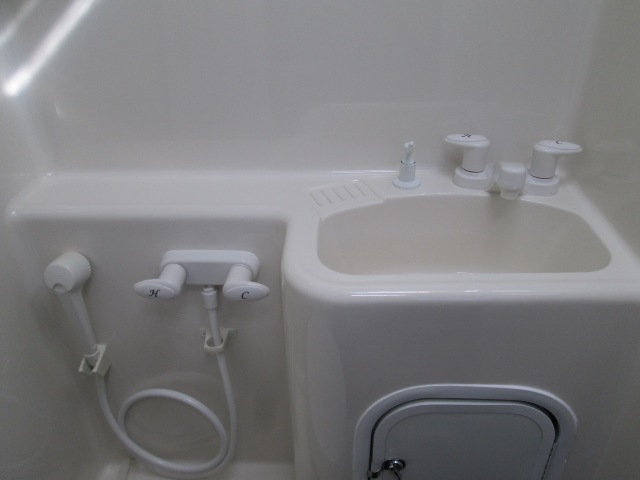
Though the faucet was a matching inexpensive unit to offset cost of doing this, I actually like it. Plan was down the road to replace but unless there's a problem probably not. Installed soap dispenser in previous faucet hole. Margaret filled the bottle and then I washed my hands! Something as simple as moving it over makes it way easier to use sink.
Still need to pick another holder for the shower heads new home. The hose hoop Ill probably move existing one, move the stick on hand towel holder to cover holes. But now that I'm thinking about it we have a nice towel ring that came with bath towel bar we bought ages ago but hadn't got installed because it interfered with hose. Hmm wonder where its at...
Oh just a note. I had modified the shower faucet. Because of where its at it might get accidentally turned on. My original plan was to simply rotate the handles, however these faucets the stem has a flat instead of a spline, handle will only go on in one position. So I swapped the hot and cold stem assemblies. They are quarter turn valves. Now they both turn up for on, rotating backwards from normal but will avoid an unexpected shower. We don't run our hot water that high so a non issue.
Move & mounted the hose and shower head brackets. And taking finished picture in daylight
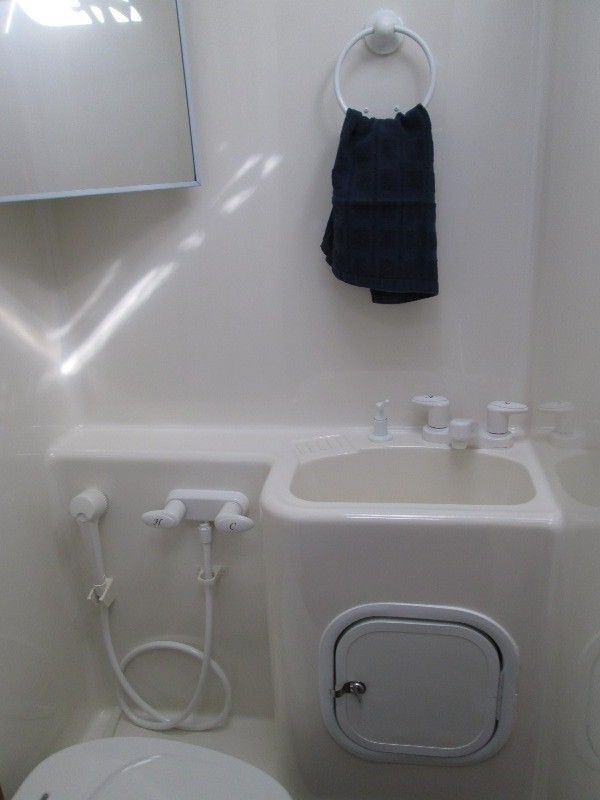
Found and mounted the towel holder. It covered the shower head holder screws but exposed screw holes for the hose ring I ran in some painted screws. Maybe something better will come along.
Am going to install another, or was, shower head holder on wall to left. Cheaper to buy a whole hose & head kit? on the round toit.
Back to Ourelkhorn Camper Modifications page