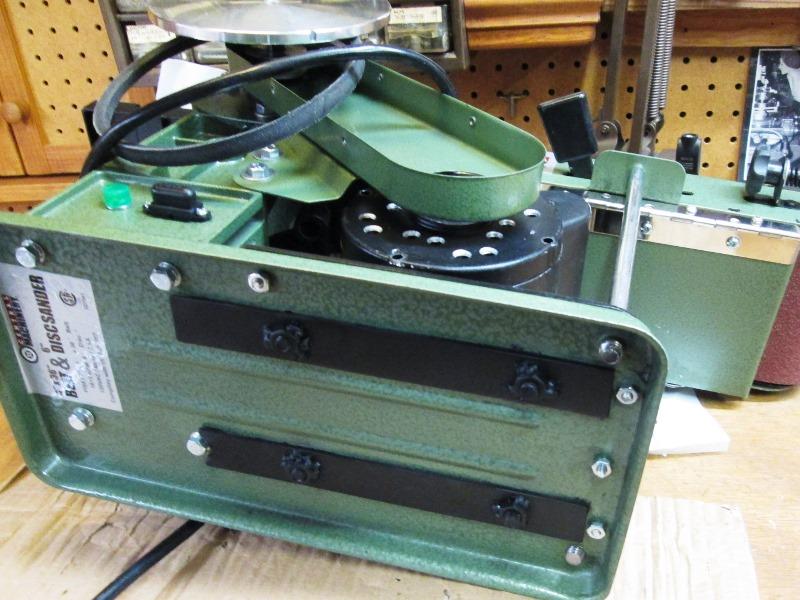
![[4x36 sander missing picture]](hfbelt18.jpg) Fix, modify, break- repeat
Fix, modify, break- repeatOther day needed to use sander. Carrying outside realized I forgot stand (normally set sander on bench, carry stand outside 1st) so sat sander on garbage can that was handy while I went back into shop for the stand.
Sander fell off...
Hit 6" disk, plastic disk cover exploded then disk took hit and bent main shaft, landed on belt box twisting it. Virtually destroying machine. Spent a lot of time ttrying to make serviceable again until I realized the shaft bent... Took a few days but decided to replace machine with another. Incorporate past mods that I added to old sander and add a few roundtoit improvements.
Modifying 2nd sander
- Split into sections as stuff added to this page, mostly for my own reference-no particular order. Only adding new where signifcantly different than mods to original sander-otherwise linking to old sander mods which will open new tab.
- Address belt tensioning: Add motor alignment bar for easy belt tension adjusting, add motor nut plate, fab belt tensioner.
- The motor: Drilled end for air. I use vacuum fitting & rotated the capacitor. Replaced bearings( w/ video link), Replace drive belt.
- Body mods: trim casting for more belt exposure. Add support for belt box at lower roller and another rod for horizontal support.
- Rework sanding belt fence to use wing nut, add guide for self alignment when fence mounted. w/Video
- Add 110V split receptacle: 1 side switched to turn on vacuum w/sander, the other hot for general use.
- Drill out air port for more vacuum:-FAIL- subsequent rewelding of port as belt ground thru cover
- Hinge sanding belt cover:Copying spaceing out cover as I did old sander to use full vaccum realized I could hinge! w/Video
- Add vacuum port adapter tee allows vacuum attachment with belt horizontal & disk connected at same time. w/Video
- update to vacuum port adapter update to update/ add pvc ells to route vac adapter tubing
- The stand Moved to own page, Shown above H/F pedestal #68321. Necessary mods,specifically how its assembled.
- Address belt tensioning, pulley/motor aligning procedure/method:
![[4x36 sander missing picture]](hfsander3.jpg)
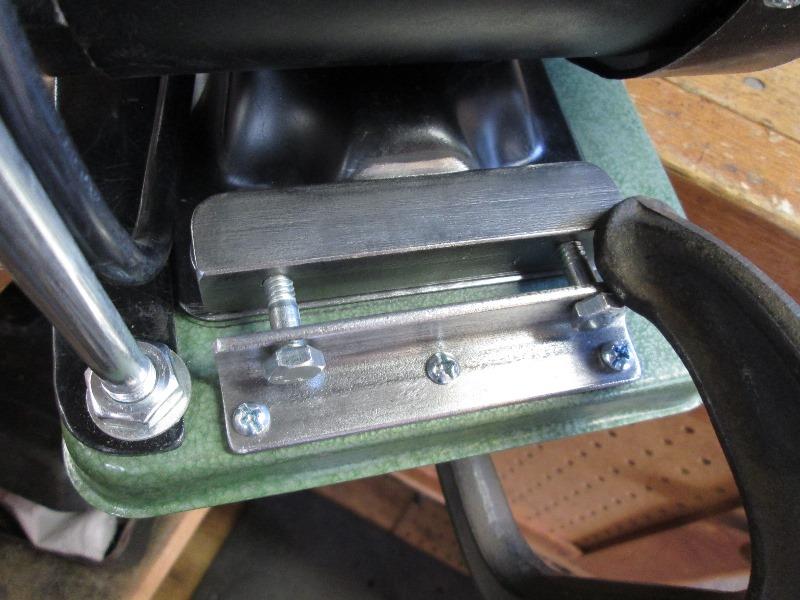
Once pulleys aligned and belt adjusted and motor tightened, added flat bar setting against motor flange. Now I can easily loosen/tighten to adjust belt tension if needed, pulleys stay aligned. Simple, used belt rest rod and small nut bolt at other end.
Adjusting motor bolts painful. To simplify, tack welded the nuts underneath to pieces of flat bar.
With motor/belt tensioned and pulleys aligned, removed one side/pair nuts, place drilled flat bar over bolts and retighen nuts, then weld. Repeat for other pair. This does limit 'twist', I cant imagine ever needing more than this allows but flat bar could be split if wanted. Works slick, single wrench to loosen/tighten motor from on top. No reaching underneath for nuts while holding tension on belt and tightening bolts with 3rd hand.
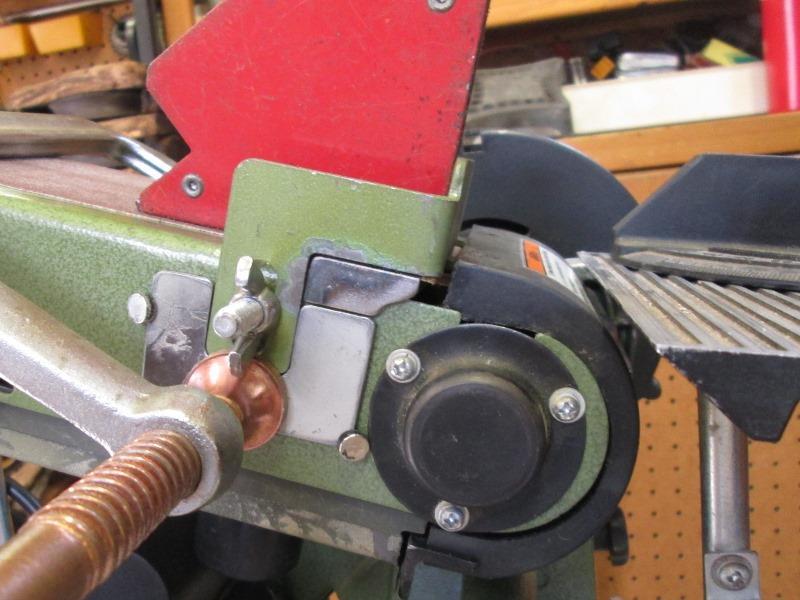
Then added tensioner to pull belt tight. 2 pieces of 3/4" angle. One bolted to frame, the other welded to motor base. 2- 1/4" bolts pull motor and hold it.
Here angle with 1/4" holes bolted to base. Angle to be welded to motor is tapped.
![[4x36 sander missing picture]](hfbelt5.jpg)
Welded
![[4x36 sander missing picture]](hfbelt6.jpg)
Cool, loosen motor bolts one hand/one wrench. With motor against flat bar can only move in/out, stays aligned. Pull belt tight, snug 1/4" bolts, don't have to hold tension while tightening bolts or holding motor with lever.
- Motor:
![[4x36 sander missing picture]](436motor.jpg)
Motor has internal fan but all the air comes out its cover intended to blow across surface to cool. I wanted some to go THRU motor. Disassembled and drilled the aluminum end bell with (16) 3/8" holes. This direct carry over from old sander. Helped a bit so added to new sander.
![[4x36 sander missing picture]](sandvac1.jpg)
Direct carry over from old sander (Details here) but took this new motor apart to drill. Old motor I rotated leaving wires on surface. Worked but didn't like. As I had motor apart drilled to relocate wires to come up inside capacitor cover. Few pics -with motor apart rotating capacitor, the needed mount screw hole lines up with gap in stator so room to drill and tap.
![[4x36 sander missing picture]](stator1.jpg)
The stator stops about 1/2" shy of case end- room to drill thru case for wire hole and ground screw. I shoved a piece of tin under case to protect the windings in case I broke thru. Protect the windings at all cost.
![[4x36 sander missing picture]](stator2.jpg)
Drilled new mount screw, ground screw and hole for wires. Relocate grommet. Soldered capacitor leads to motor leads, extended the ground wire to reach new screw (motor is also grounded thru chassis)
![[4x36 sander missing picture]](hfbelt7.jpg)
Used old ground screw to mount a piece of aluminum and clamp 3 layers of screen over old wire hole. Just another vent.
These motors are very easy to take apart. No internal brushes or other wiring to deal with. Remove pulley, fan cover and fan, 4long thru case screws. Mark end bell orientation. Light tap and end bells came off. The bearings are pressed both into end bells and on shaft but the end bell press is very light. Removing from the shaft was a few light taps on inner race to remove. Note wave washer behind pulley side bearing.
![[4x36 sander missing picture]](rs6201.jpg)
Mine tapped the pulley end bell and it easily fell off. Taped fan side bell came out with shaft and rotor attached.
![[4x36 sander missing picture]](hfbelt8.jpg)
Tapped the remaining end bell off. Note depth of seated bearings, may or may not be against step. Reinstall new bearings on shaft by driving against INNER RACE ONLY. Also note how much force is required to remove old bearings. Mine came off pretty easy so planned to just tap back on. Other wise if really tight (like most) you may need to freeze rotor/shaft to slide on warm bearings.
Link if embed doesn't show
On recomendation ordered a trueflex 1210 3/8"x 21". Its close and would work but really too tight, Ate up all the adjustment I allowed for. Trying a 1220 3/8x 22" which may be too long.
Yup, the 1220 22" belt too long. Using the 21". HF belt must be between?
![[4x36 sander missing picture]](hfbelt16.jpg)
Didnt get pics. Modified the sanders base opening up slots 5/16" so motor can move back for shorter belt.
Drill (2) 5/16" holes beside existing slots and filed out. I could do because I have the nuts welded to a pieces of flat bar.
As this wouldn't work just nuts&washer, option would be to slot the holes for 4 main body bolts and use larger washer. I simply didnt think of this untill I started drilling beside slots...would have been way easier.
But I can use off the shelf 21" belt. Did have to rotate the belt guard box down a bit.
- Body mods:
![[4x36 sander missing picture]](hfsander2.jpg)
Sander has allowance to use table at the belt, which is how I use it, vertically with table, but its almost like an afterthought. Travel across the belt face is limited. I removed some of the body material to allow sanding wider (up to 6 1/2") material flat on table with disk on, shown above.
![[4x36 sander missing picture]](hfbelt9.jpg)
With table at 90° cut body is just below top of table, leaving about 1/4" materail above the adjusting slot. Without disk on allows full travle across belt.
![[4x36 sander missing picture]](hfbelt10.jpg)
In my wisdom I bent to piece of flat bar as it needs to contact the bearing cap at its outer edge so it still rotates. Used a longer bolt thru support to secure table, floating nut to secure support. Works great and virtually eliminates the box bouncing. However...
![[4x36 sander missing picture]](hfbelt11.jpg)
My dogleg created more work. Better and easier would be to use washers or spacer behind the support and table arm. At least for me as I use table, if you don't use table no problem. The angle adjustment bar hits the new support being bolted against the table arm as that is right where it swings. I ground off 1/8" from the adjustment arm/knob boss and loosend bolt where table attaches to arms and slid over. Now arm goes behind the support but hit the bearing cover as it swings up. Slight grinding and bending got it to work, but again spacer behind mount bolt would have allviated.
![[4x36 sander missing picture]](hfbelt15.jpg)
Easy enough while I was welding on the rear cover extension to add second support tab. Not welding you could simply bolt on a piece of angle as support tab.
![[4x36 sander missing picture]](hfbelt12.jpg)
Threaded a piece of 3/8 round bar. Heat and bent to get about an inch offset.
![[4x36 sander missing picture]](hfbelt13.jpg)
As box is not over the base on the opposite side, support rod needs dogleg. If no other mods possibly you could use cover as the rest support, ensureing its close to corner so as not to bend cover.
![[4x36 sander missing picture]](hfbelt14.jpg)
Drill hole thru base, nut & washer both sides. With this and lower support box is now supported at 4 corners.
Link if embed doesn't show
- Mount belt fence and bracket
Change 4x36 belt fence to tool less attachment. I rarely use machine horizontally and do not have the belt fence mounted as it interferes with table. I use belt in vertical position with table. To make allowance for using the fence with belt in horizontal position wanted 'quick' way to mount and remove without tools. Simply removed bolt that attaches fence to machine. Used a 5/16-16 bolt and threaded from inside of machine sticking out, using a wing nut to attach stop when needed. So switching from vertical to horizontal will be easy. Added mount on side of machine to auto place the fence. Table can remain mounted to use belt horizontally without disturbing table. Simply spin off wing nut to remove the fence and return to vertical use.
Now just slide fence onto bolt, tighten wingnut. Guide sets it square and about 1/8" above belt. Fence rests on added 1/2" flat bar and within guide cutout, also restrains from rotating.
Video during modification..20 min, this fence mod at 17:52.
Link if embed doesn't show
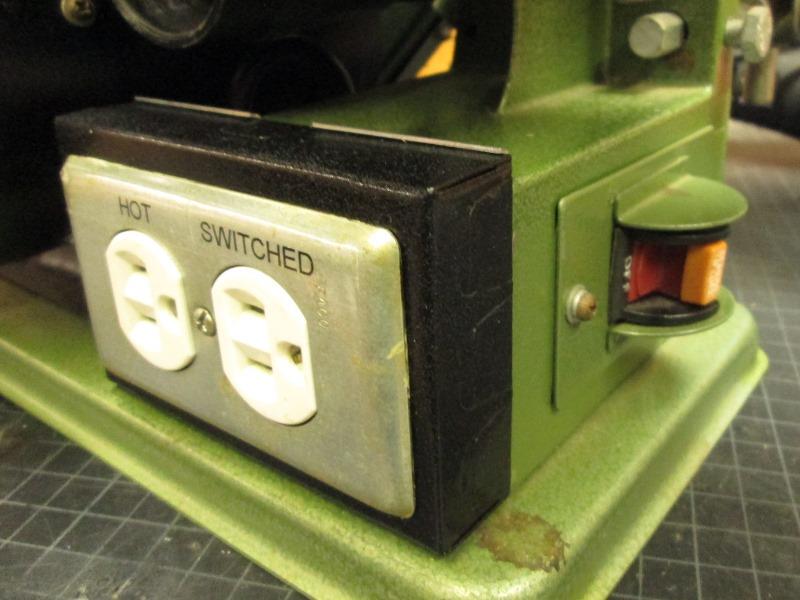
- Add split AC receptacle
Add split receptacle with one side switched with motor turn on switch to plug in the shop vac. Better than the remote as it will be auto on /off with sander. Plus give me a hot receptacle to plug in whatever else outside.
Had an old shallow Legrand wiremold metal box, box full of receptacle and old cover and other parts needed. Mostly package of Noble 523H piggyback female with male tab connectors. As the sanders switch switches BOTH the hot and neutral wires, tapping it to feed new receptacle. Piggy back off incoming line & neutral to feed hot side of receptacle, and the switched output line & neutral to feed the other receptacle. Clear as mud, but doesn't change way sander is wired, keeps the common (neutral) and hot separated.
![[4x36 sander missing picture]](sandwire.jpg)
I added a pilot to alert when sander plugged in (receptacle hot) and a fuse.
![[4x36 sander missing picture]](hfbelt17.jpg)
Fuse and pilot is wire to hot input (cord), NOT the switch output. Pilot is tapped hot side of fuse
Nice-auto vacuum on -no other step needed. I've added receptacle to several other tools, table saw, grinder stand- etc. Simple convenience not having to run another cord to wall receptacle when at a station using one tool. More details on old sander page
- Fix first attempt to increase vacuum flow (2018):
Makes sense- however DON'T I did -FYI.
![[4x36 sander missing picture]](hfsandb12.jpg)
I had to reweld back plate where air attachment port screws on. I use shop vac with the sander when working with wood. Air restriction though due to rather small holes on tube not very effective for drawing dust and also makes the vacuum work too hard.
So tried opening up the port as others mentioned. When vacuum attached to opened up port the volume indeed is increased- not only does it suck more dust with additional holes- it also sucks the belt. Causing it to eventually sand thru the sheet metal and port fell off. Not uncommon doing this mod.
After opening up port I had to use fitting on vacuum hose that allows control how much draw thru sander without restricting vacuum motor. Which adjusting where belt doesn't contact returns to almost no dust draw, or back to where it was before opening port. Only real cure is to bend up a deeper back plate or add spacers somehow. (readdressed and fixed below)
While opening up the port does work to draw more dust, unless you have a means to control air don't just open up port. If reading this with intent to add holes to port do it incrementally....
- Ability to run full vacuum and hinging belt cover for easy belt change
Previous on old sander..
Addressed lack of adequate vacuum and tendency for belt to grind thru cover on old sander and it worked well so was going to duplicate on new sander.
Laying out though realized I could hinge!, no need to unscrew 6-8 screws to remove cover and change sanding belts
Originally I added 1/2" flat bar to space out rear panel. Tack welded to ribs inside body. A clever person without welder could use wider flat bar cut to fit and bolted.
Still required screwing cover on but allowed to run full vacuum without sucking belt into cover. Original modification of old sander, Here and video (30 min) Flat bar drill/ tapped to match cover spacing. Cover will set shifted over to left so its tabs on right side are inside of flat bar, left side tabs are outside of flat bar.
Link if embeded video doesn't show, 30 minuets of old sander mods with fixed cover spaced out.
- Hinging cover, spacing out but also accessing belt without screws
![[4x36 sander missing picture]](hfbelt20.jpg)
Basically same as old one, weld on 1/2" flat bar on left side but instead of screwing cover to it, screwed piano hinge to it.
- [As an alternate to welding, flat bar could be bolted. Use 1/4" wider, say 3/4 on left and 1" on right, then slot. Drill holes matching sander gusset plates 1/4" or so from flat bar edge, cut from edge to hole making slots. Slotting will allow flat bar to go over internal gusset plates far enough to bolt to box
Alt 2- left side could use a wider hinge bolting directly to case. Would shift cover over so bolt/rivot flat bar to right side of cover, either inside or outside of its flange (Should hit box edge) ]
Many ways this might be done but I had flat bar, welder and some scraps of 3/4 hinge. All I'm really saying here is welding is NOT the only way to add hinge or space out cover
![[4x36 sander missing picture]](hfbelt23.jpg)
Prior to welding notch top of left side for roller assembly to clear.
![[4x36 sander missing picture]](hfbelt19.jpg)
Drilled new holes for screws trhu hinge that will go into flat bar about 1/4" from hinge edge (stock holes wont work). Then mounted hinge to cover with 8/32 screws and nuts. Place cover & hinge on flat bar to mark it, drill & tap for 8x32 screws. Ensure there is a slight gap between edge of cover in closed position and edge of flat bar behind hinge.
![[4x36 sander missing picture]](hfbelt21.jpg)
Screws must NOT protrude thru flat bar. At least on mine, they ended up right where belt edge might contact. I ended up grinding screws on hand to about 1/4" long and used washers.
![[4x36 sander missing picture]](hfbelt22.jpg)
I moved cover down about 1/2" from stock location. Top of cover to be cut and folded over to close gap.
![[4x36 sander missing picture]](hfbelt24.jpg)
Reason for moving down I thouhgt I was going to fold and attach bottom to plastic as before, but unneeded (or wanted). Cover closed, gap miniscul, plastic doesnt sag.
![[4x36 sander missing picture]](hfbelt25.jpg)
On the right side, I used a piece of 3/4" wide flat bar to close gap and act as stop for cover. Top is notched like left side to clear roller assembly but also needs to be notched at bottom to set flush. Theres a doubled piece of sheet metal under bottom. Left side only runs down about 10". Right side ran down to top of plastic, about 13 1/4"
Thats it, hinged! Now to hold closed. I found some little over center or cam action latches. Rivoted catches to cover. Place and rivot latches to case. I did have to notch the flat bar for the latch rivots, But they work slick. I wouldn use where resisting any weight but for this 'door' perfect.
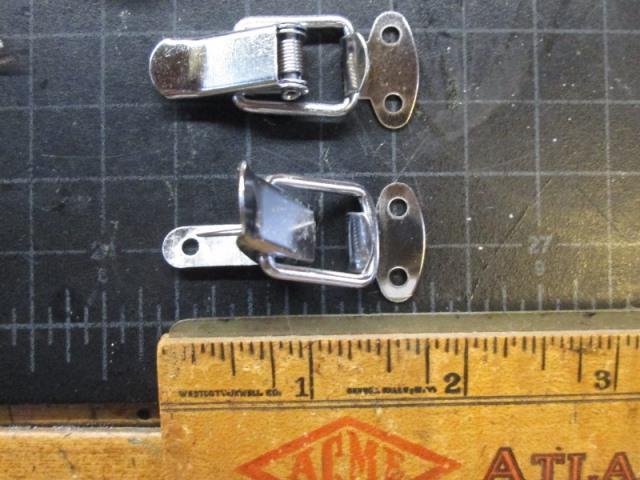
If you pop the spring out from behind the bail, relieving tension, its a lot easier to mark for holes and attaching, then push the spring back.
Link if embed doesn't show, aprox 18 minuets
- Add an vacuum port tee adapter and hose connection from old sander.
Details are on old sander page Here.
And added hose routing: Here.
Breifly:
With ability to run full vacuum to sander, without sucking belt into cover, just need easier way to attach vacuum hose.
Used in the vertical position easy enough to attach vacuum to port with shop vacs remote elbow, however doesn't work in horizontal use. Also have to manually detach hose, plug in reducer to attach vac to disk port.
Stumbled upon an adapter that fits sander belt port, center outlet that fits my vac hose and has 3/4" outlet for disk port. No more swapping back and forth. vacuum can be attached in vertical and/or horizontal position.
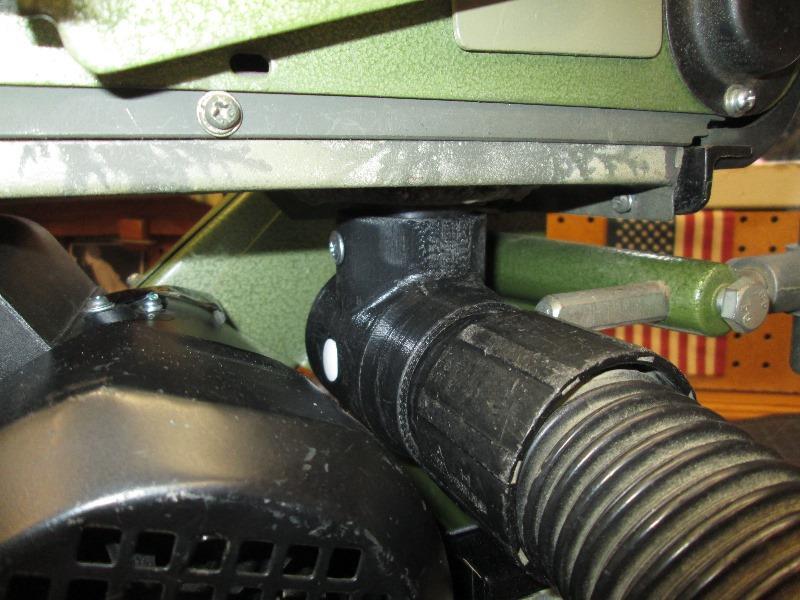
Some modification required but it simplifies. Basically a tee that is 3D printed. It allows plugging in vac hose when belt in horizontal or vertical position with outlet to connect the disk port.
But this tee works well. A lot simpler just plugging in vacuum hose
Video during modification..10 min.
youTube Link if embed doesn't show
- Add ells to reroute adapter tube
Video (pictures) of modification..1:38 min youTube Link if embed doesn't show
Starts at 46 seconds...
Back to shop tool mods
Back to Our shops home page