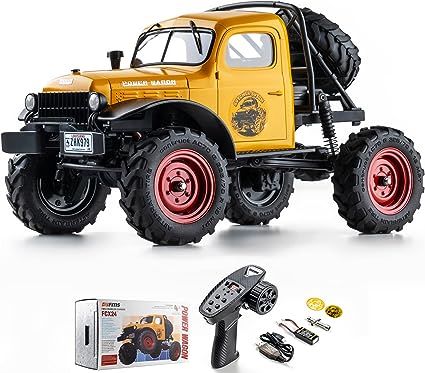
FMS FCX24 4x4

4 wheel drive ready to run,
everything but 4 AAA batteries.
Red, yellow or blue truck ~$140

1x 1:24 FMS FCX24 4x4 Crawler
1x Transmitter
1x 7.4V 380mA Battery
1x USB Charging Cable
2 Speed transmission 1x Wheel adjuster
O-rings to convert to oil shocks
Full ball bearing
Metal portal gears
1x User Manual


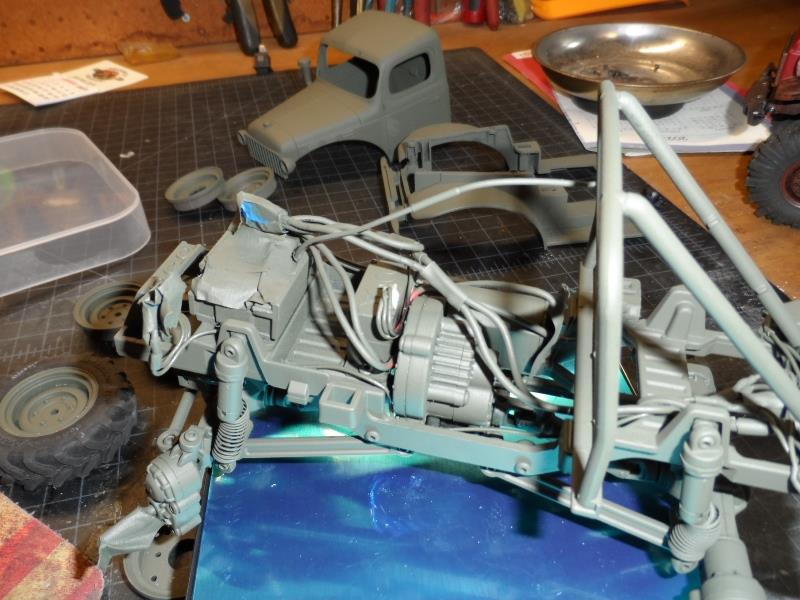
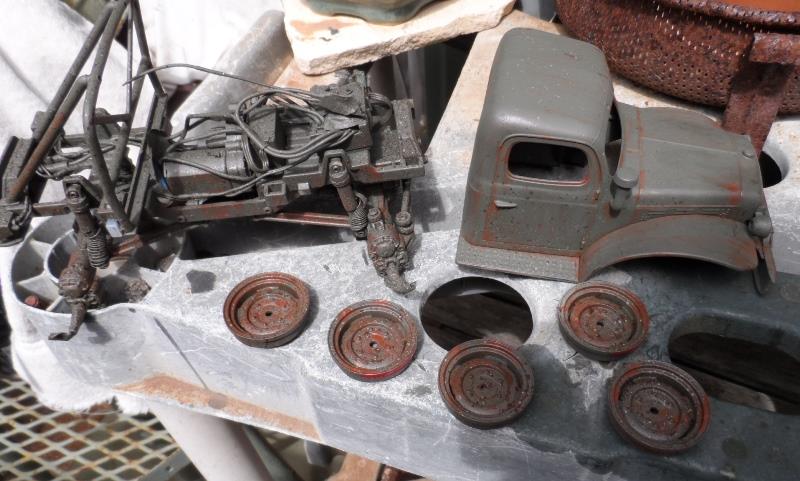
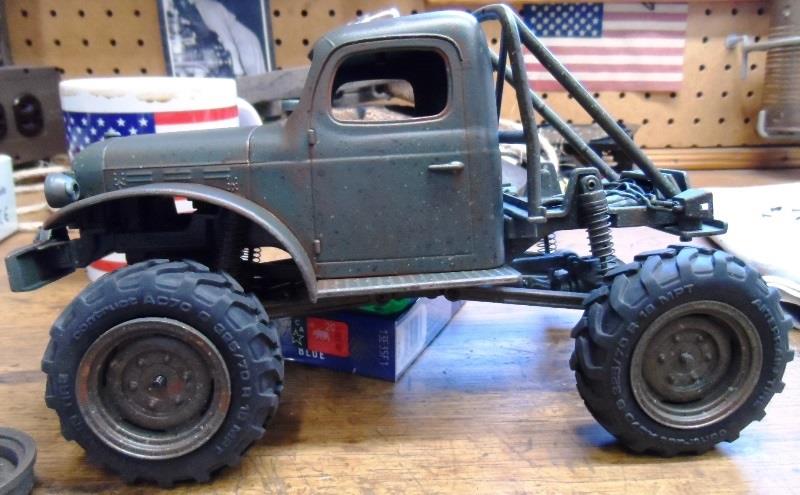
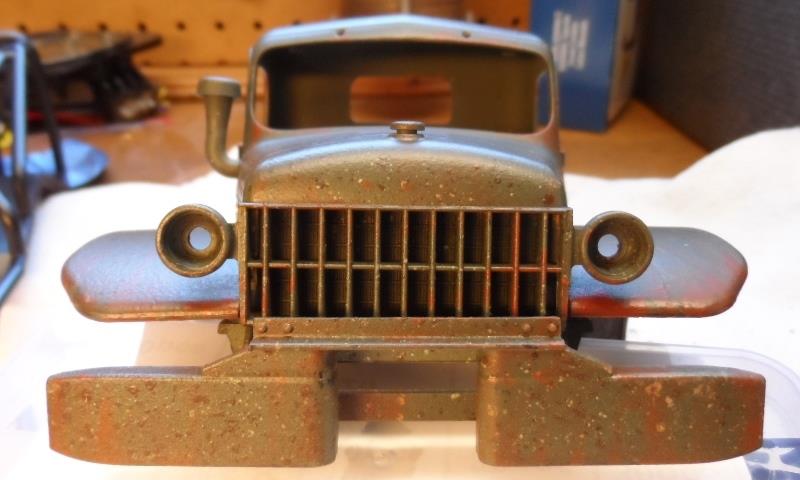
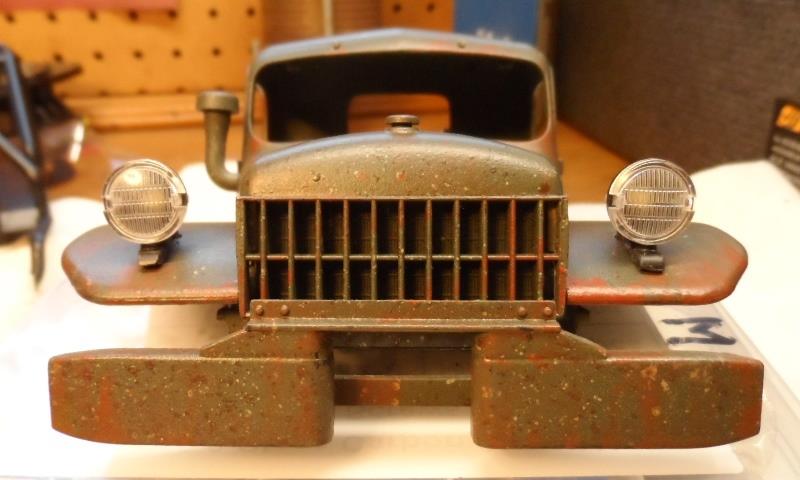
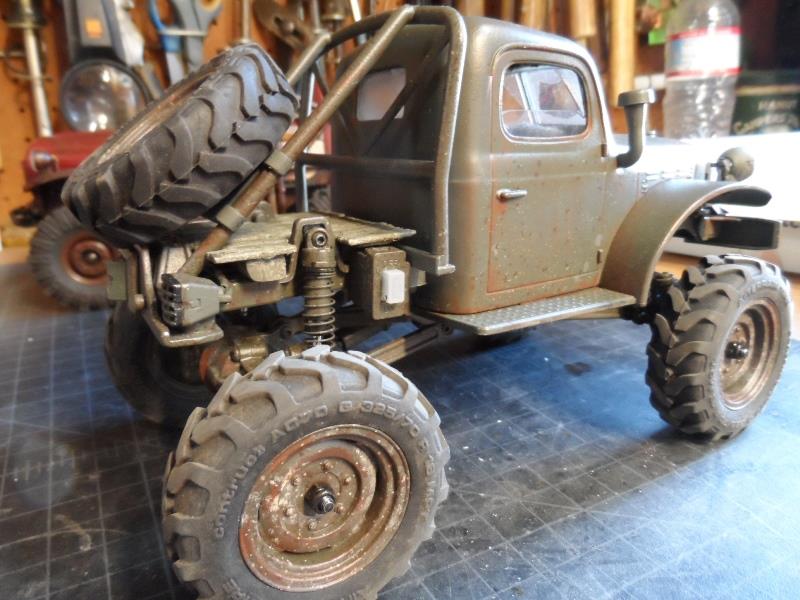
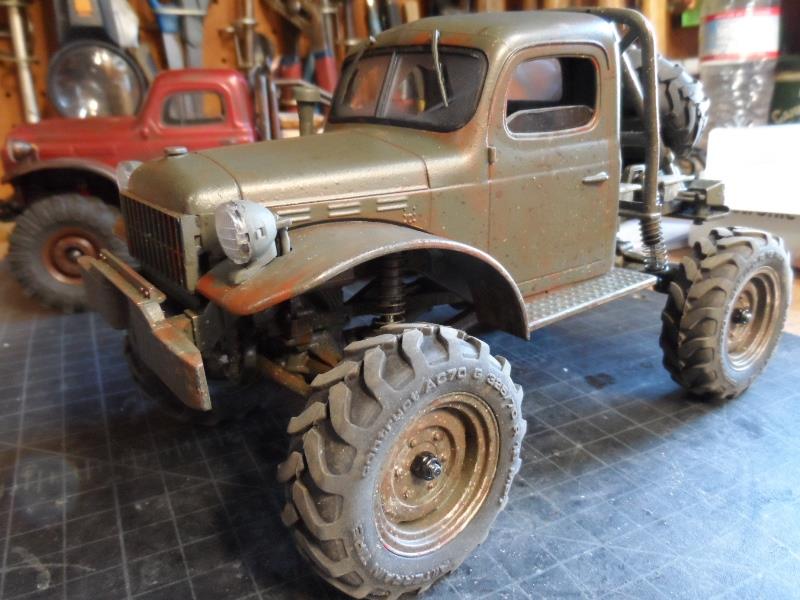
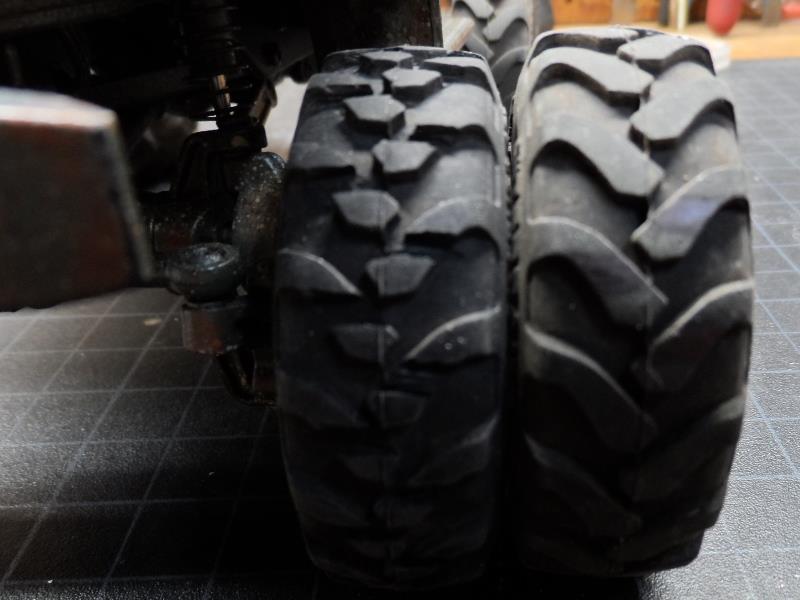
Simple inexpensive 1/24 scale rc truck. picked one for son then another for my self. Was relatively inexpensive-just wanted something small/cheap and simple to play with other than my 6x6. Out of the box this ready to run RC truck is a blast. It certainly isn't a crawler (by 1/10 scale standards) and soon realized small scale is a whole different ball game. The body while fairly accurate to post war Power Wagon loosely mimicking WWII WC models. It has the headlights mounted to the grill instead of on fenders. Has a snorkel? Scale wise frame is bobbed with no bed.

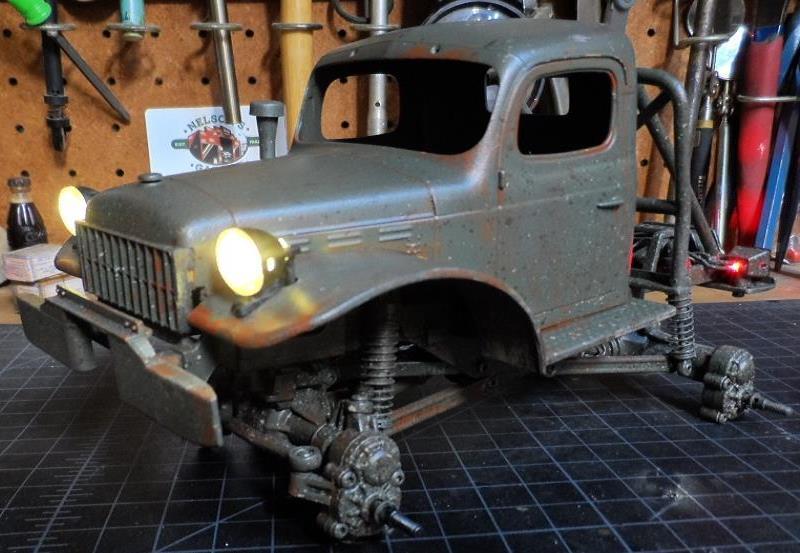
Modifying 2 trucks, nothing performance wise other than wheel weights, just making easier to use. 1st one we added a battery disconnect switch, rear bumper and taillights. Relocated the ESC power switch. Then added a small platform/bed. Second one same but turned into full paint weathering and headlight addition.

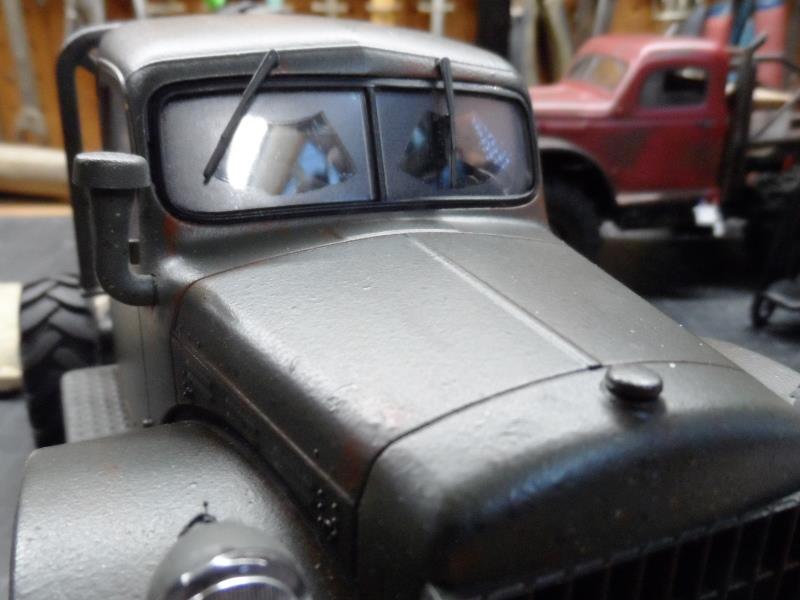
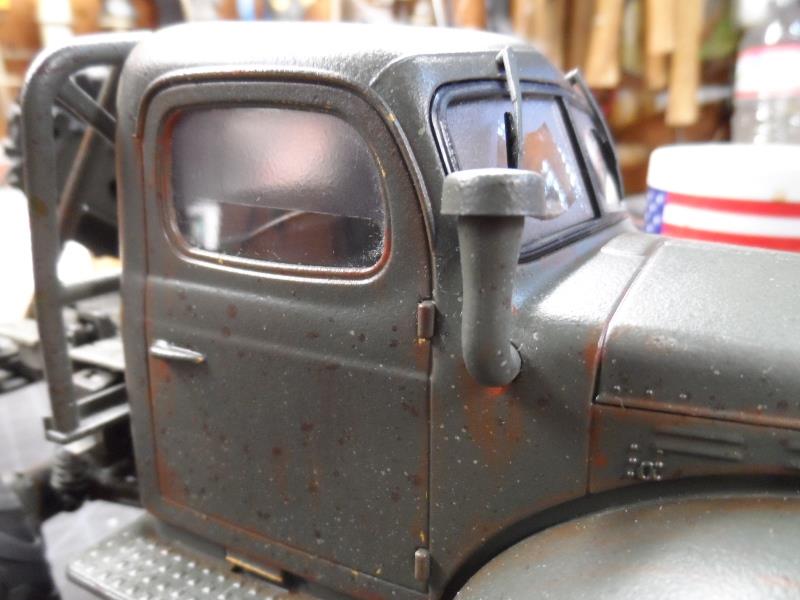
In order of occurrence, more or less, mods. I didn't get pics of all. Doubtful if helpful but might help toward a direction. Really just documenting for myself. One for my son added the above mentioned mods otherwise is stock. Mine added the above mods but also I decided to paint and got rather involved... Just time in the shop...So it begins

Truck one section
Truck two section
DISCLAIMER:I'm putting everything, both trucks on this one page, so it's very long, a bit disjointed


TRUCK one.
Minor rewire main switch relocation. Body mount changes, roll bar fortification, rear bumper, add battery switch, taillights, bed platform to both trucks.

1st
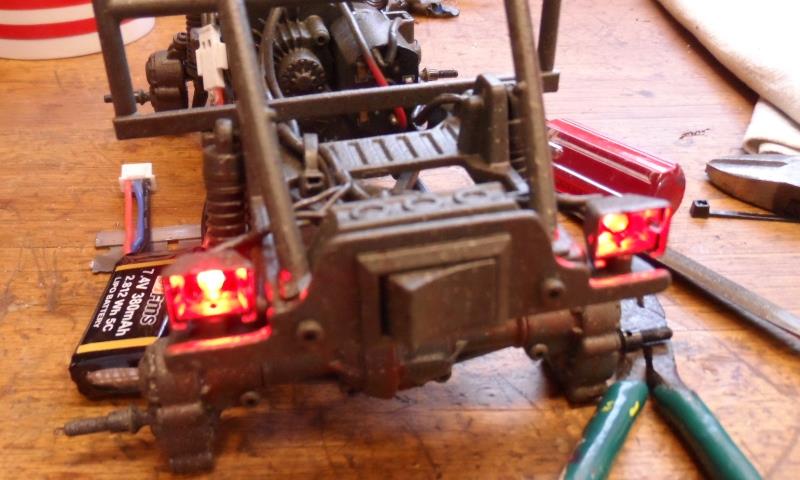
My biggest complaint on the FCX24 is the body attachment. To make easier I relocated the ESC power switch outside of body and added the switch that disconnects battery from truck. Extended the battery charging plug to reach back of truck. This allows him to charge truck without removing body, battery disconnected. We added taillights that are powered directly thru battery switch (ESC switch independent). This gives visual indication whether battery connected before charging. Not recommended nor do I but its how I wired both.

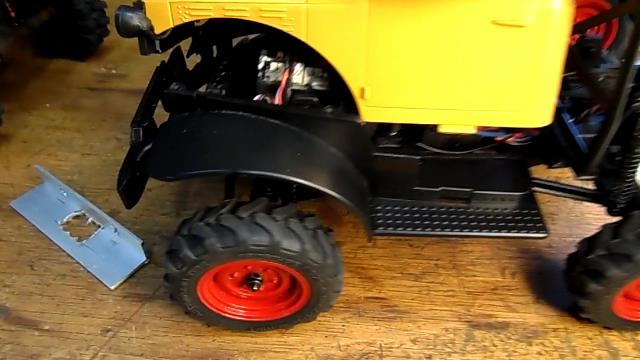
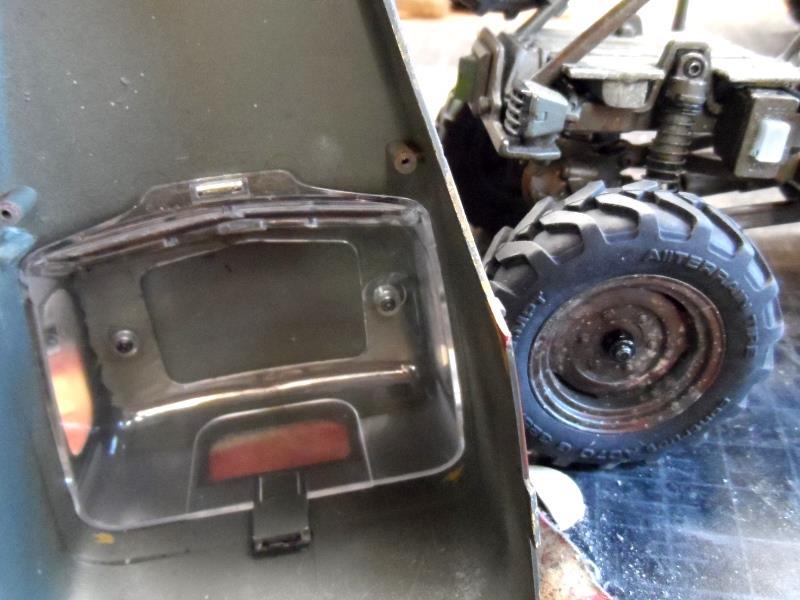
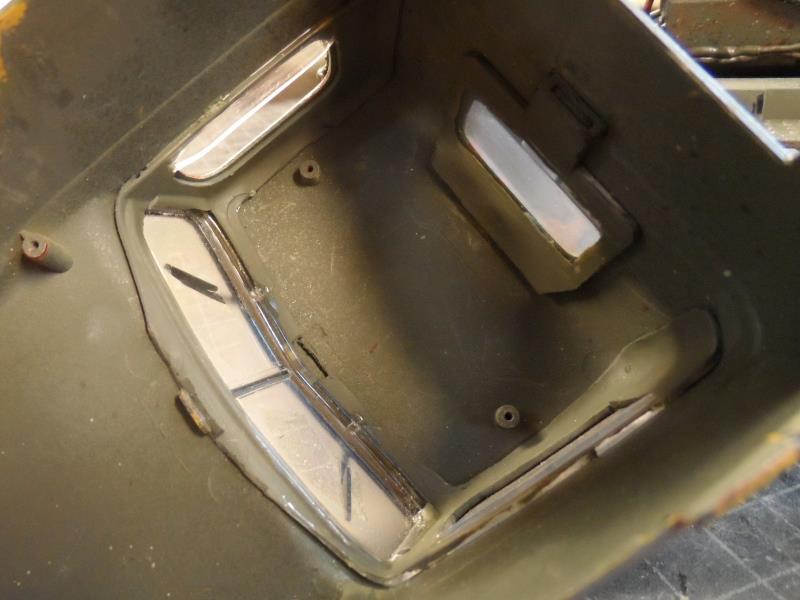
For body removal found you can leave the fender assembly attached to the truck, 6 screws separate body from fenders allows simple clipping cab on to fenders instead of reaching up underneath trying to release the 4 body plastic barbed clips. Insert grill then clip cab to running boards. You might need minor clean up around the grill so it slide in without catching. Way easier

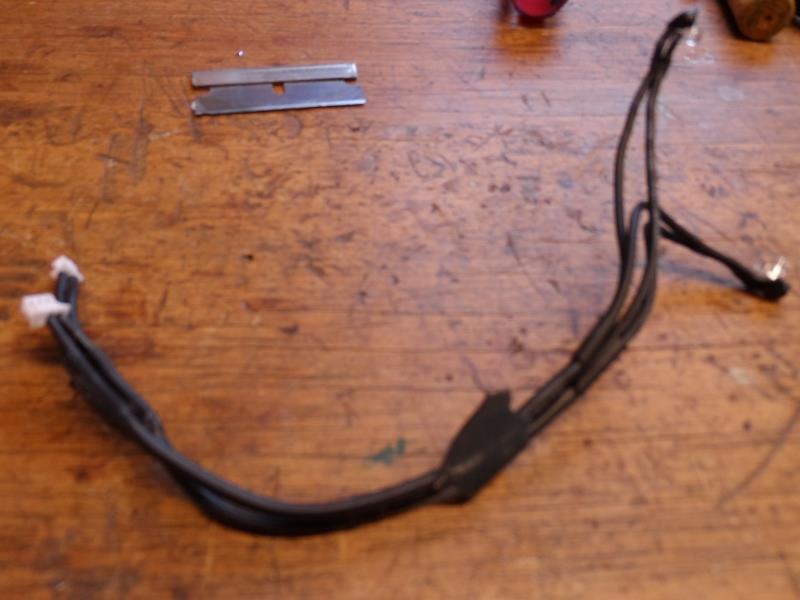
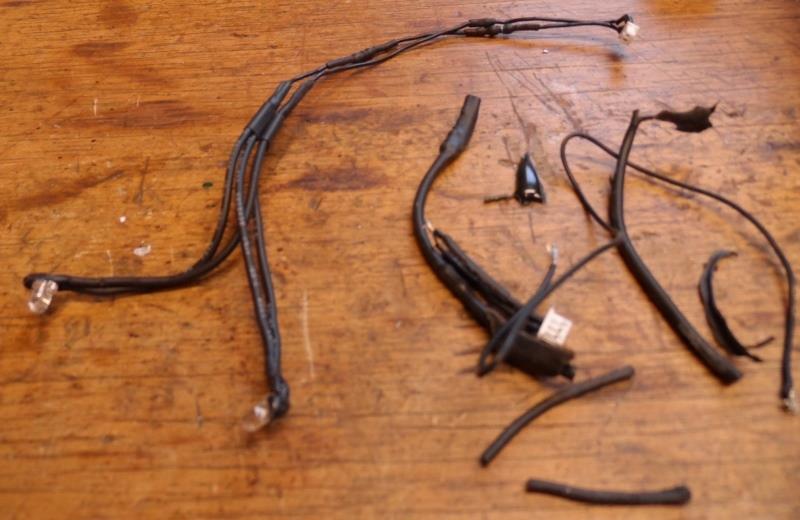
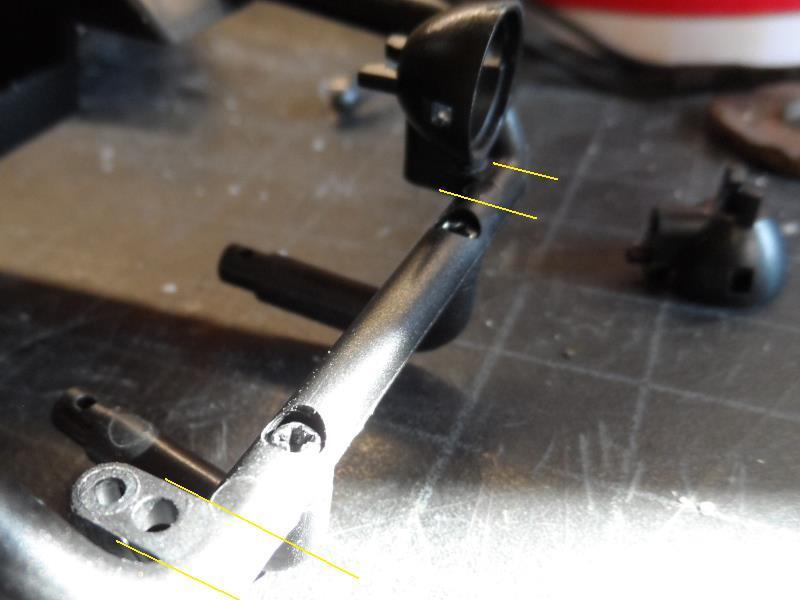
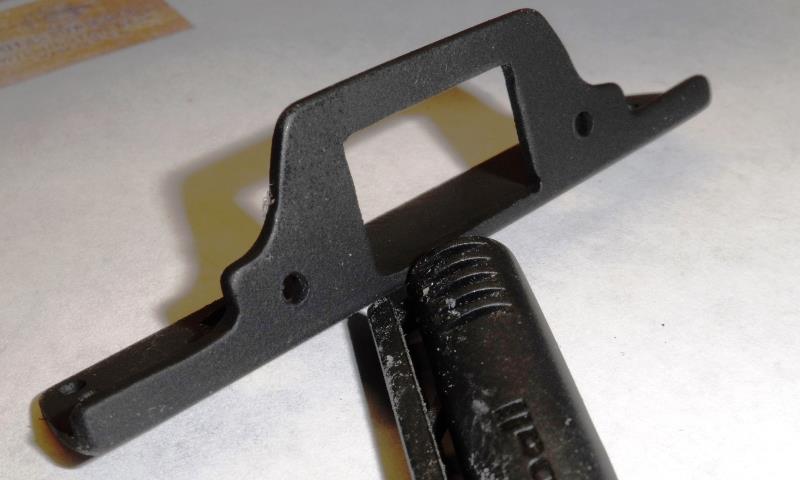
Which, shown under second truck section, I stripped of all unnecessary shrink wrap and the extra plug making the headlight harness a lot more flexible. Also allows main body removal without unnecessary flexing at the plug, still have to be careful. Wire at plug in ECS broke just performing these mods. On the second truck I removed stock headlights and mounted Atlas headlights to fenders.

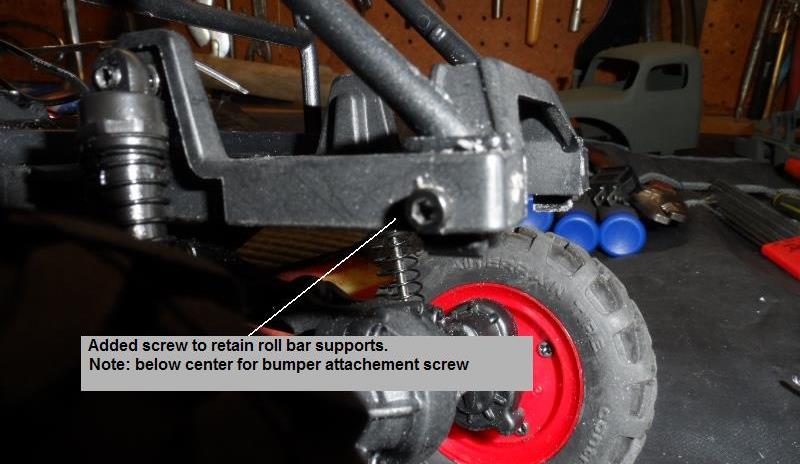
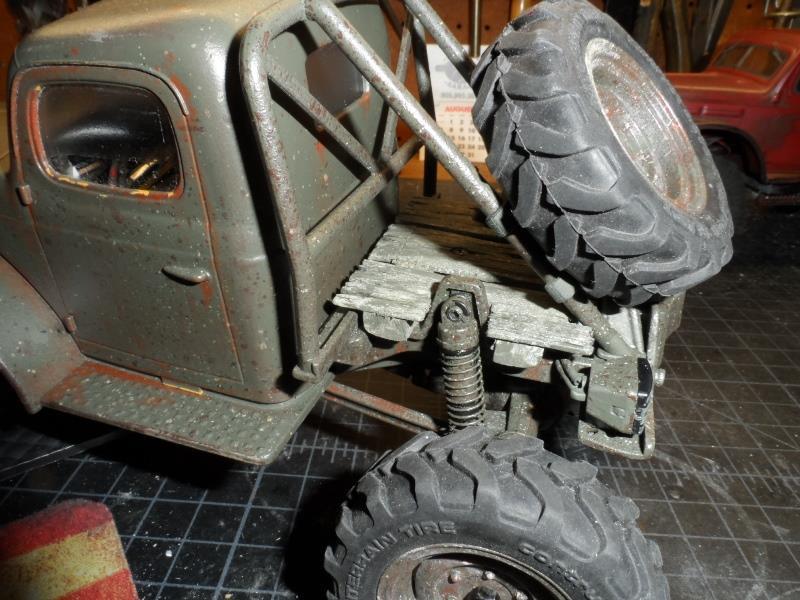
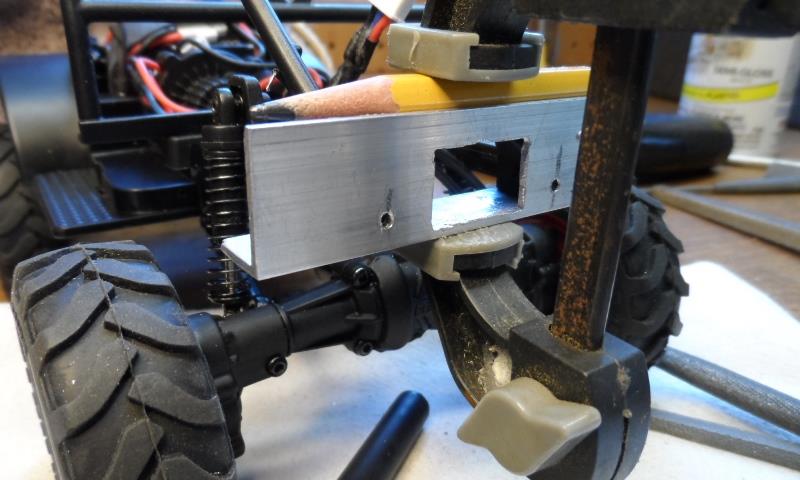
We also drilled and added screws to end of roll bar. It constantly unsnapping itself. Also super glued its supports where they screw into hoop. Note: knowing were adding bumpers placed screws just below center


Added mods....
The rear bumper (mostly for switch). Length of 1/2X34" aluminum angle. Doing 2 simultaneously.

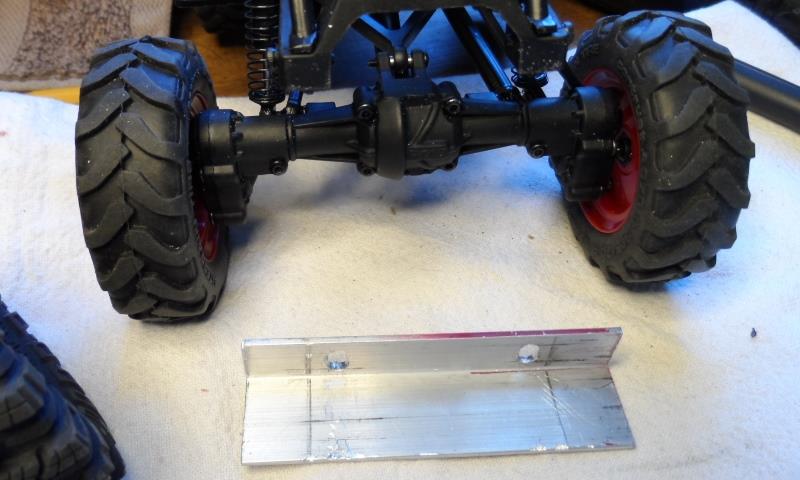
Marked and drill for screws that enter end of frame rails.

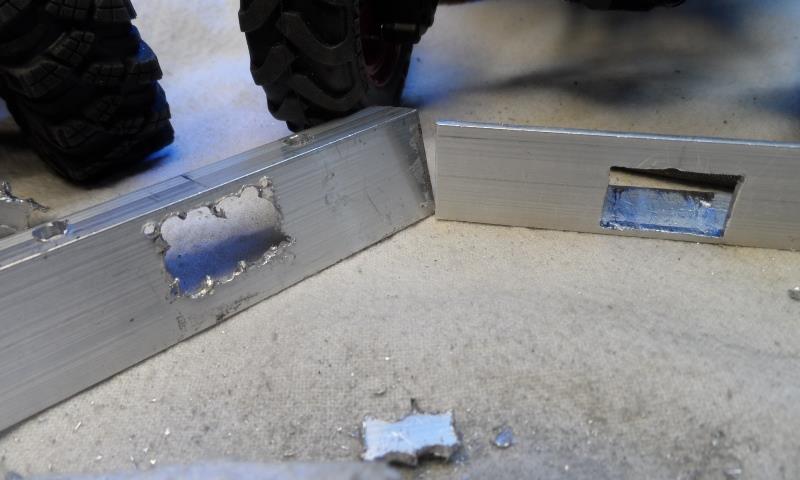
Hacked hole for rocker switch

Locate an drill for screws that go end of frame horns.

Cut clearance hole for end of roll bar clips. Holes at ends are for taillights.

Trimmed face of bumper for some appearance, and light clearance.

Note this was all done with drill, hacksaw and mini files (in case you didn't notice...) Crude but it works.

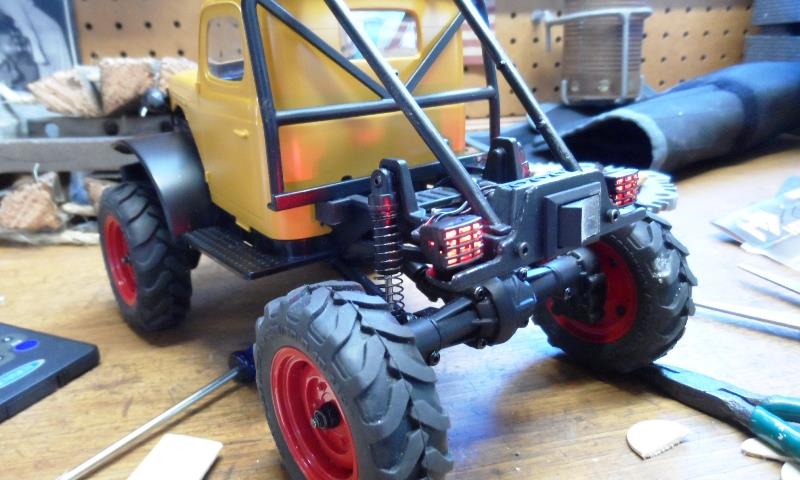
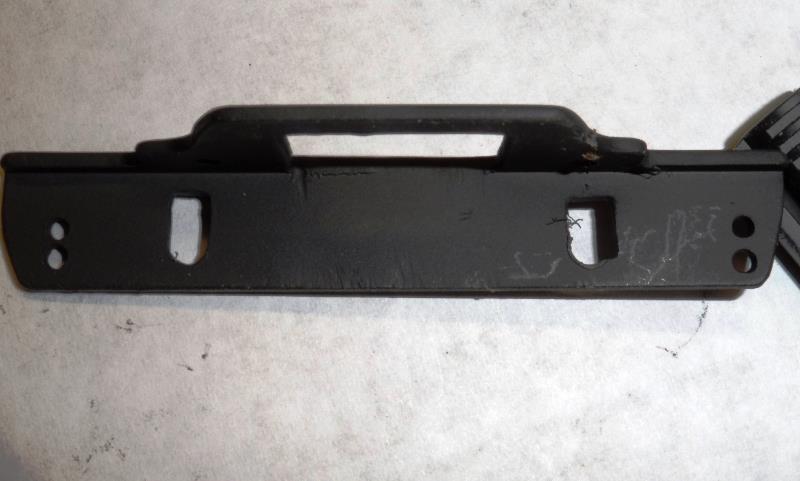
Got tail lights mounted. They are from an atlas 6x6 truck.

Everything wired. The ESC battery connection lead I cut the positive wire (that matches battery +) and ran to switch, the switch out goes back to ESC lead that feeds it. basically switch is inline on battery positive. To the switch out put I soldered the light positive lead. For ground I ran and tapped the ground on steering servo. On the battery I extended its charge lead.

Taillights are super bright, need an additional resistor as they receive full batt voltage less what their resistor rated at. Likely ok but too bright. Coarse didn't realize until wiring done and car painted. Never ends. But its working.

To hide wiring and to fill the naked chassis behind body making a small deck

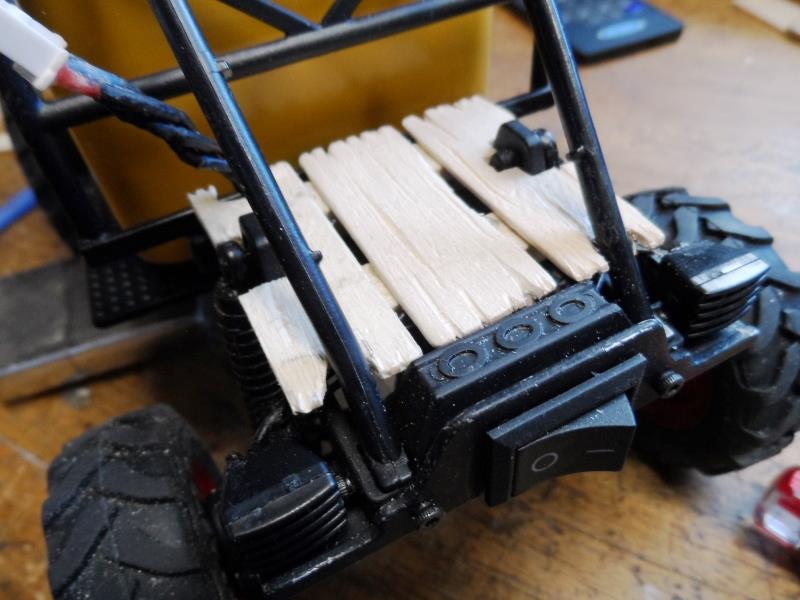
Popsicle sticks glued to 1/4 square runners. Carved to 'age'. Single screw holds in position

Spare tire covers but still nicer than open frame...

One done-short video (11 min.) of this trucks mods & quick driving...https://youtu.be/S73vWGXJnDM LINK

Back to top of Truck one section
Back to top of this page


Second truck

While these are fun I decided I wanted to make mine look a bit more period and mimic a 40s Dodge WC truck. Duplicated previous mods to 1st truck, relocate ESC switch (less the balance/charge plug extension) bumper & battery switch, add taillights. Have yet to make bed/platform as I stopped to paint...Then added bed/platform and Headlights from a FCX24

Took apart, washed and wet sanded body & fenders. Masked the vitals. Except the shocks, want body color so just shoved spring all the way down. I'll need to remove and clean paint off rods. Though need to anyway to convert to oil filled. Sprayed everything with rustOleum flat camouflage deep forest green.

Tried my best to rust/weather so it didn't look like it just got off the boat.... Sprayed several different colors then streak some rust and other colors...
Its ookay... for mostly spray paining. My Second attempt at weathering. Have since gone back and added a little more green to the wheels,( that less is more thing).

Clear matte coated entire truck.

Headlight harness

Watching paint dry, I'll go ahead and strip of all the shrink tube on headlight wiring. Dont know why but the entire length of wire is covered with shrink tube. Makes it real stiff and flexes joint at ESC plug when removing body until it breaks? Also add resistor to tail lights.

Stock headlight loom. Extra 3 pin plug? Not using so removed. Removed shrink tube up to where lights soldered together. A lot more flexible.

Resistor added on taillight ground wire, random 300+ ohms but cuts power by 2/3.


Still bright but they are LEDS...least not over driven.

Headlights
Just setting up to see progress...Liking it. Have some work yet, primarily shocks, then reassembly. But I'm looking at the headlights.

I dont like them attached to grill. I have a set of atlas 6x6 lights headlight that mount on fenders. They are larger, more scaled to body but the FMX24 body doesn't have the raised area for mounting (so they point down at ground). Either try to cut off kinda small stock lights from grill and glue to fender or make something to utilize the Atlas light housing. Other thought, other than appearance, mounting lights to fenders I wont have to unplug for normal body removal unless working on something. Again Im leaving the fenders attached to frame and only remove the cab to access battery/internals.

So kind of pausing...

Had bought a spare Atlas 6x6 bed assembly to cut and extend the bed on the 6x6. Discovered the taillight mounts on it are the exact same profile as the atlas headlights. Its a sacrificial piece so I could cut off the mounts and glue to headlights then file to get the correct mounting angle...

Super glue light housing, used a little grease on screws. When dry cut off base parallel to light base.

Plan changed in after flattening the base, I left the part on front on, just more surface. Filed to match angle of fenders. Drilled fenders with 5/64 for mount screw then a 5/32 hole at back of light housing to pass the LED thru.


Before. Too small lights, never seen a Dodge WC or power wagon with lights stuck to grill


After. Need to rework a bit. Right light not sitting flat and left bit to high.

BUT...

For getting side tracked really liking it. Because of the base doubtful I'd do again.


On to the shocks, cleaning and installing the o-rings to make hydraulic.

Nothing to show FCX24 comes with o-rings to convert. Remove shocks if installed. Unscrew the top, insert 2mm hex inside body and unscrew shaft from bottom. Remove the spring then pull off small bottom cap off of body. Insert 2 small o-rings into bottom, snap cap back on. Put drop of oil on shaft and slowly reinsert thru body. Once shaft thur o-ring check it moves freely. Replace spring then screw shaft into bottom mount. Place large o-ring on top of body. Apply oil, lightest on these works best. I use about 5/6 drops, screw on top cap. I get about 50% success...shocks sticks. Taking apart and reseating the small o-rings solves. I dont know if o-rings cocks or what 1st go around? Shocks should freely move. If it wont fully collapse too much oil. These aren't the best shock but adding the o-rings and a bit of oil gets rid of the bouncing/boingyness...


Windows Started reassembly. Put the clear 'glass' back onto body. Started putting the wipers back on and thought might be cool to make windows/dirty with clear where wipers would swing. Plus fogged windows would 'hide' inside of cab and wires.

Put a piece of masking tape over windshield. Reinsert the wipers, traced the swing onto tape. Removed the tape stuck to hard surface of workbench. Cut along the traced arc line. Then peeled off outside whole piece of tape, put back onto window to place the cut outs. Then removed the perimeter tape so all was left was the cut pieces where wipers swing. Sprayed matt clear over entire window. Also sprayed back and side windows.

Kind of nice, completely fogged to not see inside would have looked funny, this looks like reason for dirty window..?

The side windows I masked so it would look like window were rolled down. Bottom fogged to look like dirty glass with upper clear to like window open..

But dumbass masked backwards... clear on bottom, fogged on top. Looks goofy. Tried to wash and redo but the clear actually fogged the plastic.

Originally I thought about cutting the side windows but being hard plastic had decided too much work. Now seems only way to fix. Some gloss on top might restore some clarity and try again but...

While looking at it realized I could simply cut ALL the windows out from shell (especially since I now have pattern). Glue the cut pieces inside to body. Not only could I fix side windows but it would remove some of the weight of the clear window shell. AS top heavy as this body is would be good thing, well enough to justify...

And started. Weigh shell 12.3 grams. See what I end up with

Windshield and back window will be easy, just cut perimeter.

Rough start. The side windows as I'm cutting a hole need to do both 1st then cut perimeter. Got bulk with dremel then x-acto and files, whittling down-this is going to take a while. Reinsert and check until happy then cut out all the windows. Worst is replacing entire shell...or worse is it looks like pooh and use.

quite a bit later... windows trimmed. Cut out most of top though left side windows attached to windshield. Cut out back window just a little wider than glass. whoopie! saved a whooping 3.9 grams, oh well, but allowed opening windows

Glued in with a few drops and then painted inside. So almost glad my side window paint didn't work, gave me reason to cut like I really wanted to do. Defeated the hiding inside wiring but minor trade off.

Added 53 gram wheel weights to fronts...Drove it, looked bitchin but even with the paint doesn't climb any better :) Tires are almost worthless. Was really thinking of swapping on a set of Atlas6x6 wheels. They are nice and would offer huge selection of tires. The FCX24 wheels are odd, 1.3 with very few tire options, but just spent $15 for the weights which again are unique to the FCX so will live with it a while.

Kinda doubt many read thru all this. Fun project


Made another bed deck for mine...really considering flipping another set of front fenders for rear...

Need to get some matt clear on the added headlights...

and remount some tires.


Later- tires. The FCX24 is supplied with 1.3" wheels, selection of replacement tires extremely limited. The tires supplied while they look good and work ok they are the weak point, just not a lot of traction. For the 1st truck, son Matt, ordered an relatively inexpensive tire & wheel combo from Injora.

1.0 beadlock stamped steel wheels with tires. Tires should do a lot better as far as traction. A bit taller 62mm verse stock 58 mm should help with clearance.

Wheels, stamped steel 1.0, allows unlimited tire selection in the future. Add a bit of weight and center can be swapped for more offset.

On my FCX24 because I already have bought weights and painted decided to try some tires for the 1.3 wheels offered by RCAWD.

Wheels aren't included, tires fit stock wheel. I dont expect much, hopefully work better than stock tires but allows me to use my stock wheels. If they are crap then Ill go to 1.0 wheels. But worth the gamble and I should be able to tell if they might work without mounting. My thought is they are going to be super hard...if so I'll return. (Arrived -tires are pretty soft suprised, havent mounted yet.)

Since I'm ordering new tires decided to cut my stock tires to see if they perform better.

Tread doesn't offer a lot of cut options. I cut about 1/8" out of each lug, inline with outer edges of lugs. This gives some horizontal biting edges. Rather tedious, only did the fronts so far. Did seem to improve traction a bit, tires with cut lugs are really flexible and conform well to rocks etc. They could really use some sipeing, center lugs across lugs for more climbing bite, radial at outer lugs for side. They still 'slide' but that has more to do with compound, and sipeing can only help so much. Maybe later.

Nuff for now

Back to top of Truck Two section
Back to top of Truck One section
Back to top of this page

Back to RC crawler index page

Back to Ourelkhorn Camper Modifications page

148