Re design the Camper Pantry
When I added the drawer slides (pantry redesign page) I used center bottom mounts to maximize the drawer size. Because they have no self travel lock or allow use of standard camper drawer locks found myself in a quandary. I figured by the time I finished the drawers an easy solution would make itself known. But nothing came to mind. I looked at different types of locking hardware, but as I didn't want anymore hardware on the face or it would be a every time you open having to unlock or overcome friction /mechanical locks, our 1st trip with new pantry upgrade we used a shoestring and tied drawers closed.I wanted the drawers to easily open after an initial unlock. Was considering just a rod dropped thru the shelf above, but that would require pulling out 18" of rod. Then I thought about a rod with dog legs on it that caught notches cut in drawers so you only have to pull up 1/2" to unlock, but either way would require the knob would be on the shelf, it'd need to be back a few inches, not practical.
I then I decided on a rod outside, in front of the faces would work. Drill a hole in the formica top in front of the drawers, screw in a single eye bolt in cabinet face above drawers, simple, I'm tired of thinking about this. I actually made the rod with a loop at top end and attached a crystal knob but when I was figuring out where to drill hole I realized that over time this is going to scratch the drawers, needs a place to park while camped, this is just hokey. So the external lock idea got nixed in mid stream.
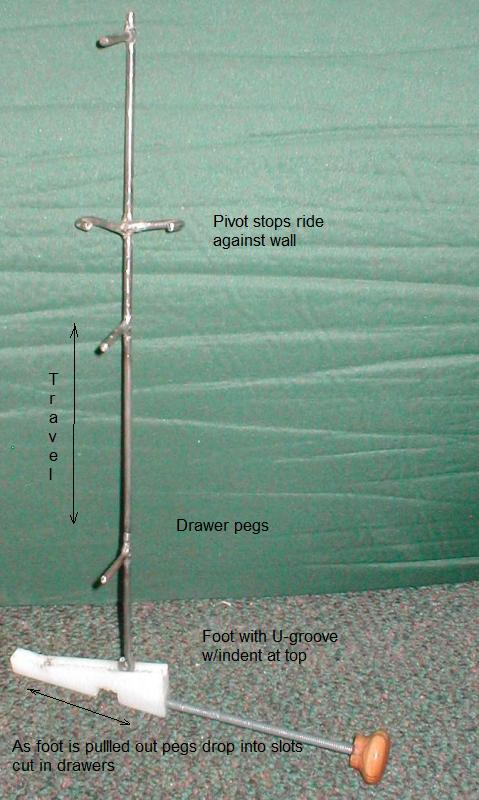
Started rethinking bout my original idea of the rod with pegs on it. The rod would be inside the cabinet so you wouldn't see it, good. All i need to do is figure out how to raise& lower it without taking up shelf space, hard. If I can do this it would be just an on/off affair, built in and just there, really good. So...If I put a pull knob and rod thru the cabinet face I could use a cable to pull up the rod...or I could use knob and rod to pull a pivot bar that would raise the lock rod or... a this went on for a couple of days. Some where during this non constructive imagineering a sliding ramped shoe came to mind, I've seen this somewhere in days past.
With lock rod sitting on top you push in the knob it raises the lock rods freeing the drawers and the knob will be against cabinet out of the way. Just put a indent at the top of ramp so vibration or weight of rod doesn't push knob back out. Pull and it lowers the lock rods. Just need to cut slots in sides of drawers. The ramp will be self locking when knob is pulled out as the rod will be at bottom of ramp and cant walk up hill, vibration will cause it to try to walk down hill.
Onedit: Is it just me or are these moving gifs just annoying?...it simplfies explantion, side by side comparrisons but I find it distracting....
Oh well sometimes that's part of it. Most of us imagineer stuff, figuring it out till it works, learning as we go, and the prototype is the working unit. If we do go back and build another one it'll be for a friend who'll end up with a nicer more functional project cause already made the errors on our own.. ha. Its all good. .
I did get a lot of luck on this part. The horizontal travel of the ramp, the slope, the weight of the rod and the resultant vertical travel all relate to each other. I got luckily on all counts and didn't have to re cut anything-it works-just plain luck.
1st cut the ramp in shoe, just guesstimate 3" (which would equal how far the knob sticks out) with about a 3/4 rise, cut over all bout 4" in case I needed more travel. Drilled & tap 1/4-20, added relief (notch) to adjust overall threaded length. Cut u shaped groove in ramp, top last 1/2" groove flattens the gets deeper to act as indent to hold in unlocked position, Bottom of groove stops before flat.
With drawers removed, sat foot in cabinet. Ripped a riser/base for foot, length of travel (8" max) out of 1x, bout 1/16 wider than foot. When everything is done a 3x8 piece of 1/8 ply will attach to riser & enclose/guide the foot (and if rod jumps out of foot groove it will still slide & be contained). Drilled thru cabinet face for knob rod inserted piece of 5/16 tube in hole.
Bent hoop end of 3/16" rod to travel in groove. Cut length is from foot top indent to underside of above shelf. Peg placement: sat rod in top ramp indent (UNLOCK POS.) Placing 1 drawer at a time, marked rod at top of drawer sides for peg clearance that'll drop into drawer slots. Welded on short pegs 3/8" above marks, and a bent anti rotation piece, also with hoops to minimize friction. I'm getting 5/8" vert. travel so have bout 3/16 clearance.
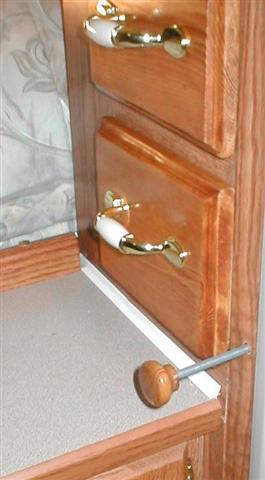
With foot/ knob in unlock (in)pos. mark location for rod, install to wall using small eye bolts opened up, verified its working, close eyes. Install foot base side.
Back to pantry redesign page 1
Back to Ourelkhorn
Camper Modifications page