
- Shameless maybe-I went thru the good, better & now best and am stoked. If your considering tie downs these are just amazing compared to using any other type of attaching hardware.
Intro: The progression
-
Back in 03 I had changed the camper mounts and tie downs to Torklift frame mounted tie downs.
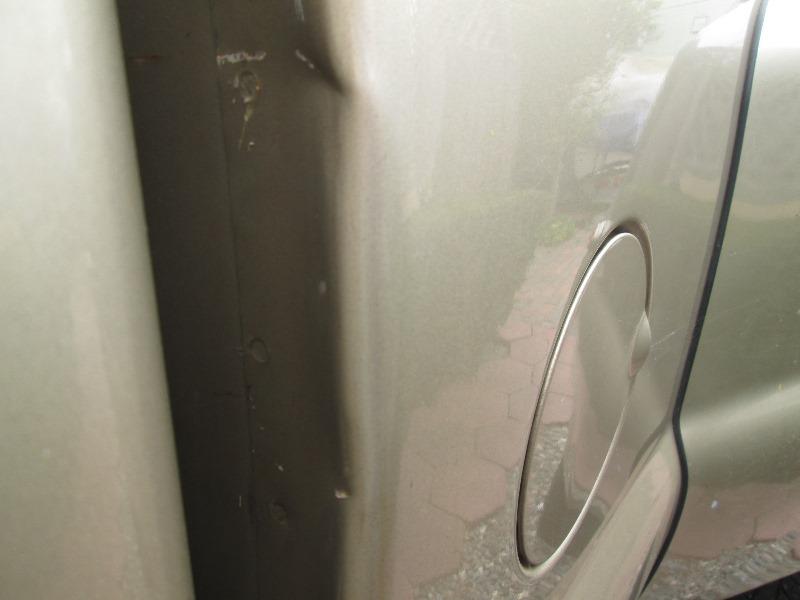
When prepping our truck bed for Herculiner I had removed the happi jack 'ears" to have repowder coated and noticed how much they were bending the bed.
Also the rear Ford bumper that rear 'button' was on flexed so much I had to tighten turn buckles till bumper hit body to have and resemblance of holding camper. So decided to replace.

Our old Happijack tie downs.
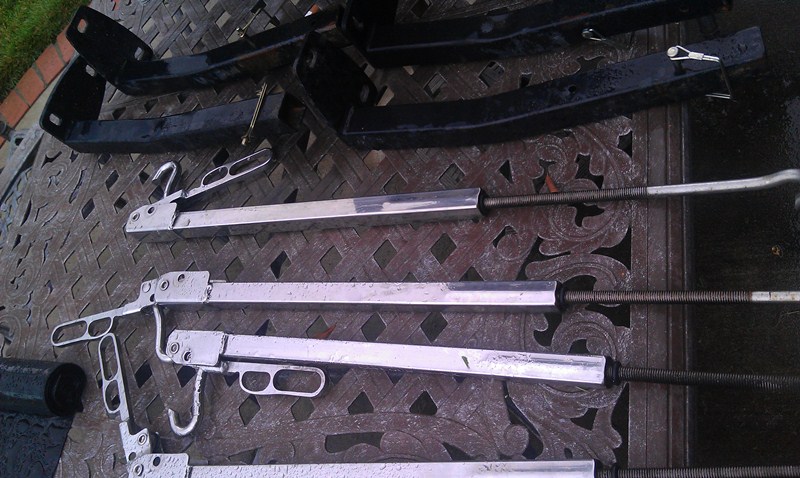
I picked up front and rear Torklift frame mounts and arms. To save some money I went with the Torklift spring loaded cans that bolt to mounts, and the simple chain & turn buckle tie down. They offered the longer tubular 'XL' spring load tie downs similar to my H/Js but setting the tension wasn’t any easier. Worked well. I actually noticed an improvement in the way the truck handled with the frame mounts & turnbuckle setup. The Happi jacks bed mounted ears and the flexing rear bumper buttons just couldn’t hold our very tall & heavy camper. On tight windy one lane back roads you could feel the camper weight shift, the bed flexing. Being tied to frame now just a lot less movement and flex. A lot more solid.
I had thought about using the original Happijack long barrel tie down instead of the chain, turnbuckle & spring loaded cans, mostly for appearance, couple less nuts to tighten. Problem was Id still need to use chain to reach the new frame mounts, and the long barrel tie downs were a pain to set tension so just lived with the T/L turnbuckle tie downs. They are functional and do work well, easy to set tension but takes me 30-45 min to adjust them all till happy and tighten all the nuts. Not a big deal, though fueling, I have to unbolt the one over fuel door to access.
When the Fastguns started appearing on the market I thought they would be really nice, simply loading the camper. Always wished I could spring for the Torklift Fastguns, but I couldn’t justify the cost. Folks that have them just rave-but they are expensive. Every time I was in a supply house I'd be looking at them.
Then one day I logged onto my favorite RV forum. A fella posted he had a set of 4 long reach Torklift Fastguns. For like half price. Whoa...I couldn’t copy his phone number fast enough; the forum has strict rules against post of for sale items etc. and knew the post would be taken as soon as it was seen by moderators. Sure enough as soon as fired off a reply email the post disappeared. I called after playing some phone tag and with a few email exchanges we finally have s set of Fastguns. They are, well, awesome. Dave also sent me a T/L locks he had.
So just pure luck that I happened to log onto forum for the few minutes the for sale add was up. Kind of grateful in retrospect for the forum rules, had it stayed up someone closer to Dave probably would have snagged them.
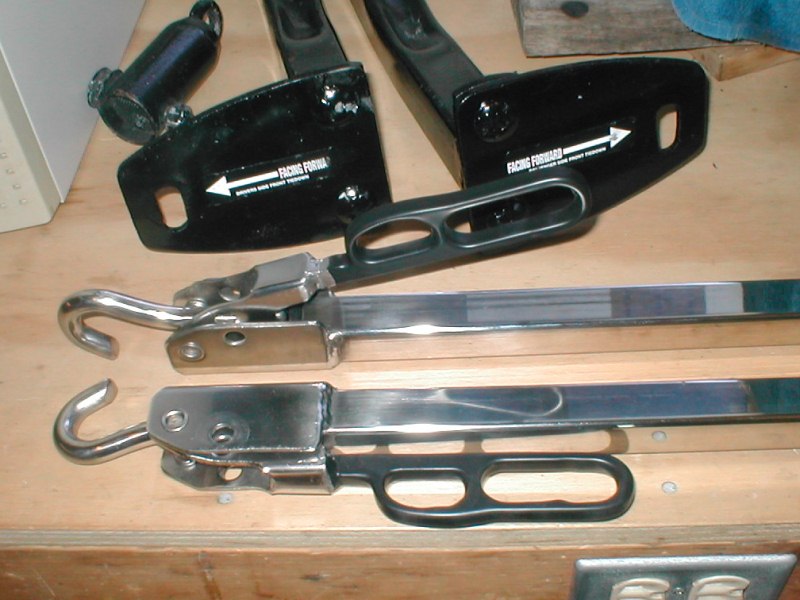
Dave sent me a photo-wow there polished stainless steel! He also has the T/L arms for sale and mounts which are still on his truck.

And here they are in my living room!
I can’t say enough about them. Had I an idea how REALLY easy to use, the appearance, might have done this sometime back. So just my two cents. Ill will add though this has been a progression for us, if buying a new camper tomorrow it would be with this setup. However back when we originally bought our camper I wouldn’t have due to cost. I’ll admit I wasn’t even aware of the different camper mounts back when, also pretty sure the Fastguns weren’t on the market.
The install
-
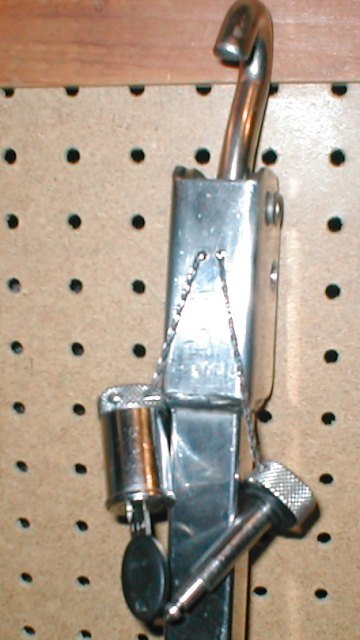
Ok enough meandering. 1st thing I did was remove the T/L stickers and polish up the Fastguns. Nice. I needed to unbolt the Torklift spring load cans from our arms as the Fast guns hook directly to mounts.
Loaded the camper, then I got on line to find how to setup the tension. There is a video on the Torklift site that explains this. Very simple, and once set other than minor readjusting if needed only needs to be done once.
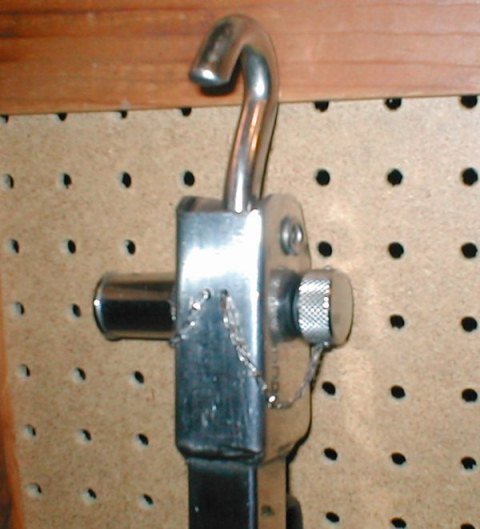
After inserting the Fastguns into camper and mounts, you just close the handle-visually check for a 1/4" gap at indicator (an O-ring on the threaded shaft) to verify tension. Done.
Cool that sounds easy enough
Rears once extended to correct length just slipped into the mounts, hook on camper, click handle shut, verified 1/4" gap, wow. The front though I had to lay the Fastguns parallel to ground to get into mounts. The hole on the front mounts was a half square for the carriage bolt that held original spring cans. The Fast guns couldn’t be inserted straight on like the rears which have a slot instead of square hole. Got them mounted but definitely need to mod square hole to a slot like in back.
Played with the fast guns for a while, no tools just flip the handle done. Way too easy. I like it. Took the TC out for a spin. On top of everything else they just plain looked good (well for a camper tie downs).
A couple of minor mods
-
I took the Fast guns and front tie down arms to shop to modify and make some changes.
- Change front mount holes to slots.
- Grind ends of one pair fastguns for easier insertion
- Clean up machining & sharp edges on the handles
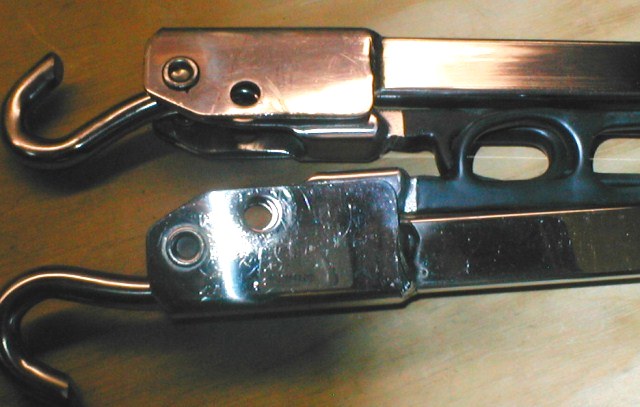
To open hole in the front mounts I drilled a 7/16" hole just below the square hole in the mounts, used a hack saw to cut between holes, cleaned up with a file. Cool now the Fast guns slip into the hole straight on. I puzzled over this for a while why the fronts had a square hole verse rear slot, then it occurred to me, the rear mounts were changed when I added the new Torklift superhitch receiver hitch few years ago. The original mounts for factory hitch won’t work with aftermarket hitch, So I went and looked at the old original rear mounts. Sure enough they also had a square hole. So between '03 & '06 the holes in the arms changed from square to slot. I guess that’s why I hadn’t seen where folks have needed to open holes, arms are newer than mine.
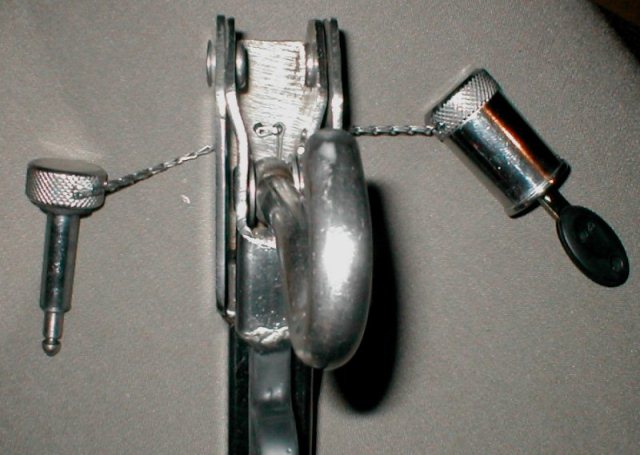
Also one pair of fastguns the lower hook was ground at an angle like the upper hooks shown in above. The pair I set up for rears hook was square cut and though it fit thru slot was tight. So I ground the hooks at an angle making insertion easier and they are all the same. I have no idea why the lower hooks on one pair was different.
The other thing I wanted to address was the Fastgun handles. Shown above after dipping, they were pretty rough. These fastguns are the older style with the 'Winchester' style handle. Newer ones now have a different handle. Machining on mine looked like some kids used a die grinder to smooth, just pretty sharp/uncomfortable. I started cleaning up but painful, Stainless is just hard. Then I decided to dip. Got the worst of the sharp edges and went and picked some Plasti-Dip. Good stuff, gives a rubbery cushion grip. Dipped 3 coats each.
Hint don’t dip other stuff while you’re waiting between coats. Depth of handles barley is more than depth of can. Without thinking I started dipping some other stuff before I realized handles weren’t going to be fully immersed last coat... oops. Lil tipping of the can got them coated. Think they look pretty good.
The Torklift locks
-
Well this was to be simply add a cable attaching both lock halves to the fastguns but turned into something else
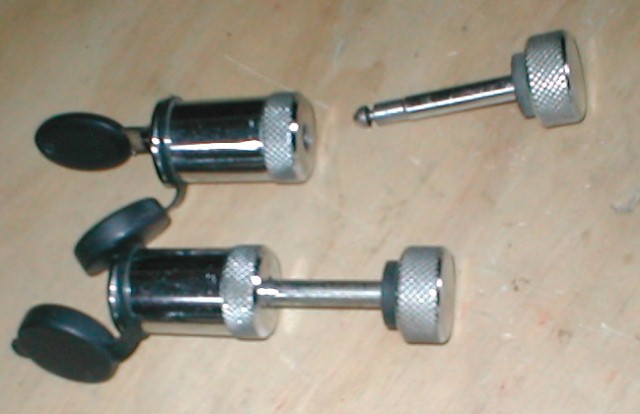
Dave had given me 3 locks (he'd lost one on road). I’ve another on order. I thought it was because the added rubber washer that puts tension on the lock so it doesn’t rattle. They can appear to be locked but not completely engaged and pop apart. I did this several times. So my thought was to drill the lock halves and run a cable between, attached to the fast guns. One, they will 'live' on the fastguns, second if they don’t get fully engaged they won’t get lost. Simple?
Not wanting to drill blindly into lock half I looked to see if could remove tumbler. I noted a small Phillips screw looking inside where the pin inserts. Not knowing if this was how or an adjustment or something I began by screwing in, clockwise. Hmmm went quite a ways before it became snug. Stuck key in to verify it still functions properly, Then I tried another lock, same thing. Ok doesn’t change function, last one I unscrewed. I didn’t get a full turn and tumbler came out...odd.
More odd is the screw disappeared. After looking all over the bench and floor I finally found it, stuck inside the lock housing. I managed to retrieve, as the screw sets in-between the outer locking cams and the disk attached & holding tumbler realized reattaching was going to be a task. Took almost an hour to realign and get screw back into tumbler. Possibly this may be why Dave lost one, not that he didn’t lock but that the screw backed out, tumbler disengaged and it fell off. If you have these- tighten that screw.
Worse than losing, tumbler can fall out and you won’t be able to disengage the lock. Though you might insert another tumbler or use screwdriver to turn cams, you might have to cut off. Of the 3 locks I have, all 3 the screws ware almost ready to fall out.
Well that pretty much consumed all the energy I wanted to spend on these. So for now not cabling. Instead focusing on making them easier to lock.
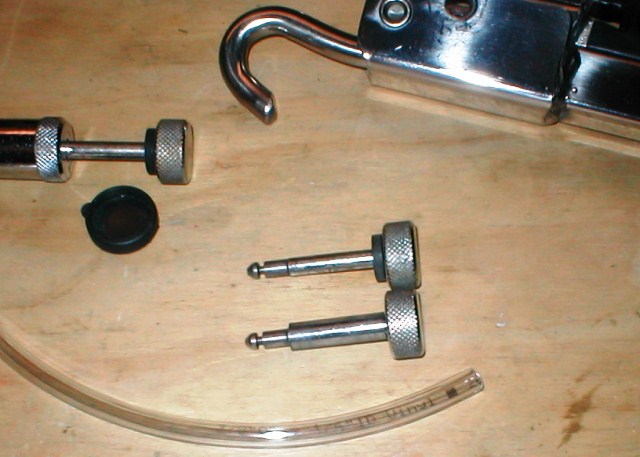
I decided to remove the rubber washer that put locks under tension & slice it in half-I assume it’s an anti-rattle-but takes a bit of effort to compress, difficult to insure they’re engaged.
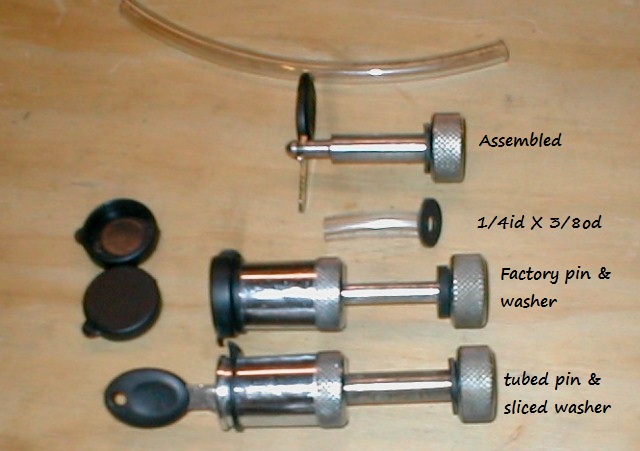
For anti-rattle I’m adding some tubing to the pin, cut rubber washer in half so it doesn’t tension the lock. On the lock half I'll add either a blob of plasti-dip or one of the lil sealing caps on end. This will keep from rattling yet add no interference when locking (or unlocking).
Well hard to see in pic but holes thru body and handles off by a good 1/16 and that’s just on one side, the other sides are off that much but in another direction. So 3/8" tube will not pass thru a 13/32" hole. With the small lock pins not an issue but for my mod I need full clear diameter.
Easy fix, set up on drill press match drill thru with 13/32" bit, then redrilled handle holes with a 7/16" for some added clearance when under tension. Modded locks slide in like butter.
Just what I did to make day to day use easier. Wasn’t to thrilled with the finish on handles but I am really happy with function of these. Will make loading the camper a lot simpler. Just gotta say- Though I had to address the handles overall these things are amazing. Every time I load/unload, stop for fuel, need to disconnect tie downs to level-oh yea I'll be stoked every time.
Update
-
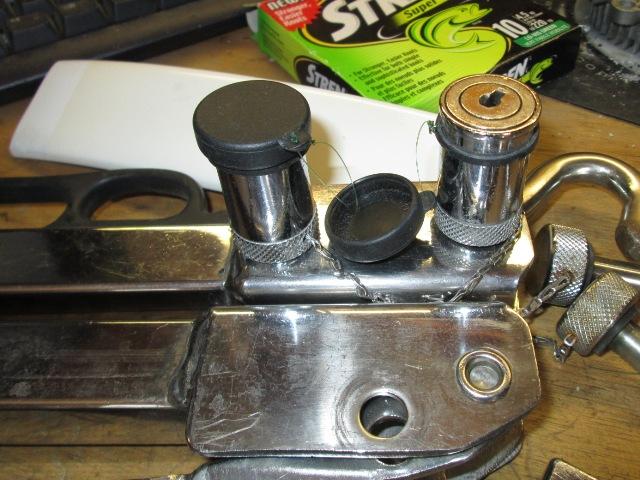
Well I figured out how to attach the fast gun locks to the fast guns. This does a couple of things.
1. They can’t fall off and get lost if not secured correctly. Important cause you can’t just go buy a replacement.
2. And equally as important just convenience. The locks will live on the fastguns. So when locking up the locks are there. When unlocking don’t need to put some place. They will just hang. This will be nice for refueling because I need to unlock & unhook to access tank.
I had thought a lanyard from steel cable would be the easiest. However it became clear making the lanyards would be a pain, I would need to drill & tap both the locks and fast guns to attach. Trying to get away from both I looked at crimp on connectors that I could pass cable thru holes then crimp on cable ends. Picking up cable and ferrules at hardware found some small Stainless chain. Its same diameter as cable and can use the crimp on ends but a lot more flexible. I decided to try it, though I bought some cable just in case doesn’t work.
The chain worked well, made this a lot simpler. Drilled 2 1/8" holes in back of fast gun, passed the chain in and out. Cool, no tap. The locks on the pin side just drilled all the way thru. On the lock side drilled 2 holes at angle so as not to enter bore, bout 3/8" deep to meet. I ended up redrilling because chain wouldn’t feed thru interior corner. Next ones I’ll just drill off the side thru. When I drilled the lock side discovered body is aluminum.
One of 4 done. They will be easy now that I know what to do. On the lock side I squished the last link so couldn’t pull back thru hole then filled with solder. Just way cleaner than the crimp on ferrule ends. On the pin side I did the same, but as its steel the solder plugs hole but isn't fused. I slipped on a small cotter pin on the chain inside, chain was able to slide back & forth and I want the lengths fixed. Nice. Now I can’t lose a lock, don’t need to find a place to set it when refueling (or go chasing when I drop and it rolls under truck, store or look for them when loading up.
Other thoughts using cable to do this is possibly using bicycle cable, either brake or shifter cable with small ball ends. Drilling thru the lock body & pin side handle and back of fast guns. Pass the bicycle cable with pre made end thru. On live end they use to sell ends, smaller than the steel rope type ferrules, which would be fine as there isn’t any load on these.
Well using anothers idea was to add fishing line to lock cover caps, keeping them from getting lost. All mine were broke and I've lost one. Simple-added ties for locks but just never occurred to add keepers for the caps.
Used a large sewing needle-poke a hole, ran the line -tie it off. Worked pretty slick. So slick the one cap I robbed from steps that wasn't broke to replace lost cap I cut its keeper.
Back to Ourelkhorn Camper Modifications page