Alternate power for radio - simple project
Installed an after market radio awhile back. When starting engine if radio on, causes radio to reboot. Typically try to shut radio off before turning off engine. Otherwise when key inserted radio comes on then shuts off and reboots when starting. Even though on our diesel you have to wait to start, usually radio hasn't finished coming (booting) on before truck ready to start.Other than short cycling the radio, bluetooth/phone connection etc, which can't be good, is simply not being able to listen to radio with door open (door chimes), having to have everything else that s on ACC circuit powered has always bugged me.
A common fix for the starting issue is to add a capacitor which holds enough charge to power radio while starting engine. However on our truck if the radio was left on when turning off engine, when key reinserted and turned on radio comes back on. The wait to start time would require an awfully big capacitor. Wouldn't address having to key on or door open chime.
Decided to simply add a bypass switch that connects the always hot memory power wire to the IGN/key on wire. Supplying always hot power to radio when switched on, will keep radio alive when starting if engaged and ability to listen to radio without key. Adding a diode on the ACC wire so when radio manually powered memory wire doesn't backfeed and power whatever else is on the ACC circuit. Clear as mud
But lets me listen to radio regardless of key, or if turning on truck radio comes on hit switch to keep alive while starting.
Few different ways
Adding a capacitor, which I'm not addressing, allows a few seconds of keeping radio alive. It would be in place of the switch I used minus connection to yellow wire. Diode still needed so what power is available (not much) doesn't get drained off by whatever else is on ACC circuit instead of radio.
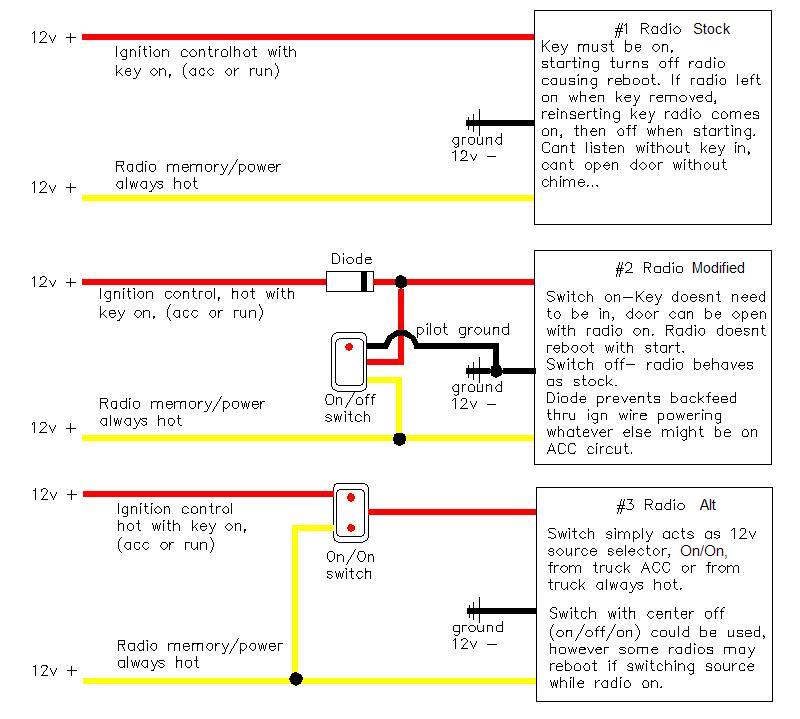
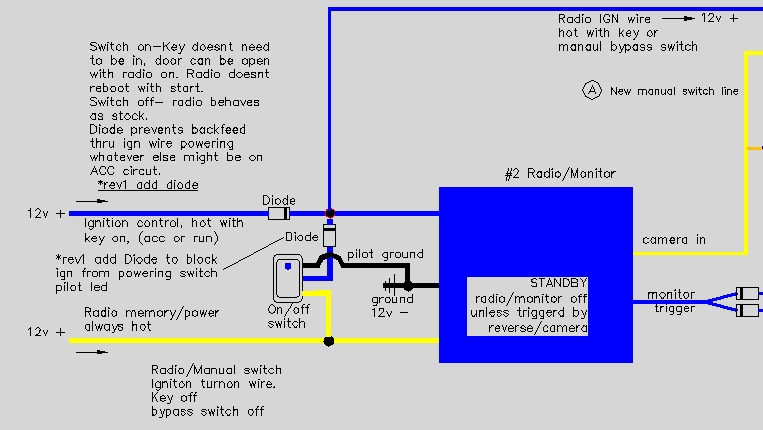
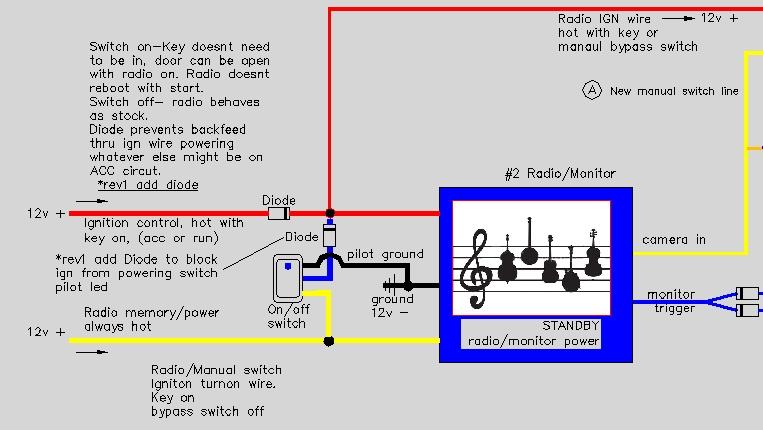
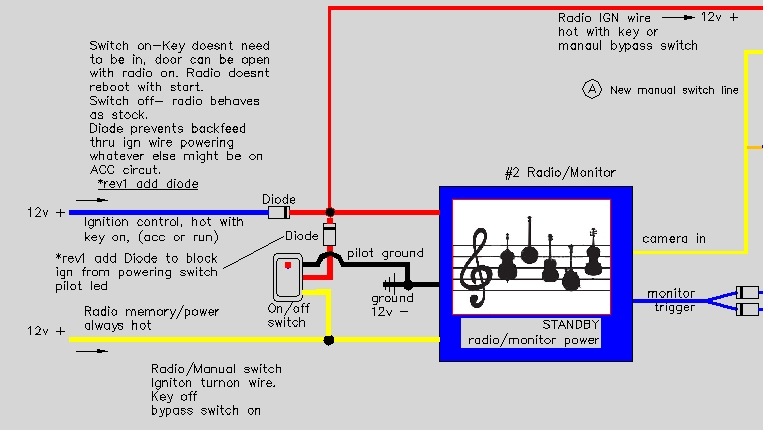
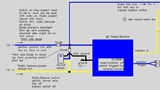
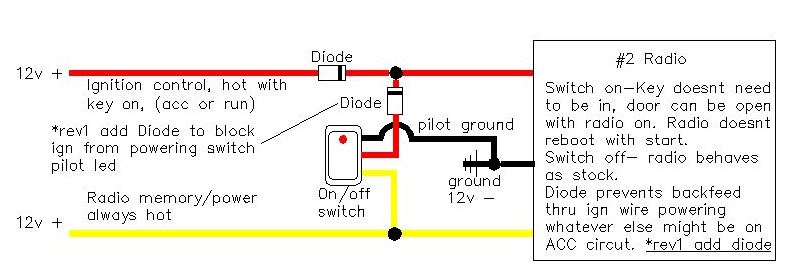
#1 is factory. Two power wires feed radio. 1 (yellow) is always hot, supplies power for memory/standby and main power for radio when turned on. 2nd wire, (red) is from ignition switch and is only hot when key in, on ACC or run. It basically tells radio its ok to come on. When starting car, power on the ignition wire is either turned off while starting or power falls enough to cause radio to shut back off (if it was on.
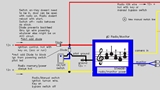
#2 is what I did. Add switch supplying the IGN red wire to radio with power from the main yellow wire. Diode prevents backfeed. It allows radio to stay on while starting (if switch on) or just use without key. Yes,-its possible to forget to turn radio off...p> It retains factory ACC switching but allows supply 12v without key or starting. Switch will have pilot to know what source is. If pilot off source is normal truck ACC. if pilot on in bypass.
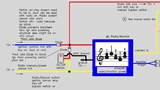
#3 may be simpler to wire, switch selects 12v source (factory or bypass) and isolates them from each other like the diode. I didn't see an easy way to have pilot alert position of switch so would have to rely on visually noting. Second is some radios if switching power may dump. Some are more sensitive than others to the briefest power loss so I wouldn't use an on/off/on, even then radio might dump. On #2, supply on red wire is constant when switching-.
All that said all that left is wiring. Hardest part is finding spot for switch. Mine easy to wire because I have adapter harness between radio and factory plug. Removed and took to shop.
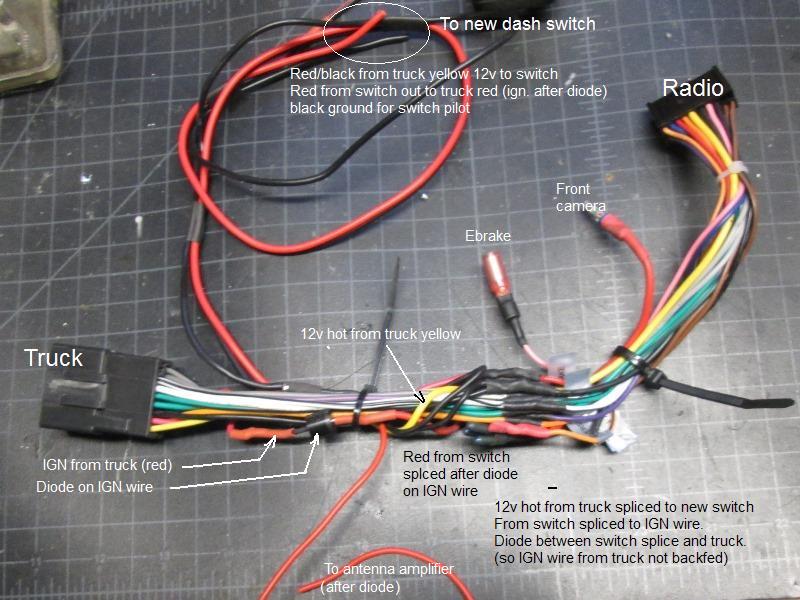
Though doesn't photograph well.
Basically attached 3 wires to harness. Black spliced to black for pilot ground, red/black spliced to Yellow 12v hot wire that will feed switch, and return red from switch that's spliced to red IGN wire. Between the red wire splice on IGN wire and truck plug is diode. I also have an antenna amplifier wire after diode. Tidied up and reinstall in truck connecting radio. Wires I let hang until switch installed.
Tested and works awesome.If radio comes on when truck turned on, hit bypass switch on, starting doesn't dump radio. Bypass off radio dumps as normal. Turn switch on and can turn on radio (and its antenna booster) without inserting key. Also as ACC not on doors don't chime if setting with radio on, doors open.
Should have done this years ago...Yet to mount switch.
Switch installed
Well switch arrived and decided what I had ordered was too large. Looking behind dash to see where I could mount a smaller switch and pilot. Using a small screwdriver to gage width of one place I thought would be good I-dropped it. Good grief not being able to retrieve no help for it, lower dash has to come off. Got the screwdriver but glancing up from floor level noticed my auxiliary amp gage in upper dash is hanging. The case separated exposing the needle... from there it all turned to pooh...
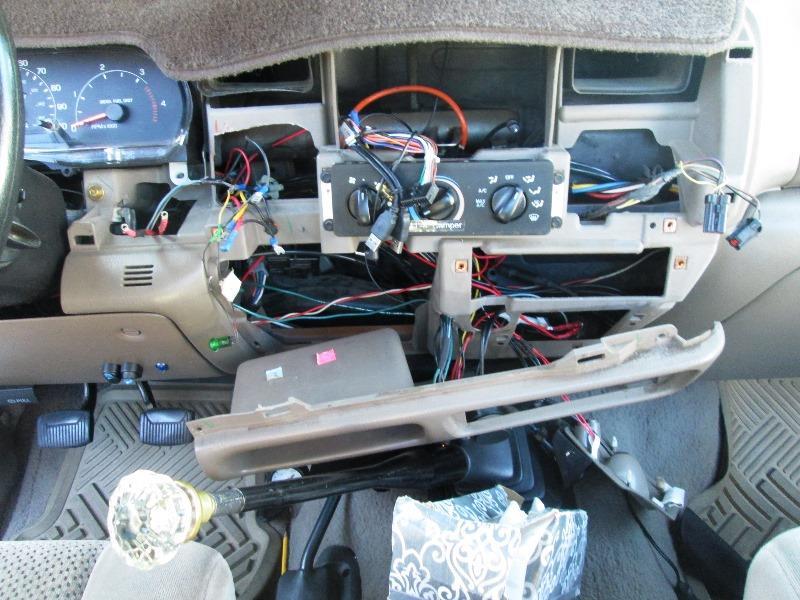
Ended up pulling upper dash to get to the amp gage. Ton of wiring, radio, air lines... just a bear. Took upper dashed took to shop. Fixed the gage. On the one hand discovered before shorting out-on the other not what I had planned for today.
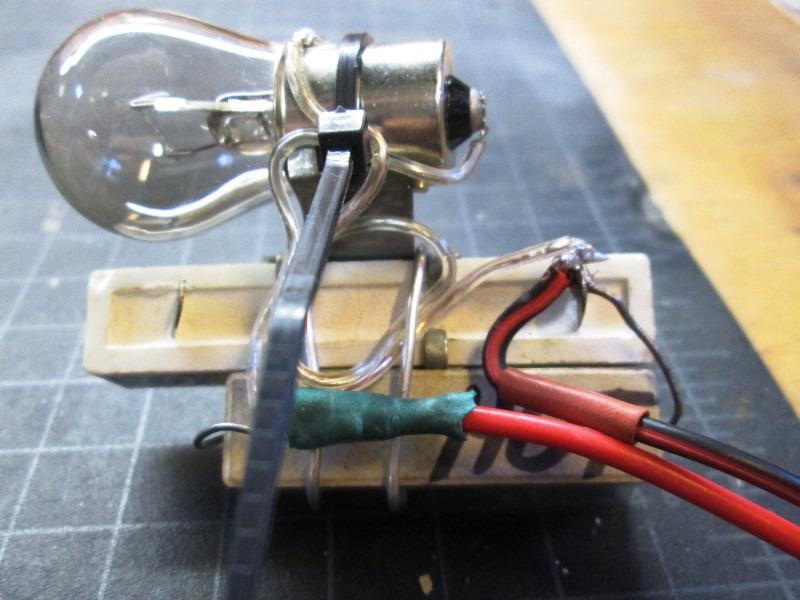
Not wanting to mount camper but need to verify gage still functions so cobbled up a load tester. Old resistors pack from 3 speed switch. Loading with metered power supply to check amps. Using only the small resistor & adding the 1141 bulb gives me 13+ amp draw once it heats up. Sort of a controlled burn as its a direct short, Initial hook up is 15amps, half a second drops to 14 then slowly stabilizes @13.5. So 3 seconds cause its superheating will match typical load in camper which is just under 14amps. With Margaret setting in the truck to watch gage touched the positive lead to camper aux charge line terminal. Counted 3 seconds margaret yells its working. Hit 15 amps then dropped to 14. Success!
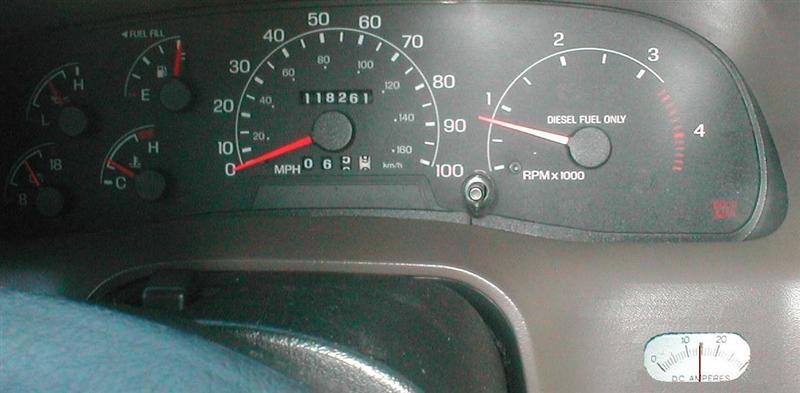
Old picture but amp gage shown-its a panel mount style cut in to dash. This was done years ago to monitor aux charge line to camper
Sidetrack:
Anyway decided since apart and air lines disconnected to swap air lines so that the red needle on the 2 needle psi gage reads right air bag instead of left. Took a bit of thought to change needle and still have right paddle switch control right air bag. Simply cutting new lines from paddle switches to reach opposite side gage ports. So right paddle still controls right air bag and vis/versa but now red needle reads right, black is left. Been using this for years and that always confused, I had to think about it. Don't know why, likely from RCA cable hook up since I was a kid-red is right-yellow video and white or black left channel.This ain't a boat- but fixed-red is right.
So killing all afternoon revisited the switch I had ordered-going to make it fit and be done with this. Since dash apart be easier to install.
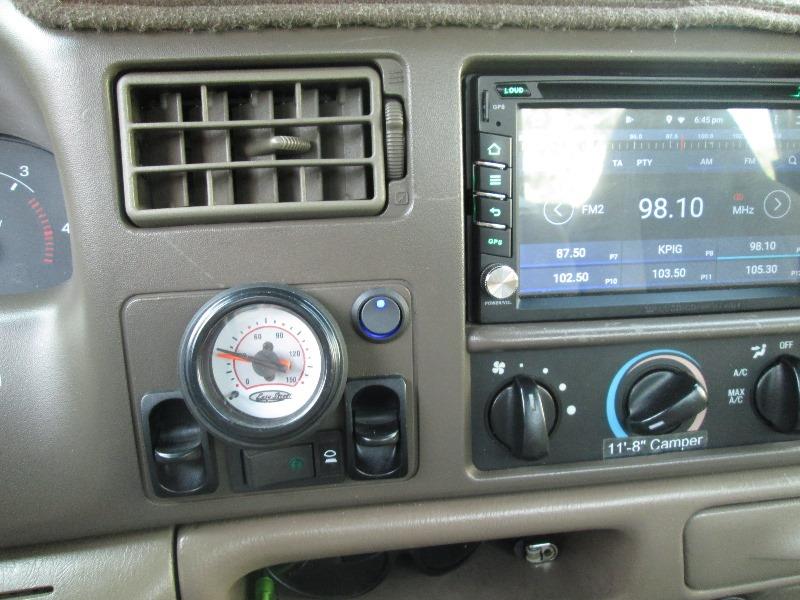
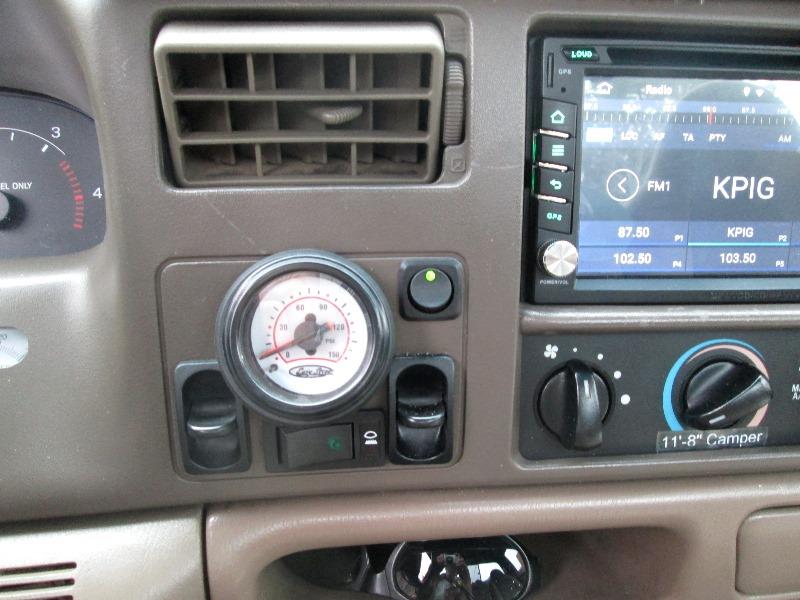
Only free space large enough and visible at eye level & from outside (to ensure not left on) was next to air bag switches. Not ideal and don't really like it but works slick. Looks pretty dorky. I've added a lot of switches but they really are not in line of sight. Envisioned mini push button between radio and vent. But after fiasco with dash decision was install to be done. Did make it easy to drill hole with dash out. Drill 3/16" centering hole, used a 3/4" butterfly bit that has cutting tips which came out pretty clean. After dash reinstalled with radio out easy to reach to wire. Picture is radio on -no key.
Likely though will swap switch for one that has green led to match dash lights. Possibly one with squarer bezel, maybe. That'll be easy through radio hole-my recent 'everything I touch turns to crap' withstanding...I'll wait a while. Done...
Oh right air bag is a little low...
Side note, having manual radio bypass also allows turning on the front camera without key. Not that I can see reason but its there. Just wasn't foreseen but have the option now. Just thinking out loud but it occurred to me powering rear camera might be useful IF I could also include campers camera....Hmmmm. where does this stuff come from?
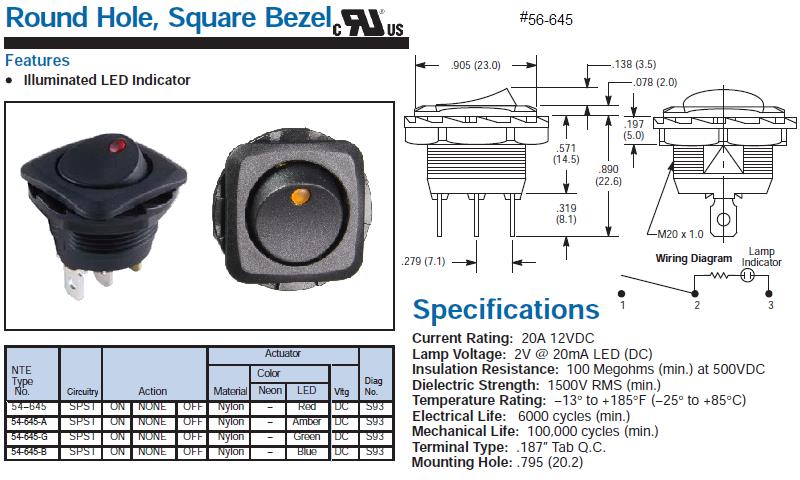
New switch on order: NTE Electronics 54-645-G Round Hole Illuminated Rocker Switch, Square Bezel, SPST on/off, 20A, 12V
New switch arrived. Nice (er). Green to match dash lights, square to fit space better
Tad larger.. Used small file to enlarge hole
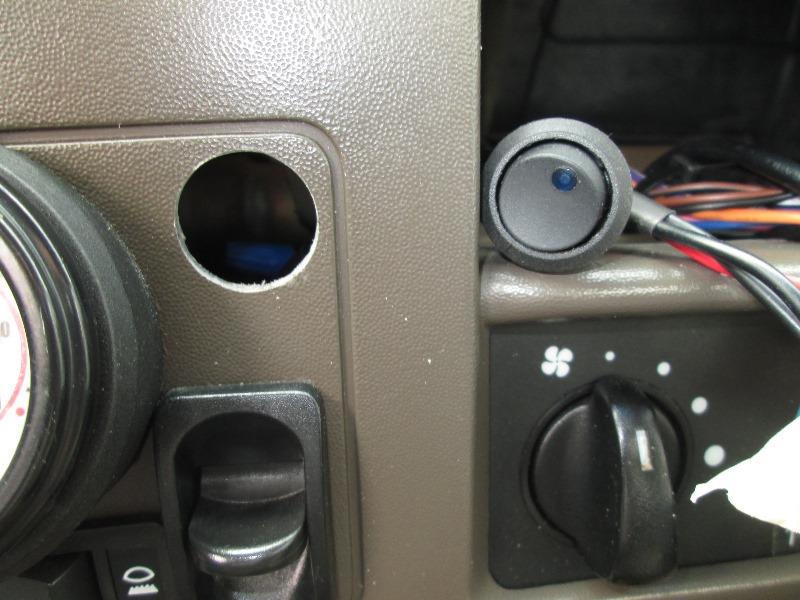
Fortunately I measured before opening up hole. For some reason many are using/recommending a 7/8" hole. Diameter of switch thread is right between 3/4" and 13/16" @ 25/32". A 7/8" hole, switch would be pretty loose. Starting with a 3/4" hole and filing little bit at a time to both sides, checking, leaving top and bottom at 3/4" for the anti rotation flats, worked well. only talking .015 each side for a better fit. Took all of couple minutes.Couldn't connect wires from back so pulled switch, push wires thru nut then attached to switch. Reinstalled the replacement switch.
Cool it works.. radio on no key, turn on either camera, green light- not too bright and it looks better IMO. Then it turned to pooh..
I got to take all apart. Put key in and turn on. Pilot comes on, with switch off. It shouldn't, no other switch i have does-regardless. I had put a diode between new switch and ignition wire so it didn't back feed the ignition wire, but with key power travels back on the ignition wire into switch turning on pilot? Purely function of the way replacement switch is wired, so check if doing something similar.
 Removed the switch pulling wire thru. Cut the ignition wire and add diode to stop ignition feed from reaching switch. I only managed to ground the constant power twice in the process...but enough. No fuse blew, but there is zero power on the constant feed from truck at its plug. Somewhere before it reaches the factory plug and its source is a break. Tested everything twice just could not find reason for power loss. Everything else on circuit works? Understand less why it didn't take out a fuse.
Finally ran another fused hot lead to radio reestablishing memory, my manual feed switching. Everything works. I need to find out why/where the factory memory wire is no longer working.
Kinda took the air out killing constant/memory wire, but overall simple/fun project that though not really justifiable other than listening to radio worth the effort. Did catch broke amp gage. When camper on will be nice to manually turn on camera.
Next is adding switch to activate rear camera now that I can. Run wire to campers umbilical receptacle (7 pin plug) and minor wiring to allow campers camera to come on.