Replace 110 V refrigerator heater element
Turn off breakers, disconnect ALL power, 110v, 12v and Gas to refer (or camper) before replacing element(s).Split into two parts; replacing heater element and showing the Dometic recall fix. As I didn't think to take pics until after I got half way thru this lot of pics are duplicates. Its very simple change out, elements are +/-$50.
The 110 volt and 12 volt heaters (if you have a 3 way fridge) located in the refer flue are similar as far as replacing. The only difference is the wiring. The 110v heater plugs into refer board with no positive or neg, either of the 2 wires can be reattached with no regard to polarity. The 12V heater does have a positive and neg, so if your changing note which board terminal is positive.
This assumes you have already determined your heater element is bad. This page is only to show what's involved. In looking on line I found everything from "its a 10 min job" to "you have to pull refer". So hopefully this gives you idea and yours is this easy. Our 110V element simply broke where the wires are attached to heater. You can easily check continuity with a meter by removing board cover (power is off?!), unplugging the heater wires (2) from board, check the wires going to the element. There should be continuity, if no continutity heater is burnt. Ill include a link to pdf file, you can check the ohms if you have continuity but still think the heater element might be your problem.
link to dometic pdf at Bryant rv for resistance numbers. Generally the 110v heater will show approx 44 ohms +/- 10%, 12v heater will be 0.6 +/-10%.
Bryantrvsupport libary- great resource-other docs if you have a different modle.
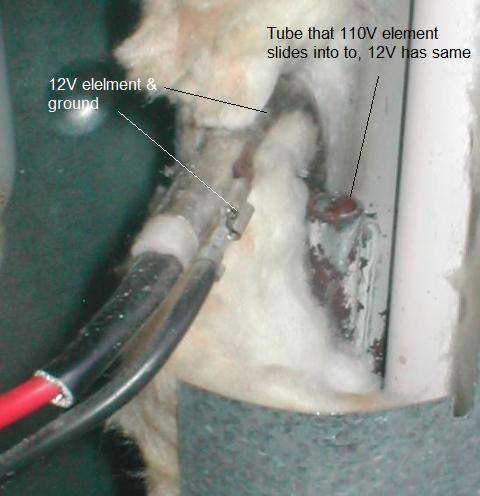
Generally the 110v element wires attachment points to element are encased, ours was a flexible rubber and wire terminals inside broke. (Another story but broke due to installed Dometic refer recall fix, the retro fitted sheet metal flame guard was touching the element wires encasement at element, when external cover was installed it forced the sheet metal against the connection and broke them . The replacement I got is hard plastic encasement so flexing should not be a problem, plus I cut a 1/4" from flue to rotate the elements so they wont touch. I also trimmed the flame guard.) On the 12v heater elements the ground is generally an exposed spade connector and they can and do corrode.
New 110V-235 watt heater element

Close up of 12V element & corrosion prone neg spade, cover removed.
On to the install. Again this isn't a step by step but it is this simple. Yours may be different but hopefully similar.
This is where its located, inside flue.
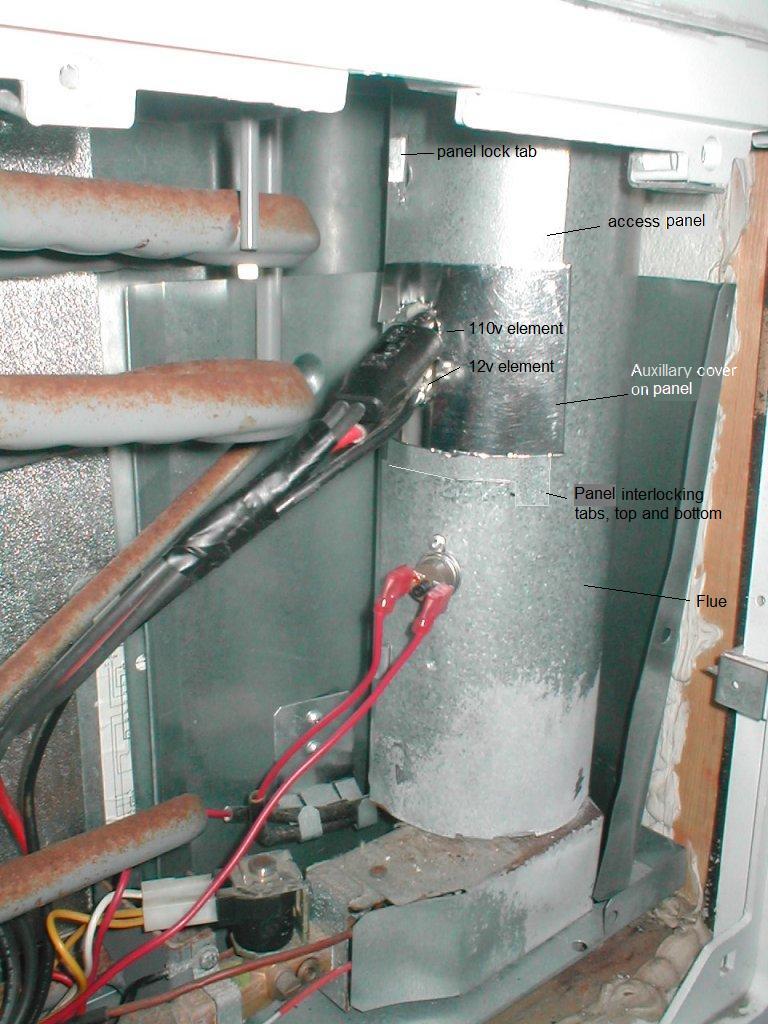
Ours has access panel on flue. Lots of sharp edges!... Bend panel lock tab, pull panel away from tab, slide up panel to untuck bottom interlocking tab then pull down to clear top taps and remove. Panel should be slotted where elements exit flue, mine has secondary panel covering slotted hole.
Once panel removed, by rotating and pushing up on the heater element it should simply slide up and out of tube, see above pics also.
That simple. Slide in new element into tube, reinstall the panel, plug wires into board=done.
This pic shows both elements installed (ours has a 110v & 12v heater elements). It also shows new auxiliary cover I made to cover the exit hole due to I rotated both elements away from shield. Yours may or may not have this secondary cover.
As noted this isn't a step by step but hopefully helps you see what your looking at. I went into this blind.
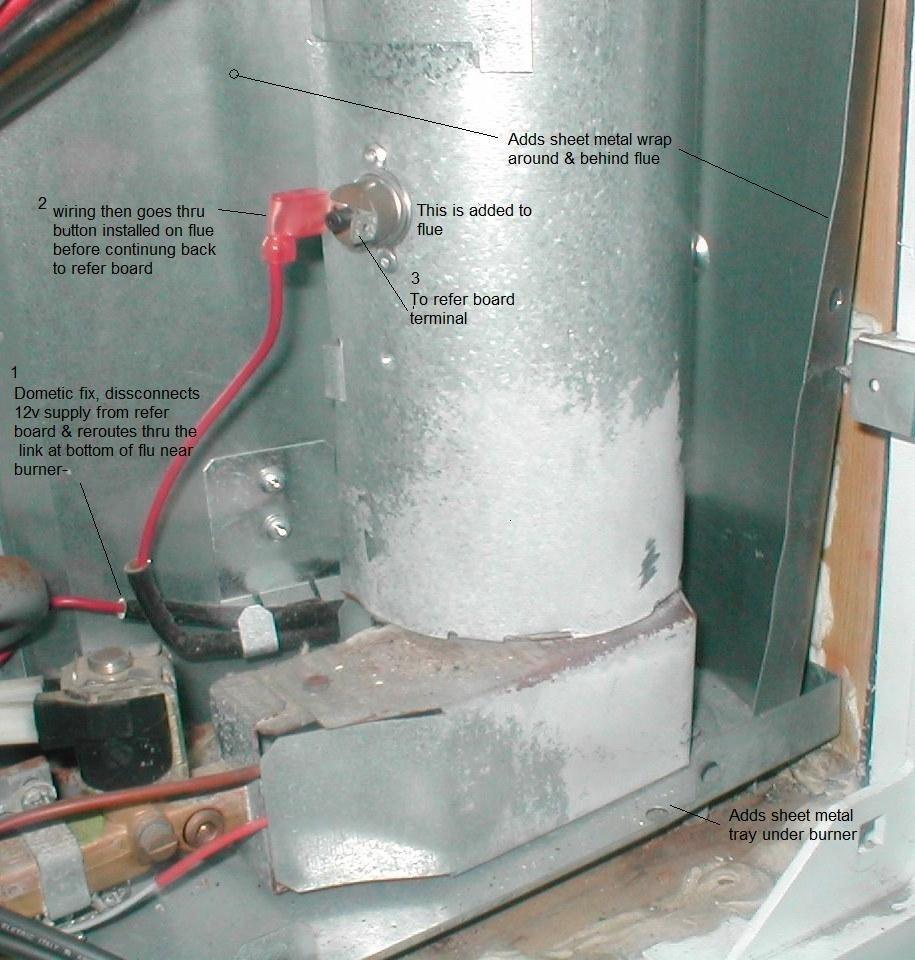
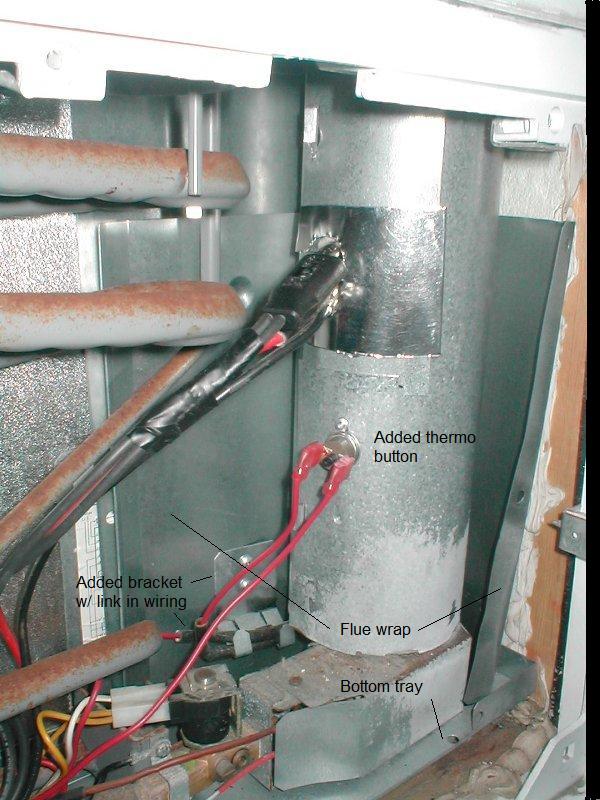
While I'm here I'll show the installed Dometic refer recall fix....Just FYI.
On the Dometic refrigerators certain models may develop a leak in the coolant lines. If this happen while there is flame there could be a fire. The dometic 'fix' is adding sheet metal to contain the fire , rerouting the 12v feed (yes your refer requires 12v to run regardless gas or 110v) and adding 2 devices (heat sensitive i assume) in the 12volt supply to disconnect power which shuts down refer if fire occurs.
Doesn't fix the problem only modifies the result? Maybe this will stop your camper from burning to the ground -unsure. I waited 5 years before finally getting around to having the fix done, but it cant hurt (unless the added sheet metal hits your element wiring). In all fairness ours is a 3way, the installed kit was for a 2 way so maybe there is allowance and 3 way kits don't set against the element. Also note as our 12v supply is controlled by added relays the smallish supply wire used that came with 2way kit only triggers existing relay (Does NOT feed 12V element) so I assume 3 way kit would come with larger wire. Find your serial and model and check Dometic for recall info.

Back to Ourelkhorn Camper Modifications page