Replace camper roof
The repairs begin....
Note: this page is primarily for my own records, adding every few days bits & pics. Began repairs Jan/16/11 finished Feb/16/11 (minus solar) right at 4 weeks. I only had a couple of light showers toward 2nd week-just plain luck. Since this is outside didn't think I could start until end of March
Well after getting some excellent help from insurance company to cover coast of materials & a warm turning in the weather I've started the repairs. A bit risky but forecast is good weather for a while, hopefully I can fix structure and replace at least the EPDM before the rain starts back in. This won’t be a step by step (most I'm figuring as I go and this is more for my own record of this task). I've done some research-installing the EPDM roofing looks straight forward. Most, if not all, of the work will be removing Everything. Removing damaged OSB roof board, all the trim pieces-just getting ready. Once I've removed damaged roof OSB panel I'll inspect/ repair rafters as needed. Then reinstall Everything.
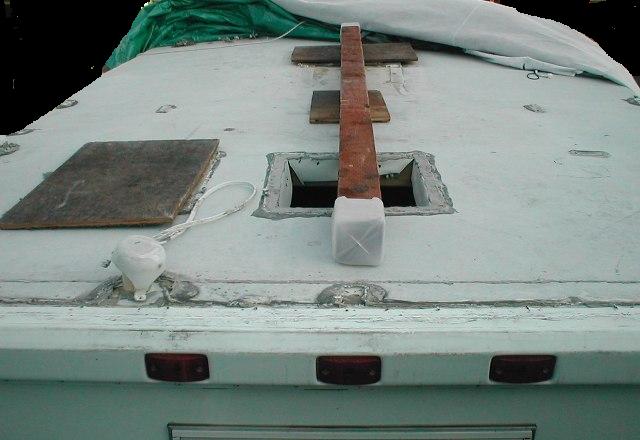
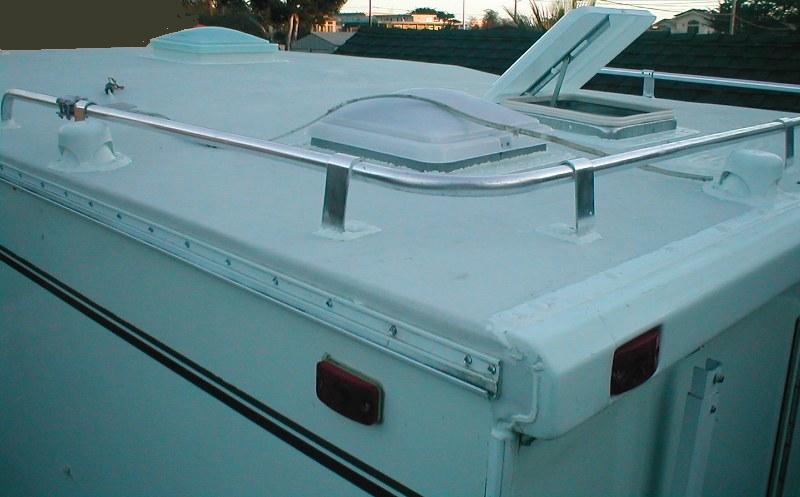
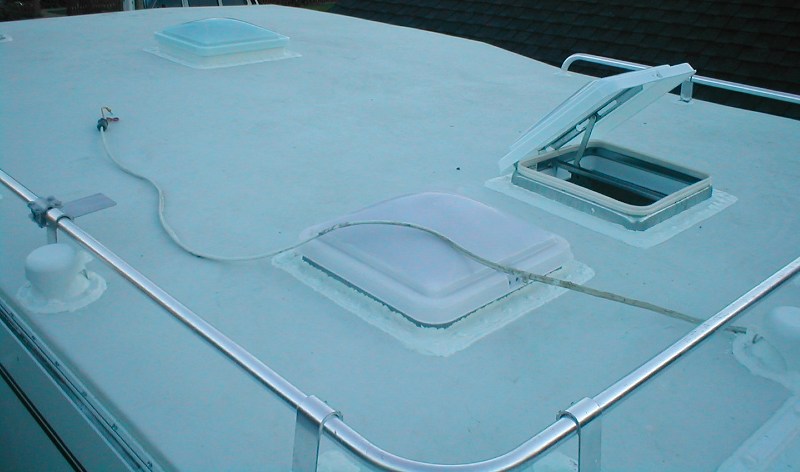
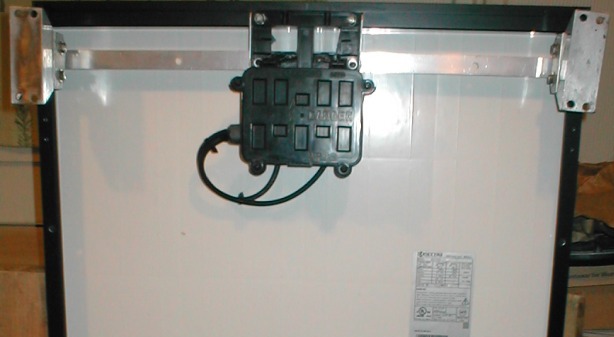
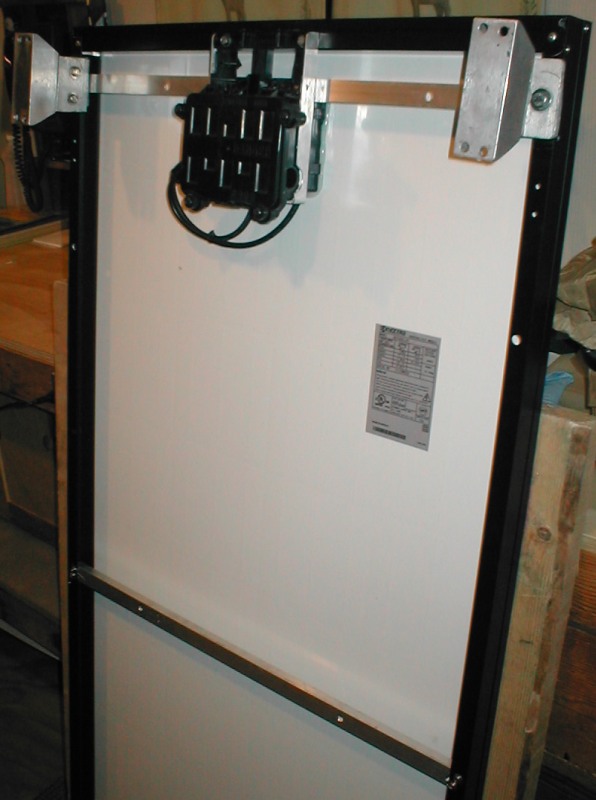
Here I've got most everything off. Rescued the undamaged bath vent, rear safety railing, radio antenna and TV coax connection box to be reinstalled. Ill replace the plumbing vents verses trying to clean putty off. New replacements parts include a Fantastic power vent in lieu of A/C, (1) new 14" std vent to replace damaged vent, replacement TV antenna.. The replacement solar panel will be ordered & installed last, give me some wiggle room in case I over run budget. It could be done later. The 4x4 is for slope, nightly I recover camper with 2 tarps (doubled in case there are any holes, water at this point would be disastrous) and the poly cover.
No pics but I preliminarily started pulling old EPDM roofing-painful its glued pretty good So I stopped. Realized at least where I need to pull OSB plywood, all I need to do is pull off strips allowing me to cut OSB. Because OSB plywood is nailed and glued I'll have to pry off, so I need to cut out sections between rafters to expose edges. This allows me to get pry bar between rafters and OSB. Fortunately I only have a one 32" section that has a rafter in the middle of it requiring this cut. The other piece is 16" transition piece so only has rafters at edges. Also when cutting thru EPDM rubber to pull only saw cut width, bout 4" strips, it pulled really easy. So instead of fighting the rubber when I get ready to pull remainder I'll just cut the whole roof into strips-
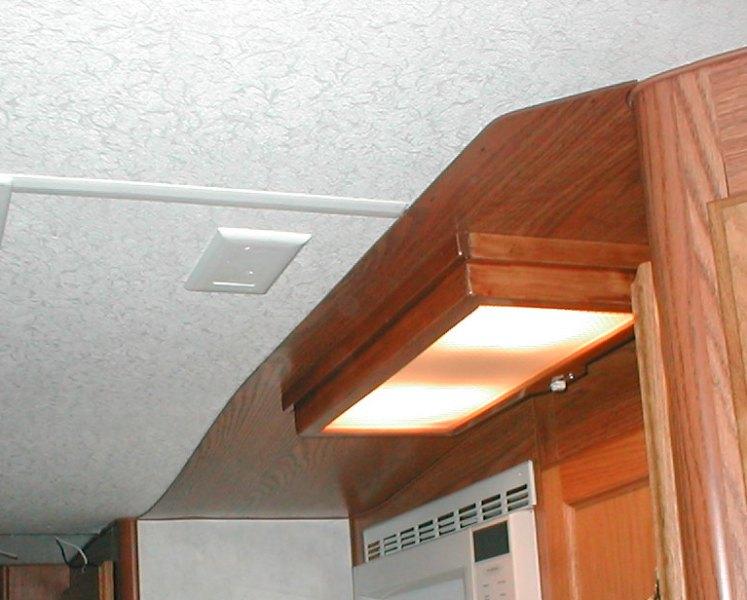
One thing that's a problem is the rear plastic cap. Not due to accident but it had to come off because it was mounted on top of EPDM. It's just disintegrating. It also with roof trim created a dam, water puddles against the joint and the rail mounts. At any rate I really don't want to reinstall it. I'm unsure how Ill warp the roof (like sides) and seal the corners. It's something I need to resolve before I start laying roof,
Cap removed, this is what it looks like & why a problem, EPDM sheet cut flush, structure is exposed under the plastic cap?. The puzzle. the 'lil blocks at end are just stuck on to glue sides on and back the plastic cap. I could remove and install a piece of luan, then full length 2x4, run the roof all the way to wall joint warping the 2x4-still don't know about corners, It'll leave a fold in EPDM?...I could counter bore the 2x4 to accept my current lights or get flush mounts....just thinking out loud. If it weren't for the lights I'd forgo the overhang-not sure what purpose it serves, just run flat, which I could do if I got surface mount lights.
Fixing the structure.
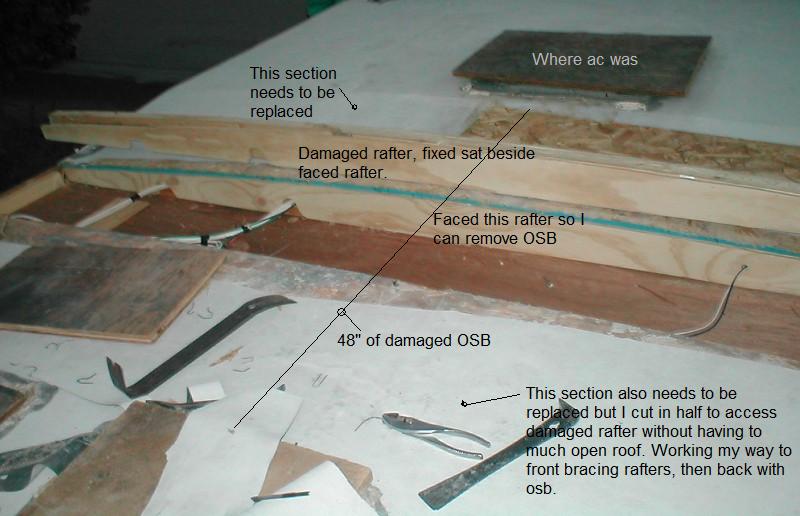
Pic is out of sequence but shows what I'm doing. Basically I have 4' of running roof that crushed OSB deck needs to be replaced. Because of amount of movement I suspect I have a broken rafter. After removing OSB I can visually inspect rafters, add backing where ceiling split etc.. One piece is about 32" spanning 3 rafters, then forward is the 18" transition piece. I first added a brace inside that spans 2 rafters. Then I cut the 32" section in half to expose the middle rafter edge to pry off OSB middle section. Very slow tedious process, using bars, pulling staples separating the stapled/glued OSB without further damage to rafters or ceiling. Basically driving a thin bar to cut glue, digging out staple. Not fun. After removing OSB was able to see suspect damaged rafter. Yup rafter that flexed (where A/C motor rolled onto solar panel) but was limited by closet wall both upper and lower ribs are split, but a clean split. all the other appear fine but have sagged.
So I removed broken rafter completely to fix, which is nice as it will allow me to trace for a pattern that I can use to face other rafters. All of the rafters have sagged and when walking on roof flexes a lot. I'll face all the rafters I expose. Also gives access to next upper rafter which Ill stiffen before removing OSB. So I'm bracing, removing a section of OSB, stiffen rafters, pull next piece stiffen last rafter. I'll only have 32" of open roof at a time. Then work my way back, reglue ceiling to rafter, reinstall new OSB.
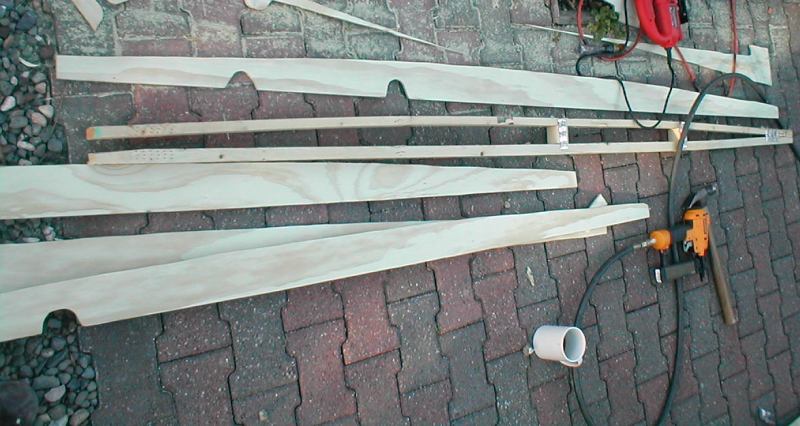
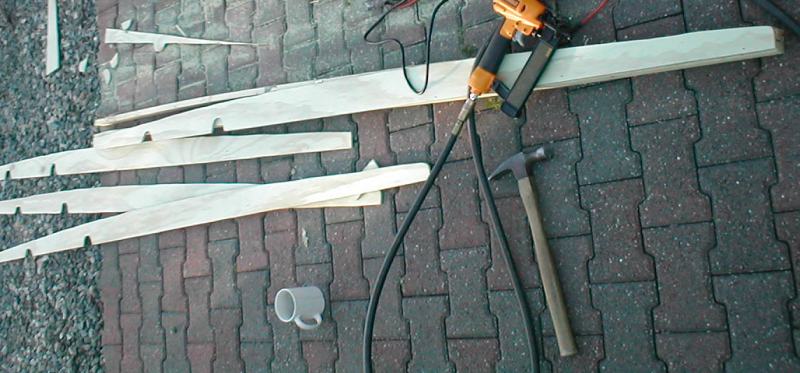
Rafters are full width made of 1x2 ribs. Using removed rafter as pattern traced arc with straight edge down. When reinstalled will correct sag. As bundle of wire passed thru rafter I had to pull a part. Having a pattern, made several plates from 1/4 ply. Faced both sides of removed rafter. I picked up a reconditioned DeWalt 1 1/4" air brad nailer, made this Sooo much easier. 39 bucks saved a lot of time & work. Used it to repair reinforcing the 1x rafters, & install the new faces.
I have to leave one end apart to get wire back in between. The other rafters won't get removed, I'll just re face to correct sag and stiffen.

Transition Piece of OSB removed. From inside camper I forced rafters up to counter any sag, then attach face plate. Ready to glue/nail face plate. After face installed I went back inside removed bracing so ceiling panel could sag, back on top applied glue under rafter, then reinstalled bracing to force ceiling against rafter. You'll note that rafters are set in pairs. (The repaired rafter laying on roof goes in front of rafter in foreground). Tomorrow Ill installed new transition OSB section. Then I'll remove last section of OSB. Face remainder of exposed rafters. I'll need to add some wood blocking between rafter where ceiling sheared.
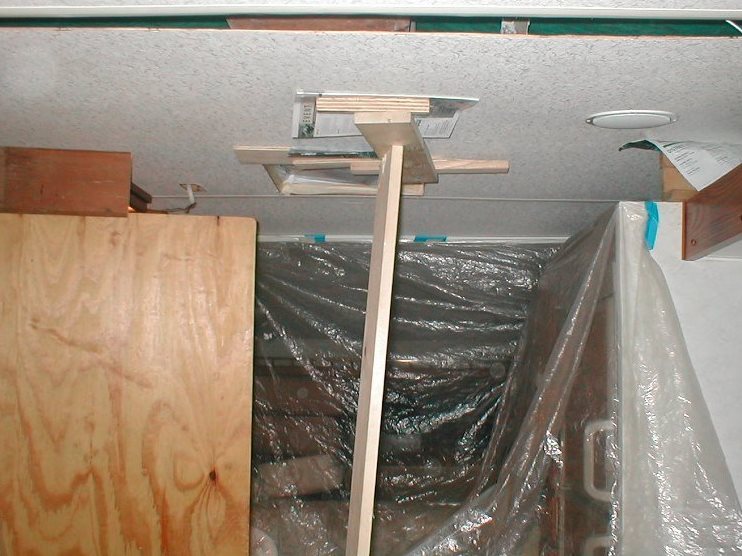
This worked but I need to make some better uniform support for regluing ceiling panel. I have some white headed nails for gun, try in closet to see what it looks like.
Almost done. I had to pull apart the single rafter (unfaced) to recrown. Not sure why but it sat bout 1/2" higher than rafters on either side. I probably just pushed it up too high when adding the temp inside bracing
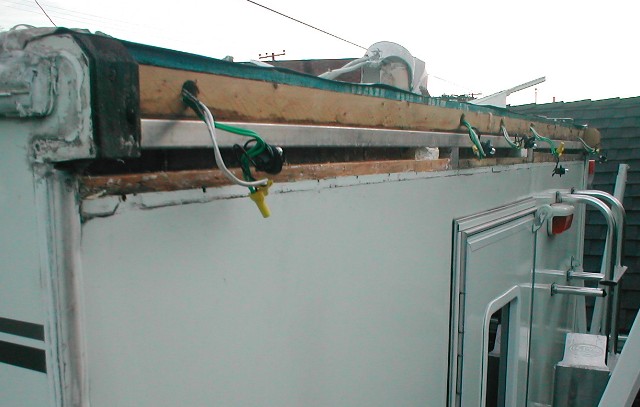
I spent almost an hour debating if I should continue removing the roof to rear of camper. I really wanted to expose the last 2 rafters to reinforce, only about 24". But since I'm working against the rain clock decided not to. That and with both rear vents in it, the extra framing would have made removal painful and another 2 days. AS it was I finished this the night before rains started back up,
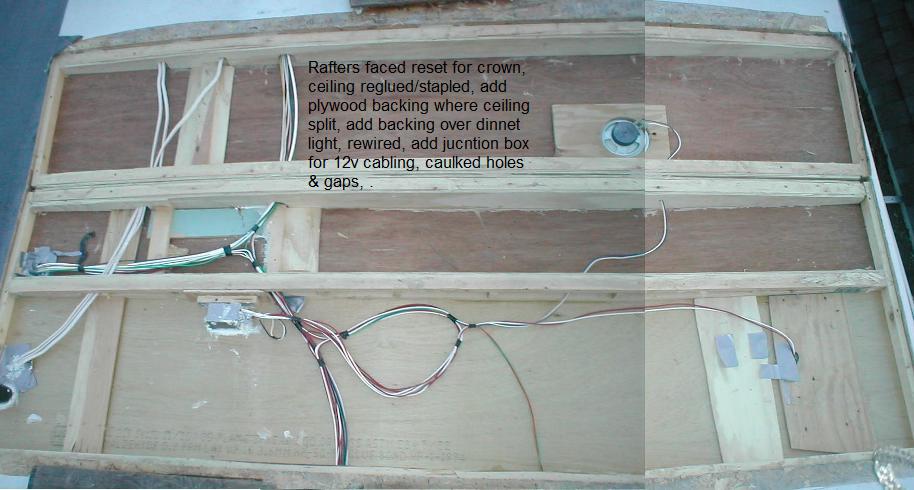
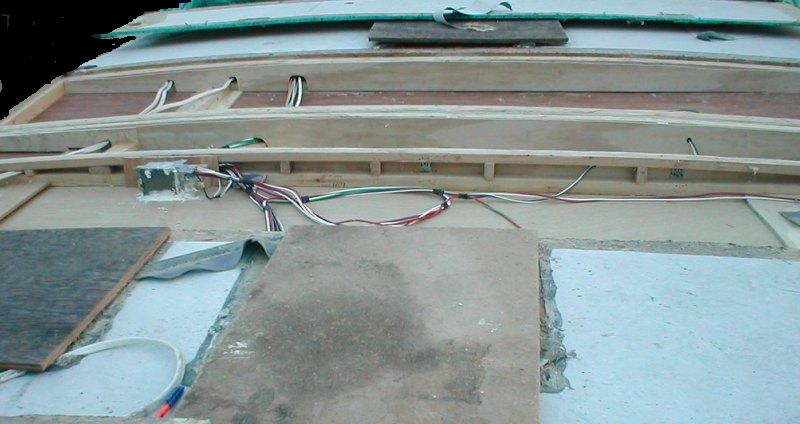
Merged 2 pictures, trying to get it all. Took 3 days to get this far. Mostly separating the glued & stapled OSB from rafters, then cleaning up old glue-just slow. But we got it. Ceiling is up and solid, was a lot simpler than I expected to get ceiling back up, plastic trim reinserted. All rafters fixed. Ill add a face to the one I had to take apart then reinstall the insulation and new OSB. Where the solar panel gets mounted Ill add some 3/8 or 1/2 plywood backing to the OSB. I may glue in some 1x2 blocking, the speaker sags a bit and couple to the large wide span cause the ceiling sags a bit.
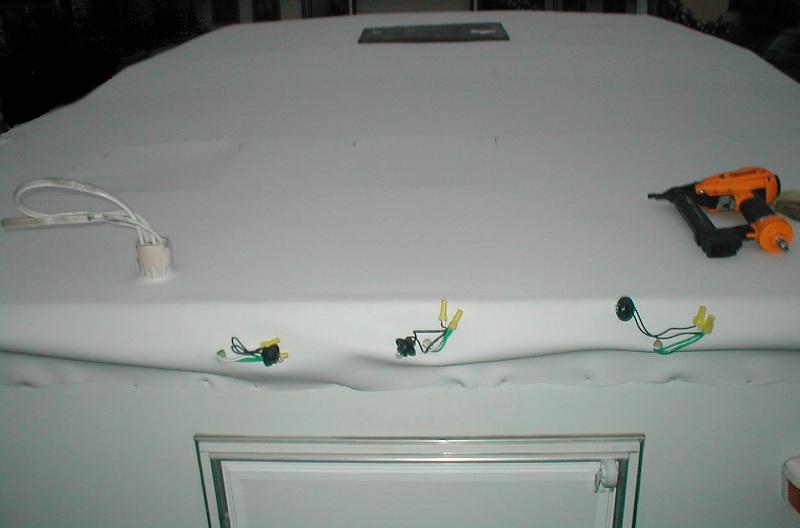
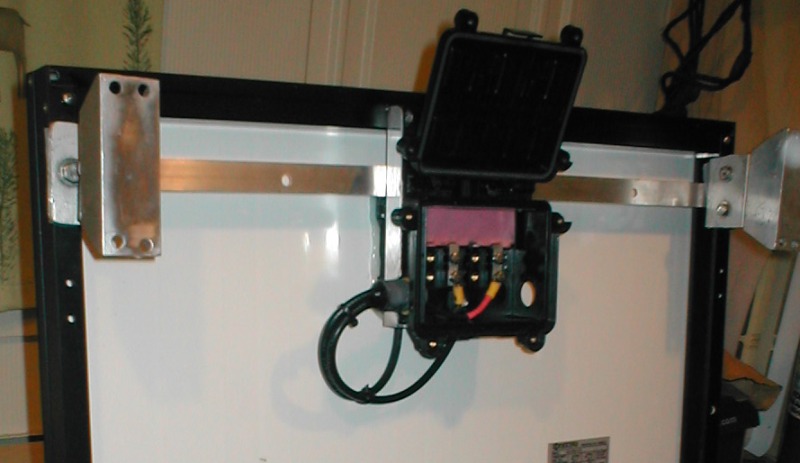
There was a large bundle of 12v +&- wires terminating with crimped wire nuts? that was laying in the roof, I ran to an added junction box in closet ceiling. I may have pulled it loose when removing insulation. There is a hole in the rear vent frame, maybe if you wanted a power vent. From new junction box I'll run wire back to rear vent (ya never know) and one to the A/C hole. We're replacing A/C with power vent & there isn't 12v in A/C hole.
Added as noted in pic plywood backing for the ceiling reattachment where it was split, over dinette light.
I ran a new 12v line to closet and installed an old light fixture at the front of closet. Mostly to hide the shear crack in ceiling but it was hard to see in the closet. Later I'll build another box to match the other ceiling box lights.
Few days later....
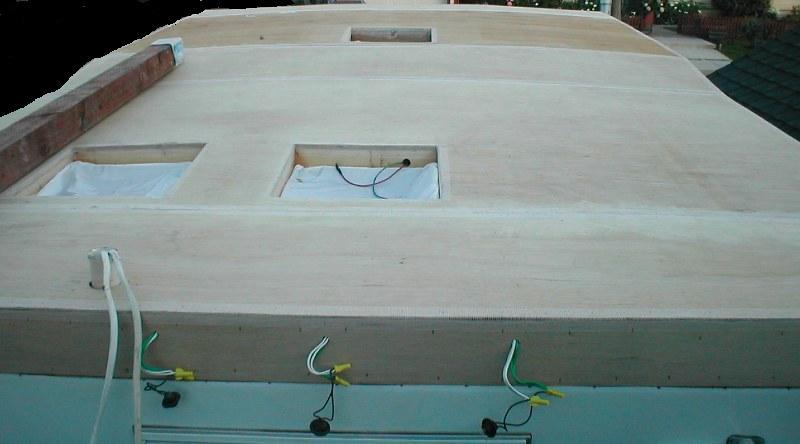
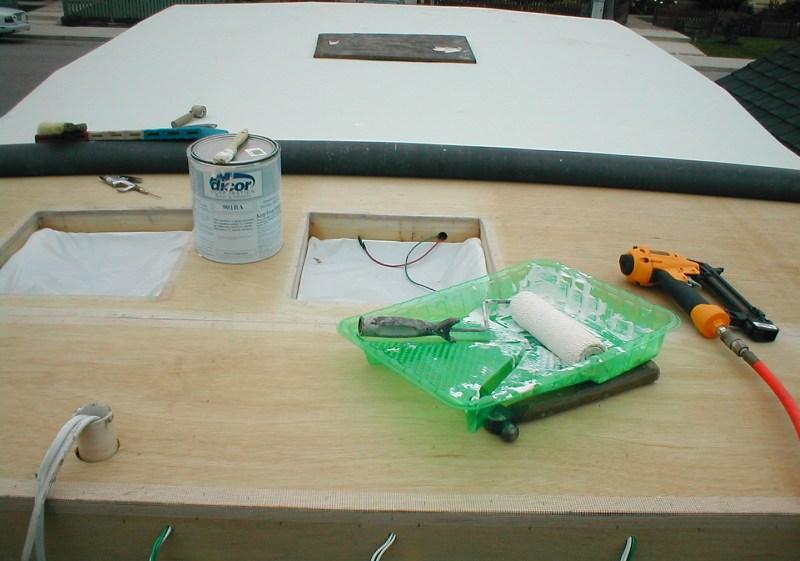
well I said this wasn't a step by step. Got all the new OSB deck glued and stapled down. Then I started the luan resurfacing. The glue used in applying the EPDM requires new wood. So after pulling the remainder of the old EPDM roof, covered entire roof with 1/8" Luan.. For this I bought another tool. The brad nailer really wouldn't hold the 1/8 plywood so bought another reconditioned DeWalt , its a 1/4" crown stapler. I've never used staplers before, just makes life simpler.
Using Liquid nails adhesive and the crown stapler got all the luan installed. Used a belt sander to even all seams, round all edges around perimeter and vent holes. Used self-adhesive web tape to cover seams and wrap all corners & edges. This gives a bit of protection for the EPDM, especially along seams that may move.
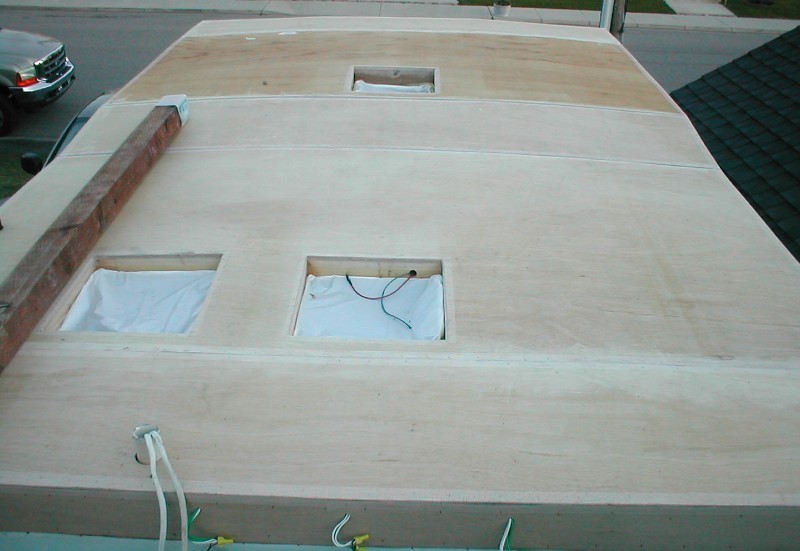
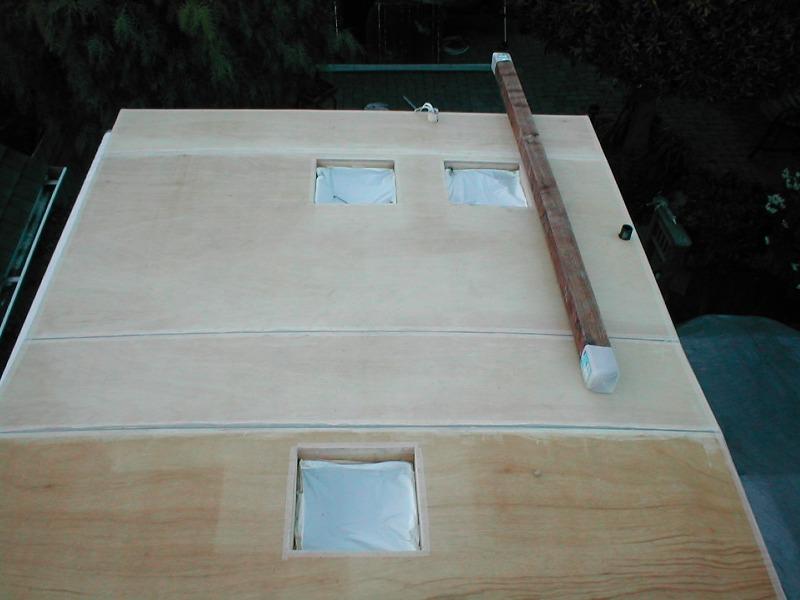
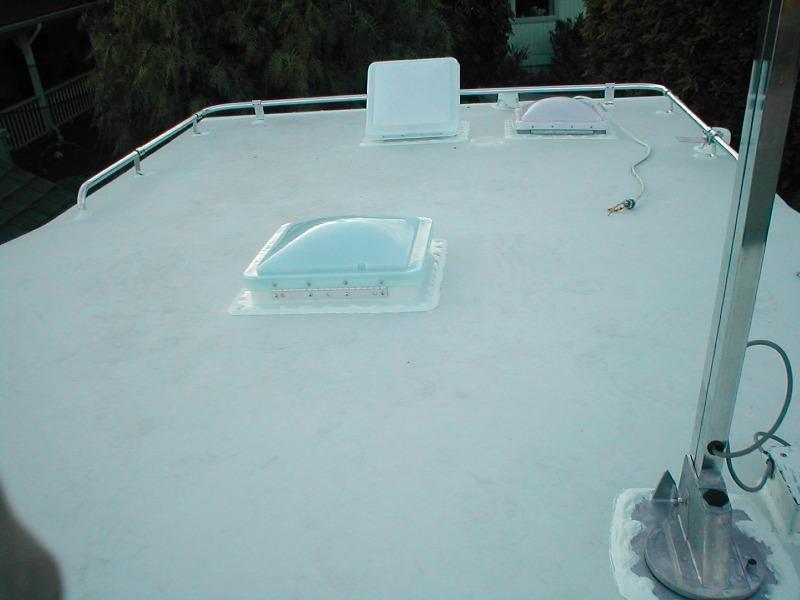
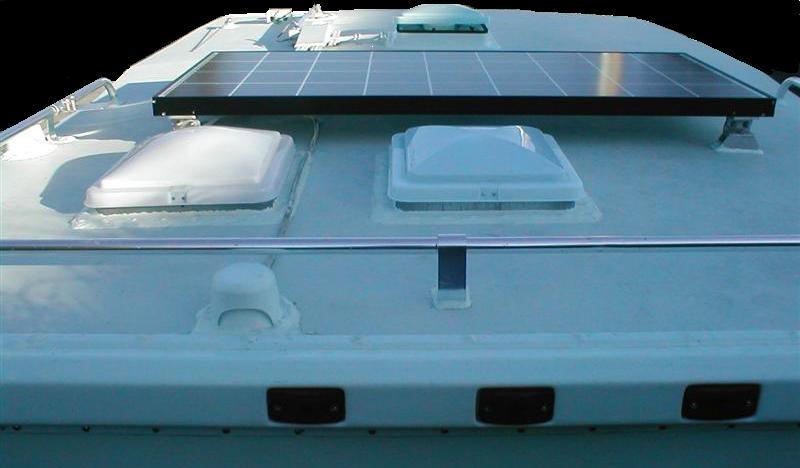
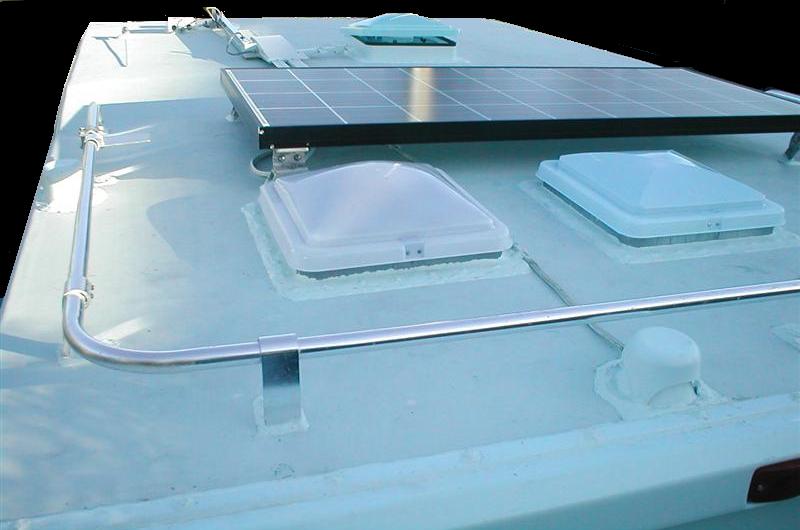
A bird's eye view.
and a view looking back. Tomorrow, Saturday, Ill lay the EPDM roofing. Took me 2 weeks with the repairs and prep. WE got a break in the weather but were right to the wire. Rain is in the forecast for Sunday, so Ill lay the roof hopefully with no hiccups just to get camper covered. I still have yet to clean up all the trim and get some screws for it. I won't cut any of the vent 'holes until I've the parts to install (on order). I needed 16 1/2' of EPDM which I picked up locally and a gallon of glue. I ended up with almost 18' (end of roll) which will work great as will allow me to just leave the back hang. I want to actually run the roofing behind the rear plastic cap. Take a bit of creativity and I won't have to try to do it tomorrow.
Installing the roof..
Here I'm bout 1/2 way done. I started at the nose. Contrary to procedure outlined by most I followed the advice of local RV store. Rolled the EPDM in a tight a roll as I could, lay glue across a 2' foot, roll roofing into glue, sweep with broom actually a wall paper broom, lay another 2'; of glue, unroll & sweep etc.- This method work well, went pretty quick, had no issues with wrinkles/bubbles. I also stapled edges as I went along so I didn't have to get on fresh roof.
The hardest part was starting. As the nose is almost 4' and relatively steep, I unrolled 4', so roll sat on flat of roof and material reached lead edge. I folded the front (booked) 2' back toward top, glued the roof then flipped back the EPDM. Then carefully rolled roll of EPDM back onto front glued section, set blocks under roll, while I glued the next section. But 1st,. To insure , I that I didn't pull the EPDM sheet and to keep lead edge tight I temporally reinstalled the front roof to filon trim. Then went back to roof, gluing and laying in 2' sections as mentioned
You'll note I started using a tray for the glue but quickly stopped, the glue started skinning in the tray and ended up a mess. I then went to carefully poring directly from can too roof. I also had air nozzle handy and was continuously was cleaning as I went, every 'lil grain of sand shows....
Finished laying the roof. As it went so quickly I wrapped the rear, tucking and folding at corners. This is to stop water intrusion at the rear cap. Loosely wrapped the rear, overlapping the filon wall. This will be covered by the leak prone plastic cap. If water gets past the plastic cap or under its trim piece, the water won't go into structure and should continue down wall. Used Dicor caulk at wire holes.
I no more than put tools away and it started to rain....
2 days later..
spent cleaning all roof trimStarted reinstalling all the trim. I had planned on lowering the rain gutter to cover old caulk line. But when I stapled roof I placed staples too high. Oh well made a lot of extra work, removing old caulk will not be fun but later. Reinstalling the side trim, applied the butyl tape to labeled pieces ( I had marked where they went with magic marker when removed). Used 1/4" hex bit in drill to set screws then used a hand drive to uniformly tighten. Next day I used spray bottle of water & a wooden clay tool to trim putty that oozed out. Ill reinstall the final insert trim later, also all caulking will be last. Ill either clean or get new trim as its pretty ugly, I tried paint thinner and it cleaned up pretty good but the trim is cheap...later.
I did learn something, I've worked quite a bit with putty tape, and it's easy to use. The stuff I picked up is extremely sticky, gooey, stretchy and just a pain. I was going to order from another source and discovered there are 2 kinds of putty tape-the stuff I'm used to which is oil based, you're not supposed to use with rubber roofs and 'butyl' tape which your supposed to use with rubber roofs. EPDM doesn't like ANY petroleum products. I didn't know that, I accidentally got the right stuff, a pain to work with but required. (However I'm almost positive what I removed wasn't butyl as it was very easy to remove old putty tape?)
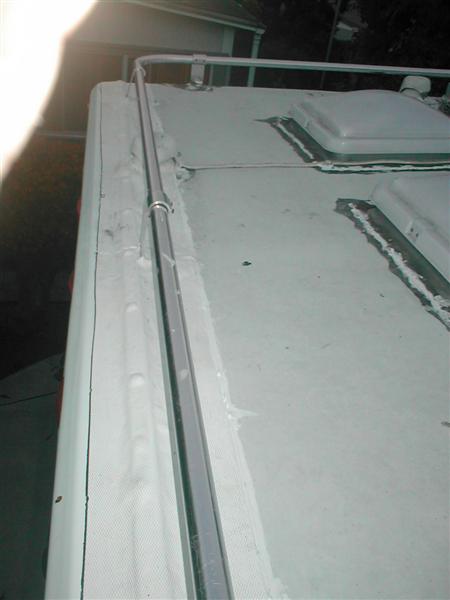
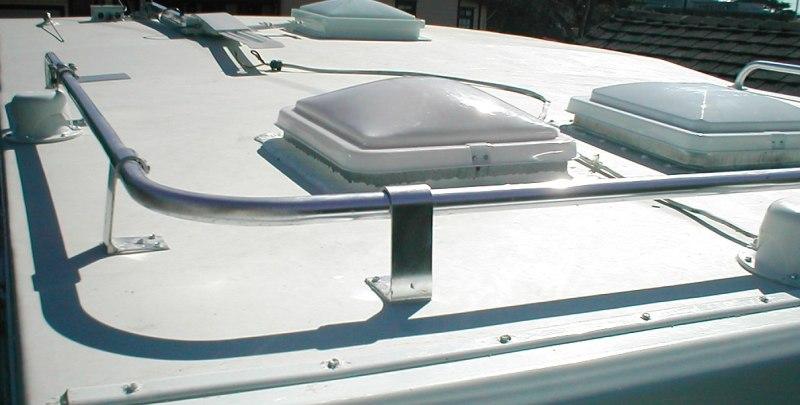
(Pic is later, after rail & plumbing cap install below). I reinstalled the rear valance cap stapling it sparingly back in place, butyl taped the top trim piece. I cut about 3/4" off the top flange that overlapped the roof so that roof trim will mount further toward edge and not be under plumbing cap (like it was). Dicor caulked the ends to wrapped roof. Bottom edge of cap was previously sealed with putty and awning rail. As I now have a sandwich, EPDM, plastic roof cap and the awning rail as trim, it's a bit different. I didn't use any tape between the cap and EPDM as I want this free so hopefully any moisture can get out. However I am going to use regular oil putty tape, cut to about 3/4 its width between the top edge of awning rail and plastic cap to seal screws (that Ill also caulk). There is a 1/4" gap between plumbing vent and roof trim rail, with the modified roof rail (mentioned below) water can drain off the roof . The pic on right is how it was, water got trapped against the roof trim and between the hand rail mounts and plumbing cap, water was always standing.
Reinstalled the bathroom vent and replacement vent using butyl tape. Next day trimmed all the butyl tape on vents, Dicor caulked the bath vent. I caulked around the perimeter and the screws, looked good but realized I created a dam and water would stand so completely covered flange. Decided as its time consuming messy to wait and do all final Dicor caulking after everything is reinstalled.
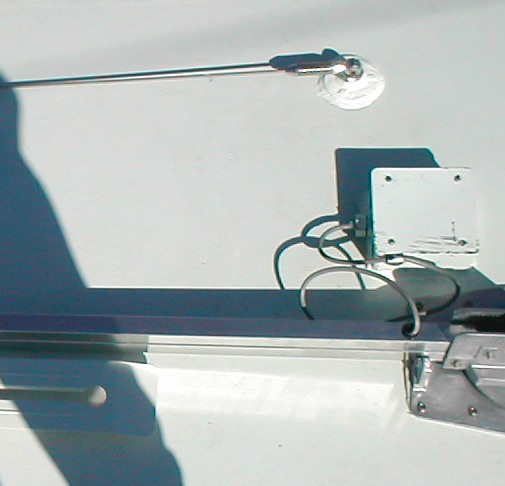
Reinstalled the radio antennae and TV coax connection box. (pic is later after antennas installed) Just for the heck of it I put a continuity tester on TV antenna lead-before reinstalling the connection box and radio antenna. GOOD GRIEF there's a dead short in antenna lead. I tried to pull coax out but only about a foot would pull out, but I can see where the inner core had cut thru sheath. Apparently its routed thru rafter and cut when antenna was scraped off roof. Unfortunately I can't use old coax to pull new one., I cut it off and then pulled inside as much as I could then cut off. Radio antenna hole is over an inside cabinet and in line with TV antenna hole, so drilled thru radio ant hole to inside of cabinet., I was able to run a piece of bailing wire from antenna mount hole to radio hole and then down inside of cabinet, tied a piece of nylon cord to bailing wire and pulled back thru TV antenna hole, then tied new piece of coax and was able to pull to TV hole in roof. Ran short distance inside cabinet to where to where coax originally came out and then down to ant power panel.
WOW-I just can't believe this- If I had reinstalled the radio ant and TV connection box-covering access, hook up my new TV antenna to find it didn't work-then what...If I hadn't of checked not sure what would have been involved to fix later, have to pull antenna, almost a disaster. Took most of the day but got radio antenna and box installed.
waiting on ordered part, power vent replacement TV antenna on order. Hopefully they arrive before the rain starts again.
PARTS have arrived!
Received TV antenna, power vent, plumbing caps. After modifying & fixing my roof rail and I can finish the roof!
.
Installing the new Fan-Tastic vent in place of the A/C, tapped the kitchen for 12v power. Nice fan it's a 4000r w/white lid. Has 3 speeds and is reversible.

I'm a bit concerned about the plastic mount flange.
The screws are quite far apart, as it came with extra screws I drilled and counter sunk additional mount screws between existing holes, also I'm using butyl tape to install, not the included foam gasket. The fan has a switch that requires lid to be opened for fan motor to work. Well that's fine but one of the things this fan will be doing is circulating heated air down during the winter. So I also added a bypass switch. I'll be using sparingly and only on slowest speed but it allows use with lid closed or if plunger switch fails, it's like an e-brake switch. (I do not recommend anyone doing switch mod-extended use with lid closed not good). I realized after I had it back together I might have tied bypass switch so it would only function on low speed-maybe.
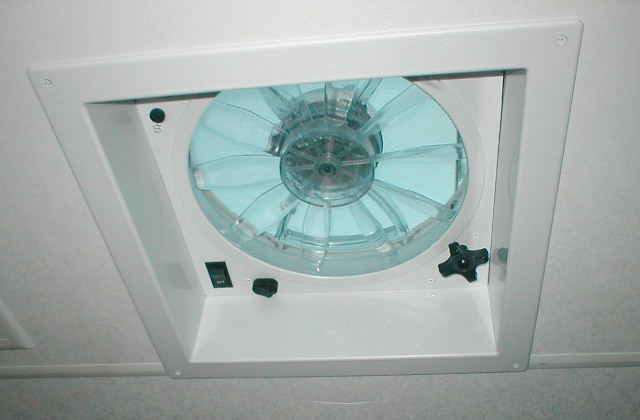
Amazing fan, played with it, opening/ closing windows to control air flow, wow. Standing next to a window with fan in exhaust mode feels like a fan blowing on you. As we rarely used A/C this will see some usage. Big plus is the additional light in the kitchen area. We may later get a free standing or thru wall A/C.
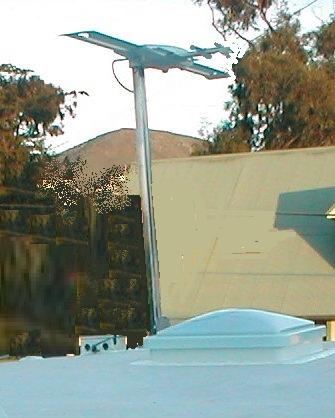
Installed the TV antenna. Pretty straight forward. It has the 'wingman' feature which is supposed to double the UHF reception. Well it does, went from 1 to 7 channels, though none strong enough to allow watching, were in a bowl surrounded by hills. Prior to Digital change we got 1 good channel and 2 fair to snowy, now we get nothing. Same when camping-most places are fringe for TV reception, if we get anything at all were lucky-If it were up to me we'd go back to analog but no one asked me.
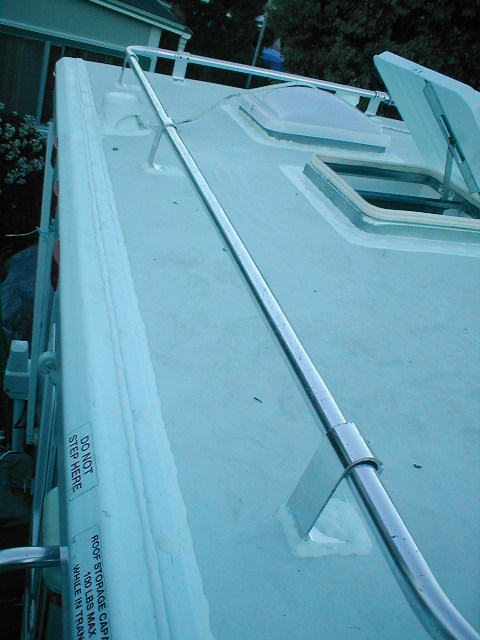
I cut the roof rail so it's both narrower and doesn't go up as far. Rail was previously mounted right on the edges of roof, hard to seal mounts. It also was on top of both plumbing vents (as it as from the factory) couldn't remove the caps. The side rails were easy, swaged male/female connection, just cut off 6" female end. Rear section I cut behind/at mount, split piece of tubing and inserted into both ends of cut This allows me to mount it farther away from the rear roof trim so water doesn't puddle between mounts. I also had to re weld one of the brackets that was broke.
The rear plumbing cap was previously on top of rear trim. EPDM now wraps to wall under the plastic rear valance/cap so the rear cap though sealed is not the only thing keeping water out. This whole effort, shortening the overlap of rear plastic cap, moving the safety rail forward and minor trimming of the rear plumbing cap makes for a much better design, water should no longer puddle and run freely off roof.
Oh jus Purdy...-
Spent the day Dicor caulking the remain vents, TV antenna, rear roof trim, plumbing caps, roof rail. Everything installed, caulked except the solar. So were almost done. All I have is caulking the top edge of the side roof trim pieces and reinstall a new replacement solar panel.. Took me 4 weeks.
So far I'm actually under budget, so ordered the replacement solar panel. Won't be here for a week and we might get rain -needed break. Got very lucky with nice weather the last few weeks allowing me do repair the roof. I finished roof JUST in time-looks like rain for a week. So I'll go inside and finish interior.
Update: I didn't finished the roof none too soon. next day it started raining, been raining for a week with no end in sight, lucky.
Repairing the interior.
Back inside I cleaned up the camper. Before starting the roof repair I had pretty much pulled everything out that wasn't bolted down, cushions, table, etc., emptying some of the cabinets I had to work in. Though I had covered everything in plastic was still quite a mess. Decided it was just too messy and the work left inside shouldn't add. Even if I have to clean again-can't work in here Tracked putty on the floor-stuff gets everywhere, sawdust, debris tools. Spent quite a few hours cleaning, putting everything back, Wow-looks like our camper again.. We are getting close...Really not much to do except the huge crack over kitchen. While doing roof I had fixed the cabinet where rafter that spilt forced face down. I was able to get the ceiling panel that sheared back up. I had added backing & reattach (glue & staple) where paneling cracked, over dinette, kitchen & along cabinet while roof was open. So what's left inside is just cosmetic.
One small crack around dinette light, when ceiling dropped the light box hit slide trim and ceiling tore around corner of box. Already fixed stapled ceiling to backing when roof was open I just moved the light box bout 3/8" over to cover crack. There is a small 4" tear in the vinyl at one corner or rear vent, not much I can do-not really noticeable but I'll probably try some paint or caulk later to hide,
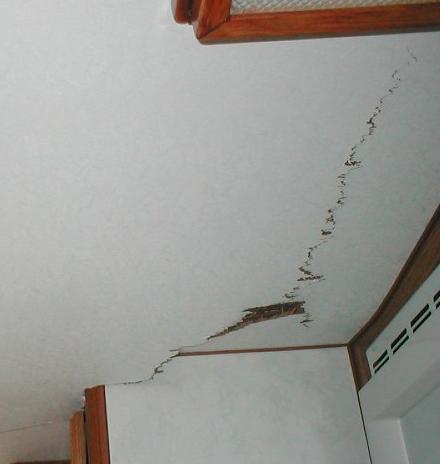
The large serious crack starts about 1" out from cabinet, goes straight in, then follows around corner, Where it goes around corner actually ended up behind the vinyl trim (lucky!) when I pushed ceiling back up. In front, where it started I added a temporary light to hide the crack. Knowing this is what I was going to do, I had run a wire while roof was open from the added junction box in closet. Always wanted a light there cause it was hard to see in closet (later I'll build a small light box full width of cabinet).
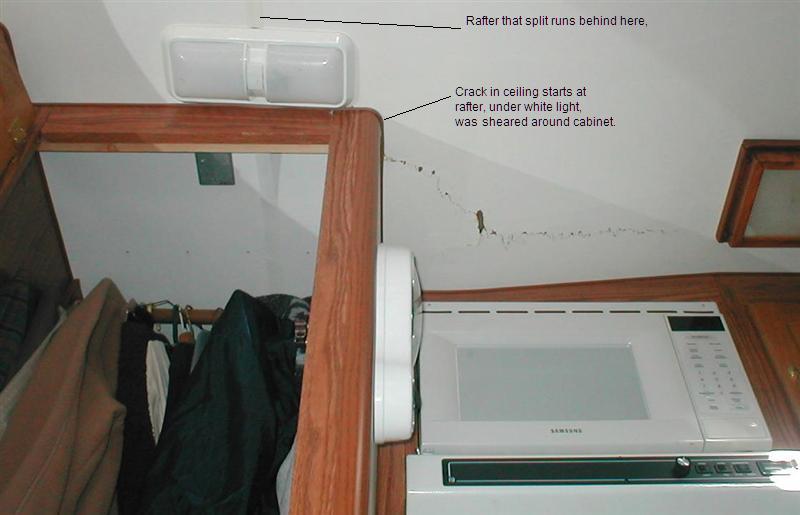
The huge crack over kitchen that will be a bit of work & last. Lot of glue and staples to backing trying to piece it together, The luan had splintered and broke pretty bad, large pieces of vinyl gone. I had thought of cutting completely out but think I want the integrity of sheet, so plan is too cover with some paneling.
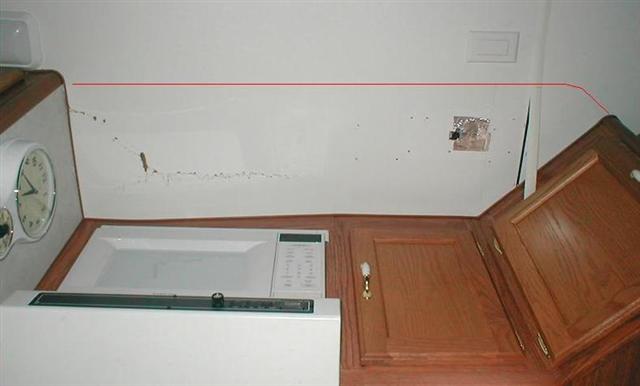
Even if I had the same white ceiling paneling it wouldn't match hard to trim so I'm using some of the oak paneling. Going from cabinet to cabinet (red line). hopefully looks ok. Here I've already removed the light,
Welp not until it was installed did I see what I hadn't previously. I was actually able to match cabinet angle. Cut a bit long and with 15 check & trims, perfect. Cuts came out clean. because it butt against the round vinyl trim I painted a thin line with stain around perimeter on ceiling just in case so whit didn't show. I also stained the edges of new panel, then stuck about 4" of new panel in a drawer and let it hang over night so it would warp to match the curve in ceiling. Next morning installed using stapler (mistake) and glue. The stapler was punching thru, so held back a bit, to hand set later, between being staples and bouncing 1/8 paneling just didn't work well, should have use brads. Oh well. Perfect match on the paneling (was the bed platform). Cool, this is going to work, kind of darkens but better than the crack and easy. All the check & fit, trial and error and final installation was done standing all but underneath the new panel. Looked good.
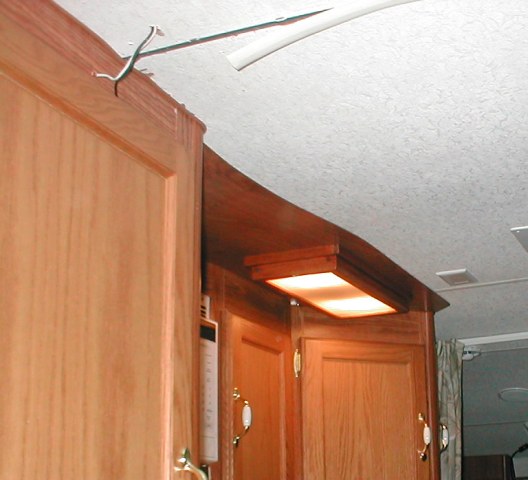
Decided to immediately reinstall light went to shop to get it and stuff to set staples. When coming back into camper is when I saw what I hadn't. The line between the different color panels and how the curved drop in ceiling stands out like a sore thumb. You don't really 'see' the curve on the white. Wow this looks like crap, it's a perfectly straight line, but as you move it looks like a piece of contact paper that is not straight and it changes. Nothing at this point I can do. I might try to overlay a piece of white vinyl paper later if I come across something. 4 pics up you can see the drop profile of ceiling against the cabinets. I've taken down the temporary light I had put up and am building another light box, this will partially hide the view so will help.
Doesn't look as bad from the bed side, the more in line you view the better it looks. Get directly under it looks great. Oh well got this far, 1st thing I'm really not happy with. Margaret says it doesn't look that bad, I was able to execute my plan - it'll grow on us. errr. Maybe because after all the work this is what Ill actually see that bums me. But repairs are done. We have our camper back.
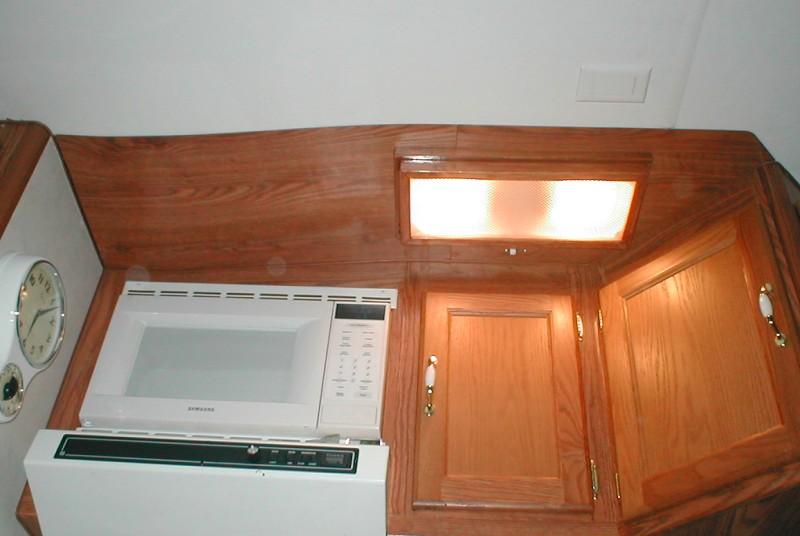
Built another light box, full length at front of closet. NIce, this will probably see a lot of use as it's in the walkway. Before, when entering had to climb up on dinette step to turn on dinette light. Plus now we can see in the closet.. Need a new mirror for inside of closet door-thought I was leaning against door frame while installing light until I hear 'SNAP'.
eeee
Conclusion:
Some minor caulking left, solar panel is in transit. Should be a bolt on, next break in weather & Ill reinstall and finish caulk. I do have a couple of round-to-it items later at some point. One is covering the rear trim bar with Eternabond tape (when I fix rear plumbing cap-see below). I may also do the front one as these were sources of previous leaks that I had to fix. I also need to reinstall the rear awning, but that just slips into rail, however I'm holding off so I can remove the awning rail & verify no water is getting behind the problematic rear plastic cap.Working on a fixed max budget I successfully stripped the camper roof, repaired the roof structure, repaired & backed up the interior ceiling, replaced the EPDM roofing, replaced all damaged accessories, (TV antenna, 1 std 14" vent, 1 14" power vent replacing A/C, 2 plumbing vents), Clean and replaced all roof trim, repaired reinstall the roof rail, did some electrical rewiring and additions, replace TV cabling, reinstall radio antenna, reinstall bath power vent.
So glad this is done, went fairly well, actually easier than I anticipated. But it took longer than I thought. A lot of minor details that just had to be done but consumed time. Again I got SO lucky with the weather. The EPDM installation which I was concerned about was probably the easiest task. I had hoped that I could get it done in one day but it only took 2 hours to lay. The most tedious was cleaning putty/caulk from items to be reinstalled like the roof edge trim, but that I did in the evenings or when it was too cold to work out side. I'd say the most difficult & time consuming was separating the OSB from the rafters. The rafter repair itself was fairly easy, enjoy working with wood. What I least enjoyed was applying the Dicor caulking, reinstalling stuff using the Butyl tape a close second. Scariest part of this project was the weather, starting this in the middle of winter, lot of stress until rubber was glued down-whew.
What I learned or was most confused by is the way this camper is assembled. Just bizarre. Some of the repairs involved figuring out how it was put together to best rebuild. I've always built and look at things as each sub assembly adds to the final assembly, this camper relies on the final assembly to complete the subassemblies. For example the roof structure, 1x2 rafters that basically sit on perimeter 1x2s which just sit on wall. The interior ceiling panel glued and stapled give rafters some structure but it's the OSB that ties rafter to perimeter. But the perimeter 1x2 isn't fastened to walls, only the screws going thru roof edge trim and filon actually tie roof to walls. Bizarre. But ceiling panel is also stapled to cabinets etc., so there is some interaction-bottom line is there isn't any structure until everything is assembled.
Other than appearance of my interior ceiling fix, the only real regret is not continuing and pull last section of OSB at rear wall. Though if had I would have not completed install before rains started and camper would be sitting there still with tarps. (Actually if camper had been covered or inside I would have taken ALL the OSB off, faced all rafters, fix & seal stuff I didn't like). But even with my mods to rear, nothing like it had been, now only a 1/4" dam at plumbing cap, water still puddles. I did get about 3/8 between it and rear trim bar (previously was on top) but after caulking it went away. The roof flattens out the last 18", I could have added some crown to it for better drainage. Fixing now isn't reasonable to reopen. If the rear valance cap wasn't such a pain (and might break) I could slip in some wedges between rafter& OSB, but tearing up new roof to reseal-nah. If I can find a plumbing cap that doesn't have such a large base it would fix this. At that time I'll also cover trim bar with Eternabond tape.
The screws, caulk, tape misc. etc. is what started eating the budget.. Lumber/materials I underestimated, odd bits I had to keep going after but I had overestimated cost so a wash. The 14" std vent, EPDM roofing & all installation stuff came from local RV dealer, hardware/tools etc. from local Hardware store. Unfortunately online ridiculous pricing for the TV ant, power vent and solar panel - is what put me under budget and couldn't buy local. Well that and replacing the A/C with power vent helped or $4.50 an hour labor :-). Tools that made this easier I've include as part of cost.
Cost and materials:
(you can click for larger clear copy in separate window)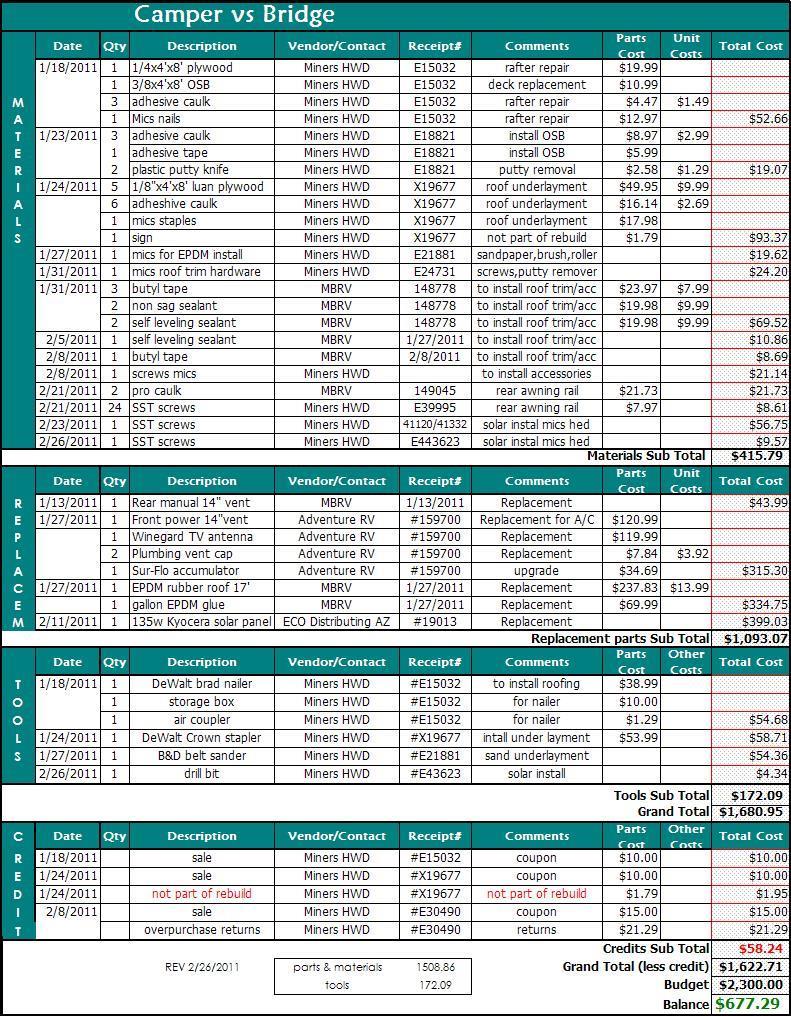
Solar reinstall 2/23/11
I'm updating the costs, adding remaining items as incurred. Finished caulking the gutter to roof. Bought extra Proflex to do some general caulking later. Other one is the solar panel. I had thought our roof was plywood, when I discover it was OSB I was a bit concerned with our 2'X5' panel being lag bolted to 1/2" OSB which has no pull strength so I had added 3/4 ply blocks at mount locations while roof was open. Bought new longer bolts to reach thru OSB & into ply backing.
The new panel frame is quite a bit different, though stronger for intended use, my tilt mounts cause frame to flex. Picked up some alum channel to add cross braces.
Also I had rescued the connection box from old panel and am adding it to panel. Panel is still available with JBox but was another $40. Older style Jbox allows direct connection of wiring, accepts additional panels, also incorporated bypass diodes (serviceable) for partial shading of panel. RV use this is desirable. New panel also has bypass diodes but there non serviceable, the new panel is supplied with potted box affair with 2 cables coming out, no wiring terminals, can't replace diodes should they fail.
Anyway all wiring will be in the added Jbox box, it now only serves as a watertight wiring terminal. The box can be directly wired, also acts as a combiner if I ever add another panel-.Anyway my 'bolt on" replacement cost another 56 bucks for the alum & SST hardware to add cross braces to stiffen, make frame for Jbox. Biggest hit was I'm using stainless hardware, just the 16 mount screws was 14$- wow. Just realized-by using my old box and ordering panel without it, the extra for added bracing was offset so a wash-cool. I might note new Kyocera 135 watt panel cost $354, old one originally cost a lot more so they are actually getting cheaper.
I won't go into detail, but added 3 cross braces of 1x3/4 channel. Shaping the ends of added cross bracing to match extruded frame, Bolting is taking a bit of effort due to smallness of frame with added channel. But this ties the side rails and my mounts together & should minimize any frame flexing. I'm also adding some screws to outer corner frame joints in shear thru overlap. Factory they are all in tension, on the ends, screwing into extruded slots. For normal mounting this would be fine. Again this will help if frame flexes..
Got cable?
I am NOT using the supplied 12ga wire multi contact crap (my opinion), I'm cutting off the connectors and shortening the supplied 12ga wire and run to added box. Then I can connect my existing 10ga cabling. Effectively I've voided the warranty so don't recommend this. I could have bought a short multicontact cable, connected to the panel wires then run to box, extra connection and longer length of smaller wire. I could have run all new (smaller) cables to controller box. Decided the dikes were a better option.( If you buy a length of cable with male & female ends, cut in half then connect to your panel you can add your own box without voiding warranty, what you would do if running to your controller using the multi contact wire) -I have to 18" lengths-free...
All dressed up and nowhere to go. Got the panel bracing added, jbox installed & pre wired. It's raining like heck for a couple of days .
As new panel is a tad wider than old one I rotated mounts sit inboard so I don't screw into rafters. But also means I can't access mount holes for drilling. I'll have to set on roof, mark holes, remove mounts ( to insure holes match)_ reassemble then mount panel.....hmmm. Be nice to get this back up and operating. That and this project will be finished.
SOLAR REINSTALLED
Well almost-due to A/C no longer in front of rather high 3 1"/2, panel needs an air foil. Nice because A/C wont shade panel but it's going to catch a lot of air that has to be addressed. Details. Because its black- panel is 3" wider so it sets closer to edge, the safety rail is inboard 3", optical kalusion but the panel is HIGHLY visible you can see underneath. Where before all you saw was white-the frame was aluminum so blended with rail, virtually you didn't "see" the panel. I have since painted underside, frame & box white...still plotting an air foil.
Back to page 1-the carnage 'bridge.htm'
....
Back to Ourelkhorn Camper Modifications page
7845