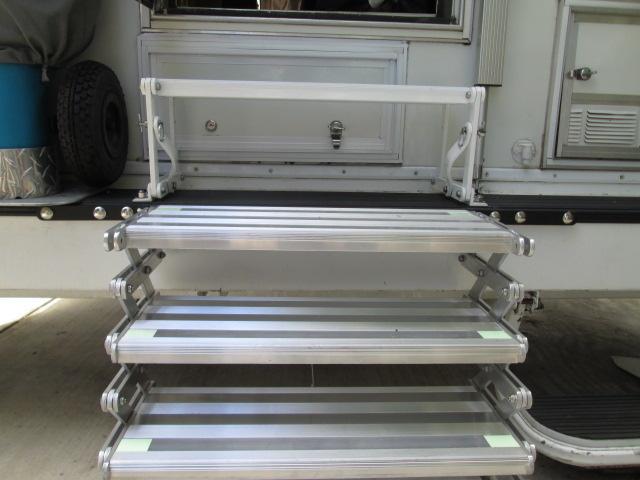
Install Torklift Basement Step, upgrading 6"x18" scissor steps to new 8"x20" Torklift Glow Steps
Preface-. Initially I was only going to install the Torklift basement step. Because of previous modifications over the years, ours wasn't a direct bolt-on until I made allowances for the basement step. As previous modification to the way our old scissor steps were mounted didn't work with the new Basement Step. The solve was using new "Glow Steps' from Torklift. For most this IS a pretty simple bolt on. In our case took a little imagineering but well worth it. All I can say is the Basement Step from Torklift is the answer to our otherwise too tall step from bumper to camper door (13 years later). The replacement scissor GlowSteps are simply awesome. The extra width of the 8" tread is just a pleasure to walk up. So how we got here...broke up long page into sections.
- Intro, history, motivation and arrival at this point.
Moving factory flip over step brackets so I can use both flip over and new Basement step
Installing new Torklift Basement Step
Torklift Basement mount modification Capture the mount bolts
Torklift Basement InstalledNice!
Lil upgrades waiting on new Glow steps
!!New Glow Steps arrived!! Some minor temporary 'customizing'
INSTALLED!Steps
Added height adjustability Reworked to accept previous adjusting feet & landing
Simple mount stand offs, and at camp Even with height adjusters sometimes stairs to low or high
Link to Torklift products
Intro: The decision
Our original steps with mods over the years.
Other than it gave us a bigger landing to step out onto-it also decreased the distance a bit. A few years later I added 1/2" spacers to both sides of the flip over step-which effectively decreased height another 1". It worked well but that last step into camper is still a hike. Original mounting did require some mods to stairs, we carry inside.
We do use the flip over when towing and while on the road. Or when I'm too lazy to set up, which isn't often-unless we're stopped for the night and won't be going in & out.
At the time there just were not any other options, though my mods decreased the step out distance it still was marginal. Definitely had to pay attention stepping out.
Recently became aware of the "Basement Step" Torklift is making. Specifically addresses and resolves the issue with the basement camper step. What is awesome about it is that it splits the step height in half, but more awesome is that it can fold down to access basement. It also mounts to top of bumper so that lack of wall surface to mount something a non-issue. Just a perfect solution.

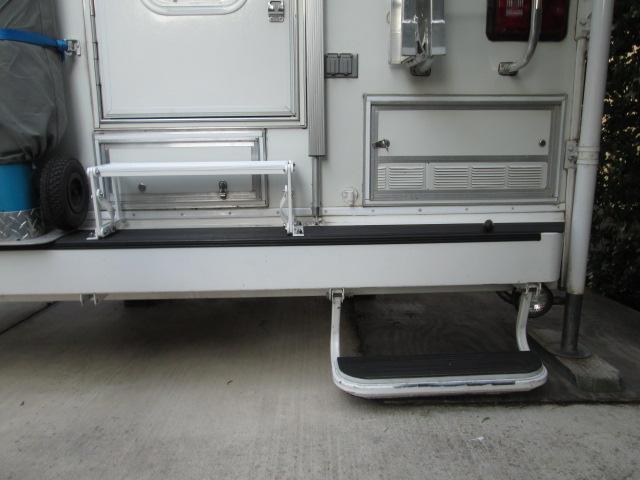
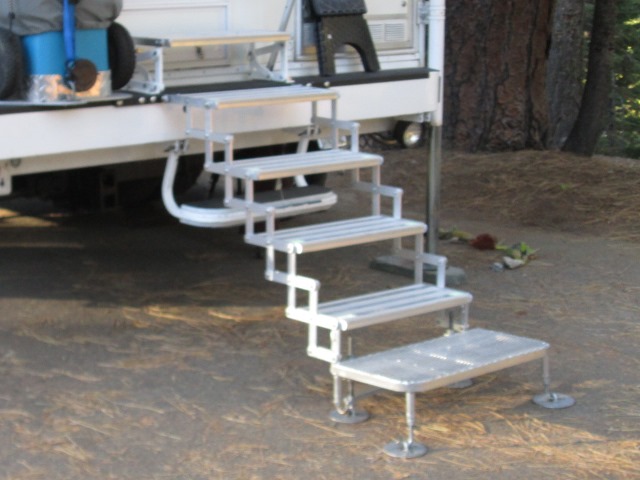
New Torklift Basement Step
Setting the new Basement Step on top of bumper I was stoked-this is going to be so nice getting in & out. For most this would be a simple bolt on as steps are likely already or will be mounted flush to bumper.
Lastly my install though shows basic install does also include what I needed to do. Because of wants/needs and previous mods. For 98% of folks yours would be a simple bolt on...also this page shows working thru a few issues that led me to the final install. If I just showed what I did would be simpler. but its not its a mess-for what it's worth, but not a typical installation.
So this page covers a few different things:
Back to the top of page
"Bolt on..." some thought required.. move flip over step
-
It became apparent very quickly because of previous modification to stairs our installation wouldn't be a normal bolt on. The top of our stairs had been modified so they could be mounted to backside of flip over step, they can no longer be mounted any other way. When on the road I don't want to have to install the scissors steps just to get in. Also when towing-we use the flip over mounted off to side. Somehow I need to keep flip over step.
Problem: Though the flip over step can hang and be utilized-step on bumper then onto new step, it can't flip over under new step so that I can mount our scissors steps. It is same width as new step. Plus the bumper bracket underneath is inline where new step needs to mount. Which means the flip moved over to tow position and flipped up for storage as it uses common center bracket, it still will hit new step.
The "Basement Step" IS getting installed. I have 2 options for the stairs. Either replace or see if I can modify back to original configuration so that they can be mounted to face of bumper not relying on flip over step. It would be nice if scissors steps stored on bumper and just drop when getting in camper but still need the flip over for towing. In order to do that the step brackets need to be moved. Looking underneath our bumper I noted it has several predrilled and notched locations for flip over step brackets. Not sure how brackets attached I pulled dump hose tray out of bumper. Looking in the brackets are held on by simple 3/16" thru pop rivets. I assumed they either had flush rivets or something. Simple
Drilled out the rivets on center and right side brackets, moved over 6" in predrilled locations and reinstalled. I used a clamp to hold brackets tightly against bumper while riveting. Note you will need a rivet gun with long snout to get inside the brackets, mines a Craftsman.
Flip over step brackets moved.
That was easy, installed the flip over. Cool. Now it's just there, can get in when just stopping on the road or when towing. Kind of nice just for accessing ladder. At some point I'll locate or fab a 4th bracket and reinstall original location so flip over 'could' be used in center location. (Or now that I'm done, also move the remaining far left bracket over-duh-swear thick as a brick sometimes. When I get a minute Ill move the far left bracket over) Though they can't be stored in that location with new step, there have been many places we've camper and unable use scissors. No reason to not have the option.
Just FYI as I've not seen any other mentions of moving flip over step brackets. I've seen others who have mounted their scissors steps as I did, to backside of flip over, but didn't need to the scissors step bracket too bumper. Only other consideration is if you tow and making any adjustments needed to utilize flip over in tow position. Some campers have 4 brackets so again might not be an issue to utilize flip over when towing.
I am leaning toward replacement steps as the Torklift 'Glow Steps' are 20" wide and can be had with 8" deep steps. Would be nice, ours are 6" step 18" wide. But I can only justify new scissors steps if I'm unable to modify mine back. Will require creating new pivot arms. Oddly the pieces and pivots I cut off 12 years ago I just cut& used on another project 2 weeks ago. Typical. To be done...
Back to the top of page
Actual Install of Basement step
-
So now were at 'normal' install point. Again for most it's just simply following the instructions and installing the new Basement Step. You're good to go. It's a pretty simple install- couple of items omitted from instruction. Locating step and size of holes.
Easy install- locate, drill, bolt
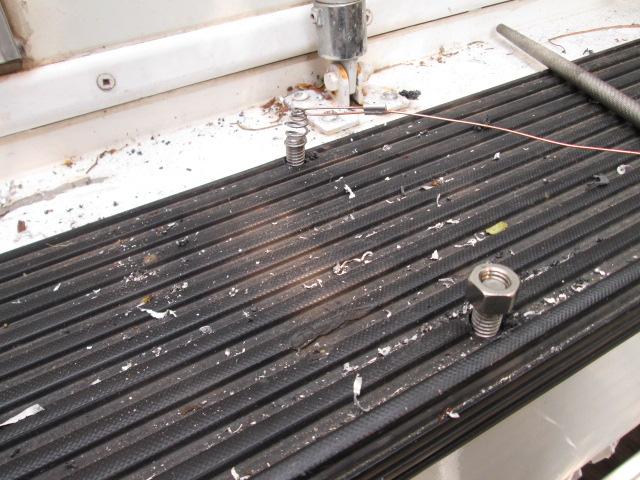
Mine has a ribbed mat on bumper that after locating step I was going to trim so step sets flush on bumper...However as I was getting ready to install I pondered this. One it would create a dam. Grooves are 1/4" deep, water & dirt would stand. I ended up mounting on top. If rubber, well actually plastic, compresses it'll be easy enough to remove, cut around the step angle least 1/4" bigger so water would drain. The mat doesn't go all the way to back so step mount angles are kind of hanging above last bit. After wards I loosened step, cut a couple of small squares of 3/16" aluminum and caulked to step.
Lined up step placement, I almost erred. I was thinking of placing as far back as it would go. If you look at the step mounting angles the rear holes are about 2" from edge where mine and I assume most must be for the odd bolt spacing, the rear wall of aluminum bumper is about 6" inside for outside face of bumper. If you place new step too far back you may not be able to bolt. Though I could access that blind space from underneath camper it'd be painful but more than likely I would have hit rear wall when drilling thru. Simply it should be mount toward outside edge of bumper. Other reason is stepping out of camper you'll have more step protruding. It doesn't say in instructions, my opinion is front edge of step mount angles would be about 1/8"-3/16" from outward face of bumper.
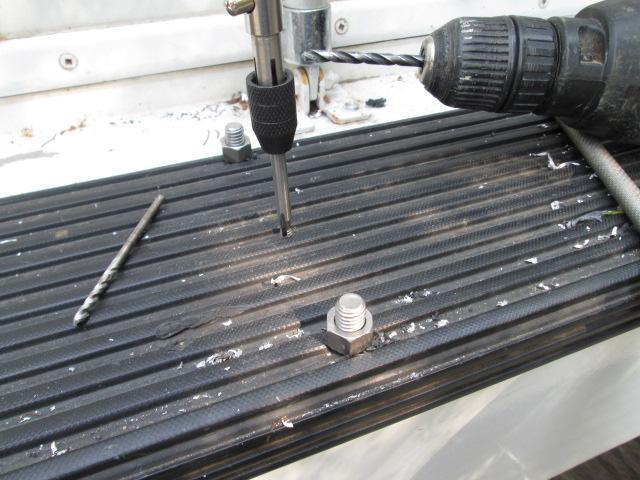
Ok--ready to install, again. With edge of step mounting angle about 3/16" from edge drill one front hole. If using the supplied fishing tool, holes should be 27/64" minimum diameter for ease of pulling it thru the hole. However I used 25/64" it was tight-but I only used tool for one bolt and then enlarged that hole. Recommend smaller bit, allows starting without wallowing step bracket holes or drilling out the powder coating. If you are installing on top of ribbed rubber mat another consideration is the ribs will likely try to walk the bit. Ensure you are FIRMLY pressing (or clamp) the step down to prevent movement. Holding step firmly- I very slowly with drill at high speed fed into plastic, once plastic cut I continued just enough to get a good point into aluminum. As your drilling thru the step drill will be at a slight angle so I didn't drill thru. Moved step out of the way and drilled thru bumper.
Contrary to instructions I didn't fish bolt and secure. I simply dropped a bolt into new hole to place mount. I repeated same procedure on opposite front bolt after ensuring step was square. Drop a bolt thru hole, continue to rears.
Once I had all the holes drilled I started to fish the bolts. Feed fishing tool spring end thru step mount & new hole until it comes out open end of bumper. Place washer on bolt, thread 'tool' on bolt a couple of turns then pull wire with bolt thru hole. Run a nut on it, repeat till you have all the bolts thru. Works well but...
Back to the top of page
Install departure, Minor mounting modification
-
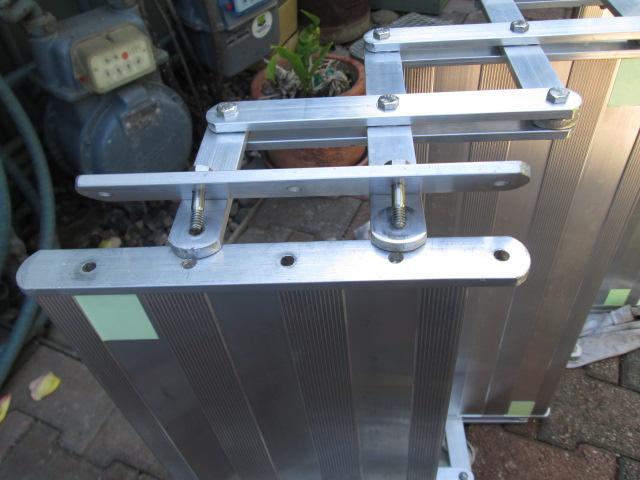
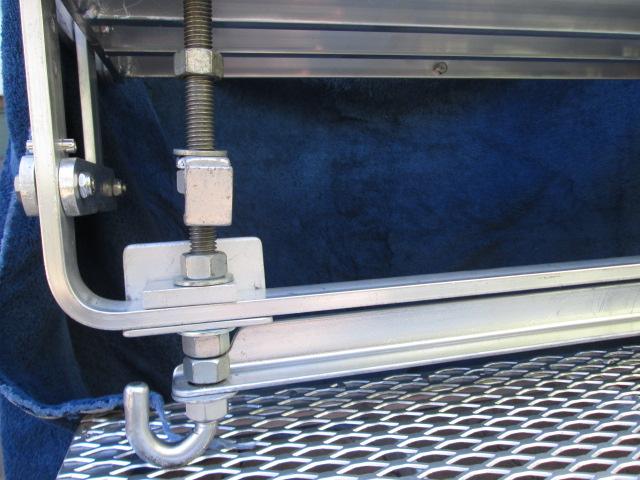
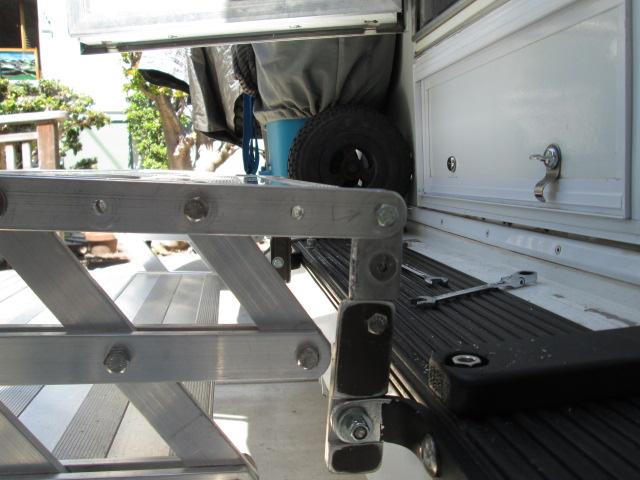
Here my install slightly departed from supplied kit. Or simply bolts still come up thru bumper but are captured-not loose until step mounted. Instead of pushing/ fishing bolts up from inside bumper, I threaded pair thru a piece of flat bar then pushed bars up so bolts stick thru, ran a screw from top to hold bar.
The whole time getting ready for this I kept thinking about the bolts being inside. Couple of things, that motivated me to rethink the mount bolts, One is I don't have scissors steps ready, I'm second-guessing installation-hopefully not paint myself into corner. If I need to adjust or remove step wouldn't be easy, stainless steel lock washer grinding into rather thin aluminum, and if they could be removed easily-you'd need to do the fishing exercise again. More than likely they might spin if I needed to remove.
Second the 1/8" bumper material would be resisting any force, especially in the folded down position. Tray pulled all the way out or someone step on it, the bumper might yield, doubtful but I'm here. It is the ease of removal & reinstall without fishing bolts that motivated me though.
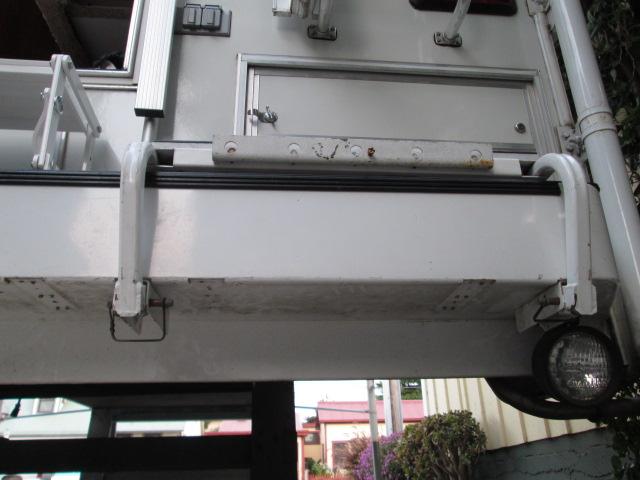
It's too bad my bumper doesn't have a door on other end. I can easily reach the bolts on left side thru door. If there was a door on other side I could reach the right side bolts. Anyway what I came up with. A bar that bolts are threaded into & thru. Assembled bar will poke thru bumper. 1 small bolt thru top of bumper into bar will hold it. I can take the new step on and off at will without re fishing bolts.
New bolt holder/backup bars
Cut 2 pieces of 1/4" x 1" aluminum flat bar about 5 3/4" long. This will place both holes less than 1/2" from ends. Hopefully bar will not hit inside of bumper. Drilled and tapped a 3/8-16 about 3/8" from one end on both bars. Then using step marked other hole, drill and tapped.
Back bar inserted
The right side I used fishing tool to install the bar. Took a while, use a long stick to help align.
Drill & tap to retain bar
Pulled the bar up snug. Drill thru bumper and bar with 9/32" in-between mat ribs. Loosen nuts so bar would drop, enlarge hole in bumper to 3/16" clearance hole. Pulled bar up snug again and tapped the bar with a 10-24 thread.
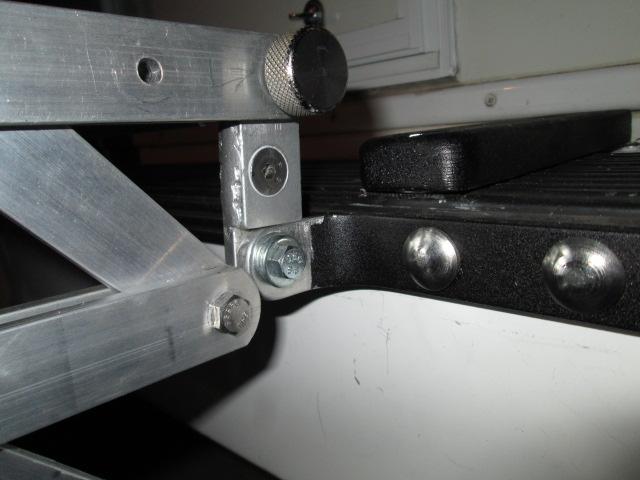
Bar with bolts caulked & fastened
Ran 10-24 screw down, removed, trimmed mat so screw snugs against bumper. Loosened the nuts and squirted caulking around bolts. Reinstall nuts and center retain screw, let it set for caulking to set. Screw head is below ribs. If I end up removing ribbed mat I'll counter bore the step mounts.
Back to the top of page
Back to Actual Install
-
Place the step over bolts and secure.
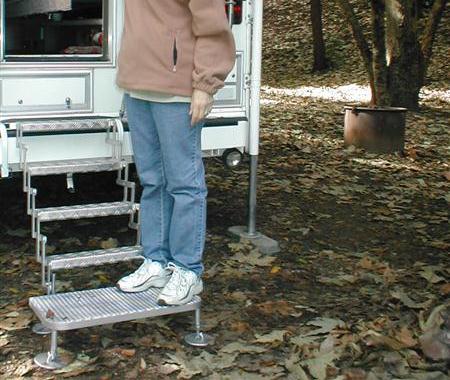
Can't believe 12 years later finally a real fix for the campers way too tall step from bumper to door.
To access the basement cabinet, just pull the 2 pins...
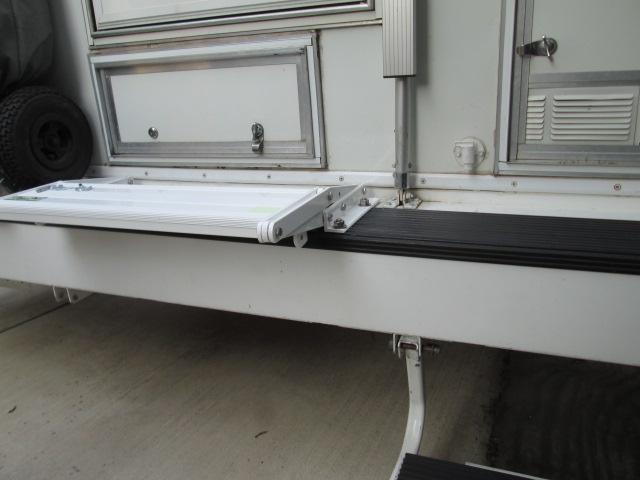
Step folds flat, how cool is that.
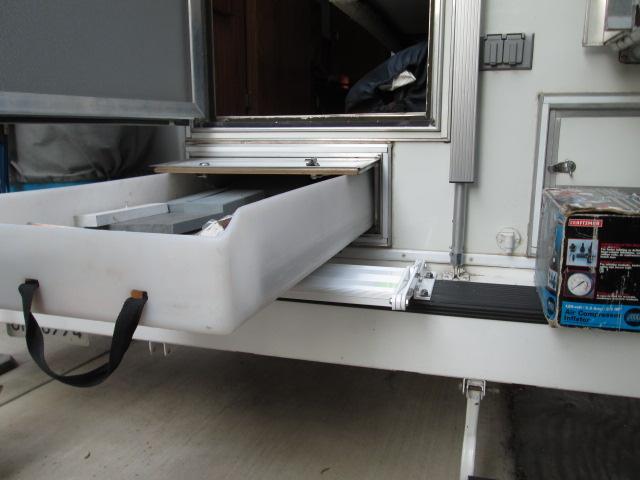
Why from the get go was unable to install steps originally at level they really needed to be, getting the basement tray out.
If you have a basement camper-this step from Torklift IS the solution for the 14" step distance from bumper to doorsill and still having access. My install though convoluted due to previous modification will not be the norm. Install shouldn't take an hour. Wish these were available 12 years ago
Another reason for the back up bar that just made itself clear. The whole time I was installing, that extra height to top of new basement step without scissors attached made getting into camper a bit difficult. Normal use with scissors steps will be awesome-but without them? Tradeoffs.. We'll need a stepladder or something when at home or off loaded. Margaret came out, she's excited about the new step. I explained possible problem when off loaded. She looked at the new basement step and "Can't you just unbolt them now" Doh.."When campers at the house or were off loaded would be easier" Good grief-felt like the caveman who watched another make fire for the first time.... I'm looking at the step while she goes back into the house. I was having some second thoughts about the new basement step. Wasn't intent but back up bar will allow easy removal of the step when off-loaded. Wow- my reservations just evaporated.
Its all about options...When at the house or off loaded and cant use scissors steps-unbolt the basement step.
Back to the top of page
Couple of small things while waiting on New scissor steps to arrive
-
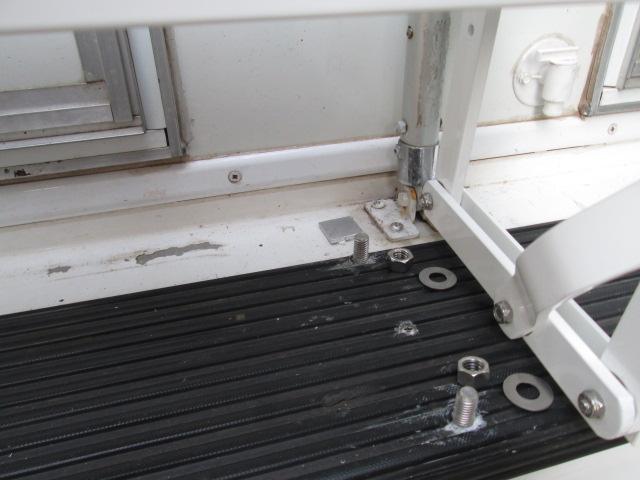
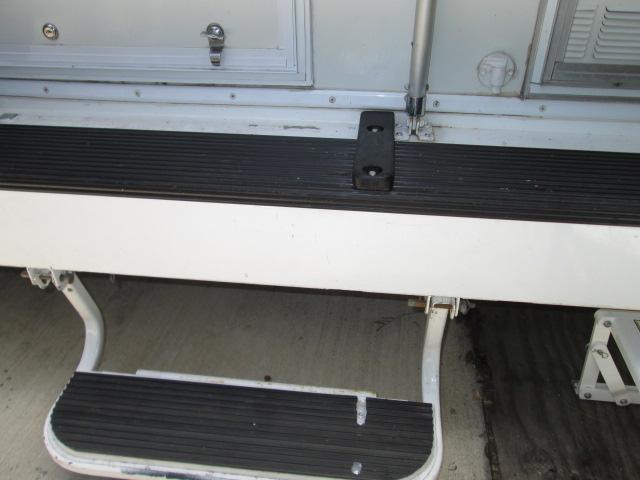
New8" Glow Steps on order-They will be mounted flush to bumper. I'm hoping they arrive soon anxious to see if I can mount & use stored on the bumper. Would be nice---not so patiently waiting for parts.
One is I now have bolts sticking up thru when basement step not used. Need to make something that nullifies tripping hazard. Shown above I just cut a piece of 1x2. Later Ill find a piece of plastic and remake-tether to handrail mount so it's handy. A very clever person if unbolting the step frequently might use a piece of stainless bar instead of aluminum for the back up bar, (al doesn't like frequent threading). Still retained from the top but reversing the bolts, run bolts thru the step into bar-instead of bolts poking up. No trip when off. I'm not redoing but had I thought of it earlier that's what I would have done, maybe.
I moved the remaining flip over step bracket so that it 'could' be used without scissors or basement step. To utilize the flip over step in the stored position under door I simply notched it (another reason of bolting top down-oh well).
The 'bars' with bolts attached are no more difficult to install than just the bolts. Other than making, a simple possibility, if you off load for mounting the Basement step. Makes the Basement Step a ill more versatile for those who offload.
And lastly while waiting for steps..made some lynch 'bolts'.
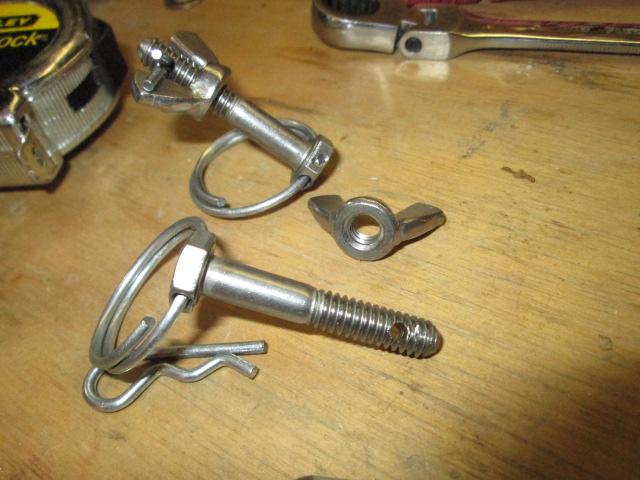
As shown in earlier pictures, the steps use a simple lynch pin to secure in up position. While they work great for ease of use I noted a bit of looseness in the step due to the pins. The lock arms can move away enough for the pins to twist in the holes. Long term I'm thinking the movement may increase as the pins may wallow out holes, maybe not.
I also noted in earlier pictures on Torklift site (and in the animated pic at top) that they used thumbscrews. I think its a better solution so I'm replacing the lynch pins. However they need to have full diameter shoulder (not a threaded section) so as not to introduce slope at the pinholes. As I know I won't find a shouldered thumbscrew decided to use bolts. Shoulder needs to be 1/2" min., thread length unimportant as I can cut- but HWD had some 1/4" x 1 1/2" with 5/8" shoulder SST bolts. Perfect. Wanting to keep the no tool option I'm using wing nuts & reusing the spring loop. To ensure the nuts can't or don't accidentally thread off, re-using clip pins.
Drilled the bolt heads and the threaded shank with 7/64". Reused the clips and spring clips. Though I'm using stainless washers also slipped in nylon washers-just to help not chew up powder coating. Ground ends of bolts round to aid in aligning thru arm holes.
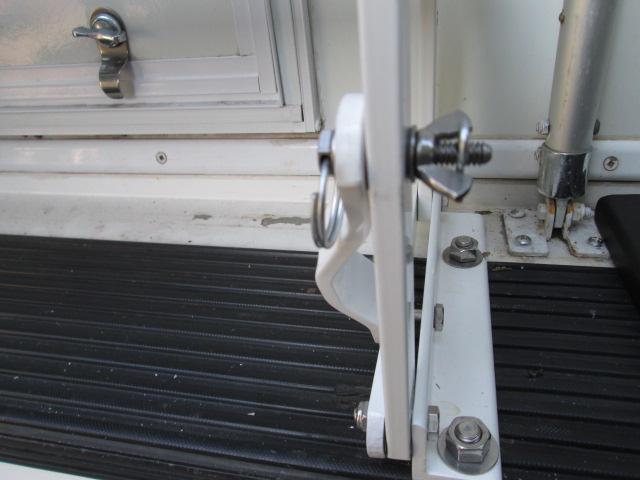
Did really tighten it up-... Still waiting on stairs...
Back to the top of page
Installing Torklift 8" Glow Steps
-
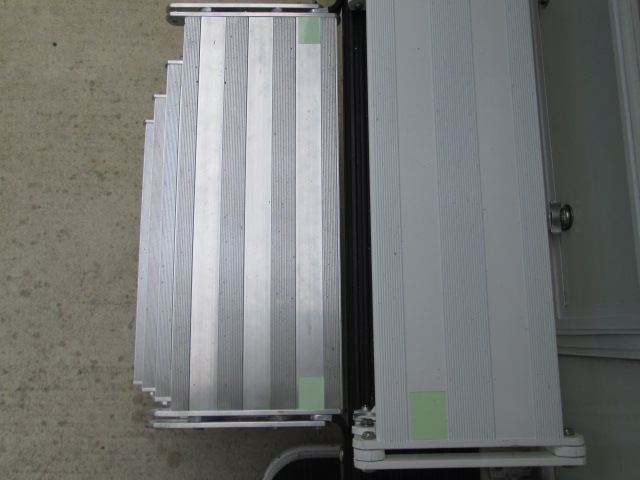
WhooWHOO! Steps arrived.They ARE really nice. Double bar, 8" deep treads is going to be SWEET.
I preliminarily set up against camper to see what they'll look like. Nice but the gap between the step and bumper seems a lot. To the point seemed I needed to look closer. I jury rigged some blocks under them so I could step in out of camper. It takes a conscious effort to miss the gap-especially stepping down on to them. Mostly because the Basement Step sets back an inch from bumper. The stair bracket sets the top of stairs about 2" away from bumper. So its about 3" from toe of top step to heel of lower step. Just too much IMO. Though honestly, I think a lot of it is because we are used to the steps mounted to flip over and had a 'platform' to step out on.
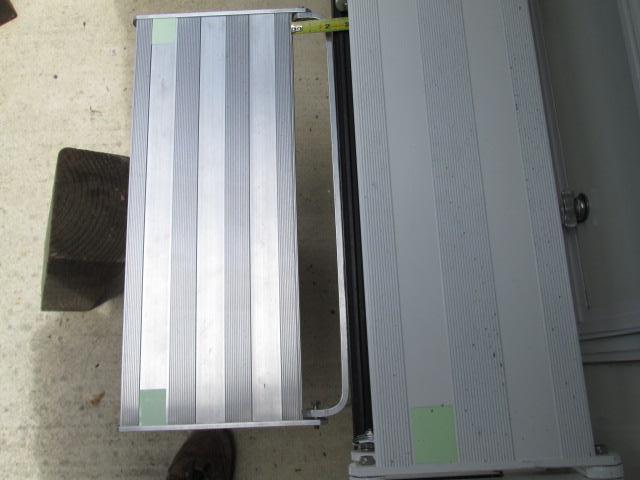
(Note- I had barely started modding steps, as described below, to install when I discovered the 6" tread on new basement step would accept an 8", also mentioned below. I'm going to see if I can order a 8". Ill continue with plans to mount stairs to use the steps until it arrives, will nullify need for some of planned mods, so making allowance to revert any changes made to steps in case I can change the tread
I've not seen any pics of installs in platform- flush with bumper installs in conjunction with the Torklift Basement Step, probably because it's a fairly new product. But the gap is why I remember whacking stair on my original install years ago-old stairs used same type of bracket, though mostly it was the extra pivot installing to back side of flip over.
I have a plan, temporary & interim, which will work and doesn't involve whacking (well at least the new stairs). Will pull in gap. At any rate what I'm going to do is split the supplied bracket in half-mount outside the steps instead of in-between stair arms. Redrilling the pivot holes will allow stair to be pulled in about an inch. Part of the interim install is I'm also rotating the top stair tread 180°, will bring in even more and end up with only a 3/8" gap. Depends on what you want.
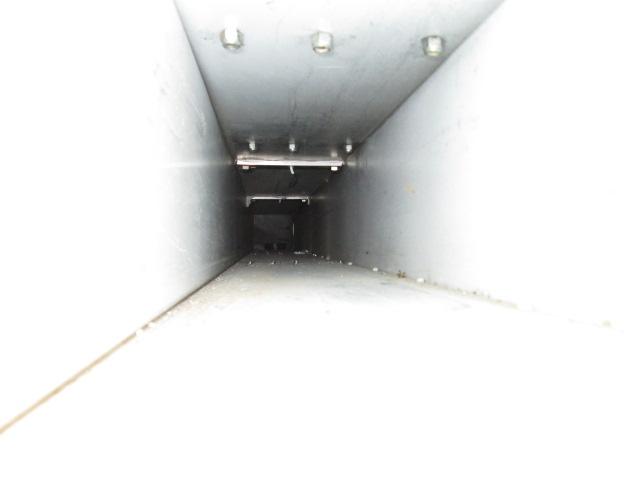
But first I need access
I'll be using a Torklift lock, like used on the Fastguns, to secure the stairs. But the exposed bracket bolts doesn't make sense. So broaching the holes and use carriage bolts. Because my plan for scissors step mounts, using carriage bolts, requires better access I pondered it for a while. I happen to glance over my shoulder while scratching my head at our jeep trailer. I noted the rubber plug on its 4" square bumper, umm. Walked over and pulled it, held up to camper bumper and before I could think of a reason not to I drilled 4 corner holes and jig sawed a hole.
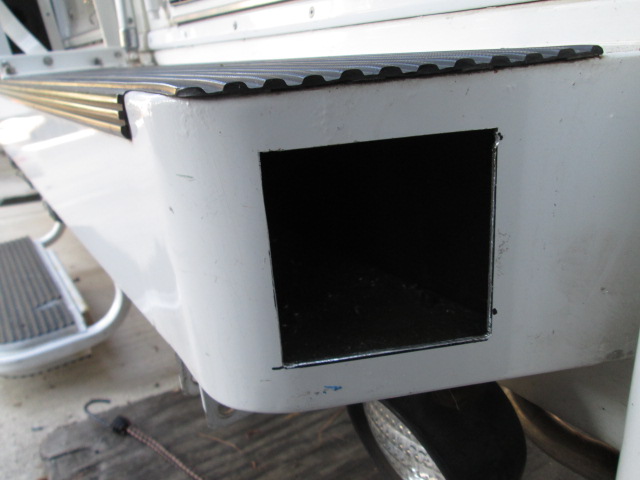
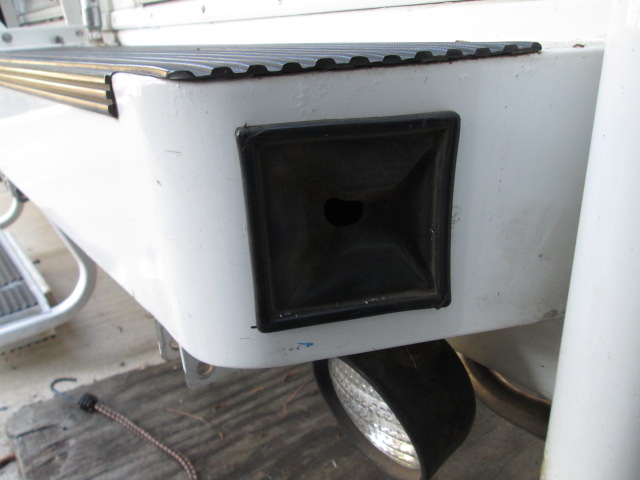
Nice-more than once I've had to fish something from other end of bumper that jumped out of tray. A larger plug would be nice as often as not I have to move truck because I could not get tray out. But another project.
Now with access from both ends of bumper I can proceed with plan to decrease the gap between bumper and step. Basically by splitting the bracket in half, can mount on either side of the step. Also keeps bumper face clear when scissors not used. Redrilling the pivot holes will decrease gap by an inch.
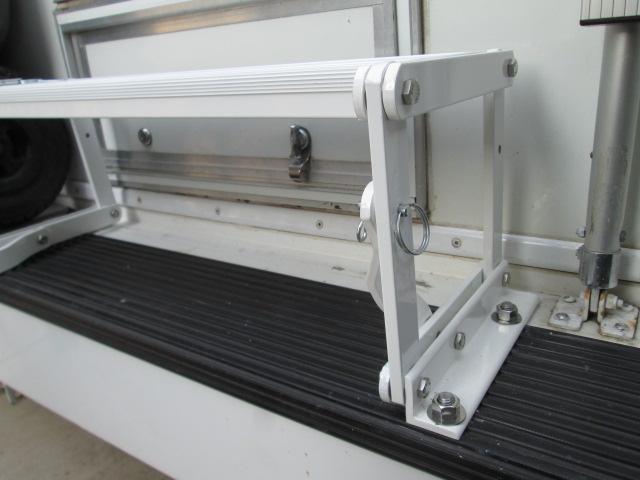
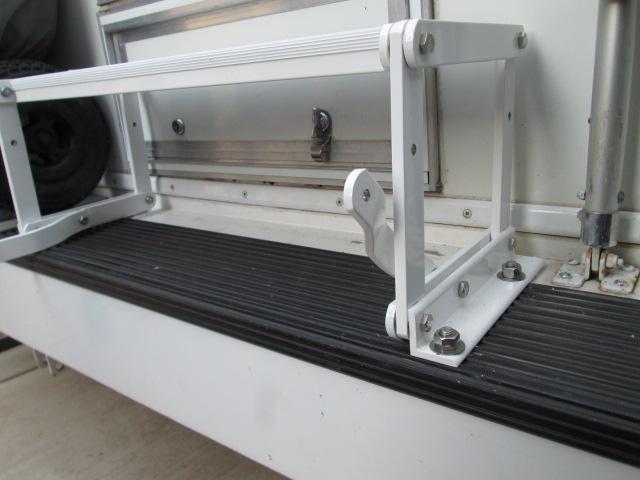
But I rotated the top step tread 180°. This puts the short end of step tread side bars toward bumper, allows moving step to about a 3/8" gap, uses original arm hole as pivot point. It will still fully rotate. Another nice mount was done by fella on the rv.net forum. Using angle and making vertical mounts. With the pivot point just higher than bumper allows steps to be rotated over and set on top of bumper for storage. Course wouldn't work with the basement step-just a lot of options how you mount. ..but I wander...
To keep the rotated step relationship between steps I redrilled the 2 folding arm holes each side. So step tread is virtually in same location. I also swapped the short cross bars at top with full length bars to capture mount ends from both sides. A little stronger and pivot pins won't see cocking or twist loads. Rounded the ends protruding at front of step. The tread can be rotated back to factory if wanted, otherwise Id trim front arms.
If you noted the terms "temporary interim mod" because when I had top tread off to redrill, I walked over to camper, being curious of difference in treads.

Holding it over basement step it became obvious that the 8" tread would mount in place of the standard 6" tread. The pivot arms & holes line up just inside the 8" step. Would resolve couple of issues. One- the above need to rotate top tread of GlowStep to minimize gap. With 8" step centered on basement arms toe of tread would be flush vertically with bumper. With step as factory assembled (and modified arms) gap between, or step out distance to clear would only be an inch (instead of 3") Even using an unmodified bracket the 2"gap would be less (IMO) an issue. Also Basement step with an 8" tread would increase the, in my opinion, rather shallow step out distance & give a larger landing. So if 8" tread swapped onto Basement step I'll rotate the top tread 180° back to factory position.
Also with top step rotated it will not fold up enough to store on bumper. Might be a consideration for some. I've pretty much decided I'm not hanging on bumper when traveling, but in factory configuration it could.
Back to the top of page
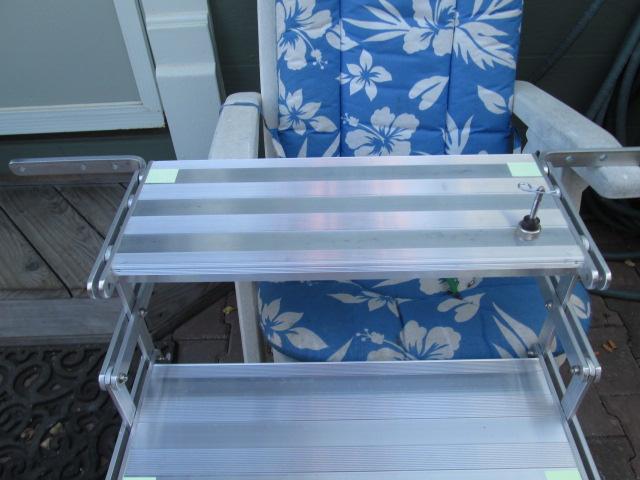
Step installed
Gap now at 3/8".
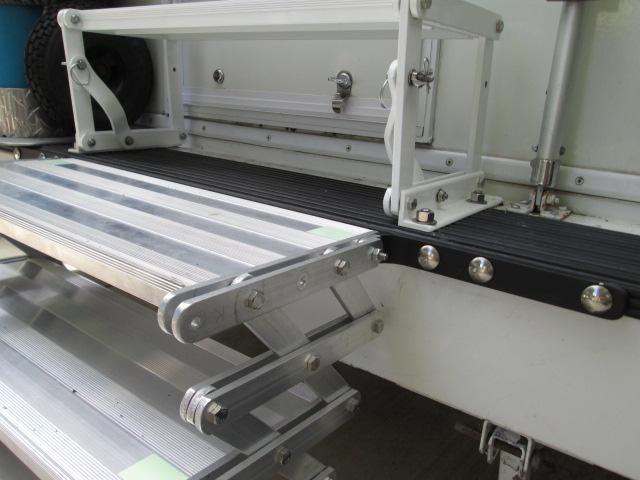
Provided bracket split and mounted. I actually cut out 4" from center of bracket, squared existing holes to accept 3/8" stainless carriage bolts. Filed the pivot ends to about 5/16 to fit between step arms.
When I get lock Ill enlarge pivot holes to accept
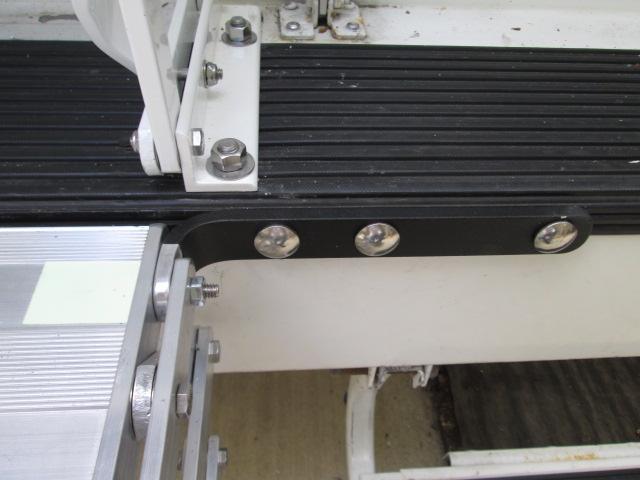
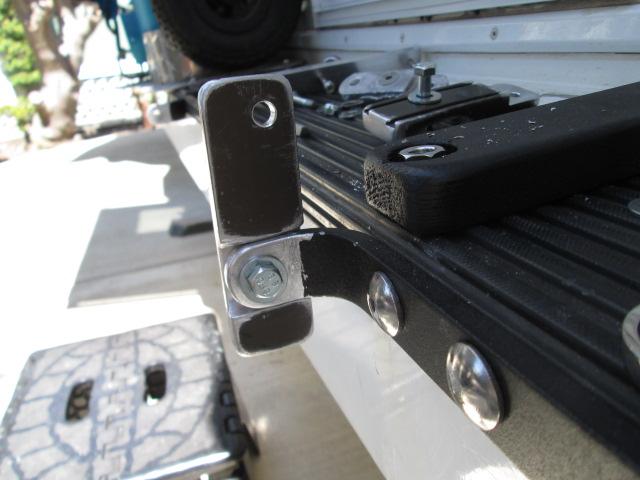
Just detail of bracket. I painted it (them)textured black to blend with the bumper pad, but I couldn't help myself and hit the stainless carriage bolts on the buffer.
Should have been like this since day 1-NICE- I'd assume for most adding the TorkLift Basement Step would be a simple bolt on- replacing scissors step, though the new 8" Glow Steps nice, wouldn't be mandatory. The mods shown just to adapt to our usage, towing and off loading.
Replacement 8" tread on order to replace the 6" tread on basement step. Then Ill reverse temporary measure to minimize gap. Mostly to give a larger landing when stepping out, but as mentioned will also be directly over scissor steps (or equal run) with no gap distance to step over. At that time Ill rotate the top tread on stairs back to factory orientation. IF the basement step had come with the 8" tread, in my opinion, would have allowed use of bracket unmodified as the gap would not be in step path. As it is though I'm happy with my cut bracket, clear bumper face when using flip over step, and allowed adding the second bar each side of top stair tread which I think captures stairs better. Had it not been for the 6" tread I wouldn't have done so kinda glad though a convoluted path to get here.
Back to the top of page
Add some adjustability
-
And lastly, incorporating the landing and height adjusters from previous steps to new steps. Won't go into any detail on its construction. Just drilling holes in bottom bar to utilize. Due to width of new steps the holes are an bout 1" further inboard than they should be but didn't want to rework old landing. To compensate (and because the new GlowSteps bottom bar is aluminum) I added a piece of steel angle and a short length of al bar on top to sandwich the hoop. As weight on stairs will focus at the adjuster legs-this should alleviate any problems. I also shortened the bottom hoop bar 2" to compensate for the length this adds. I also lost about 1 1/2" moving mount from flip over step to bumper, so it will be the same as previous steps as far as opened up length, which can be 2" too long when parked downhill. Adjusters compensate for most. A 3- step way too short, 4-step a tad long..whaz a fella to do...
At any rate these really help when camped on uneven ground, allow adjusting height and /or side to side slope. The extra landing just nice, it's usually retained/attached to steps but can be adjusted separately. Takes me all of 5 minuets to set up. That whole original configuration and install can be viewed on the 'add some adjustability' page. Separate older project...but I did ensure it could be incorporated onto new steps. Except for the disks the adjusters are fully contained on stairs-folds up as before.
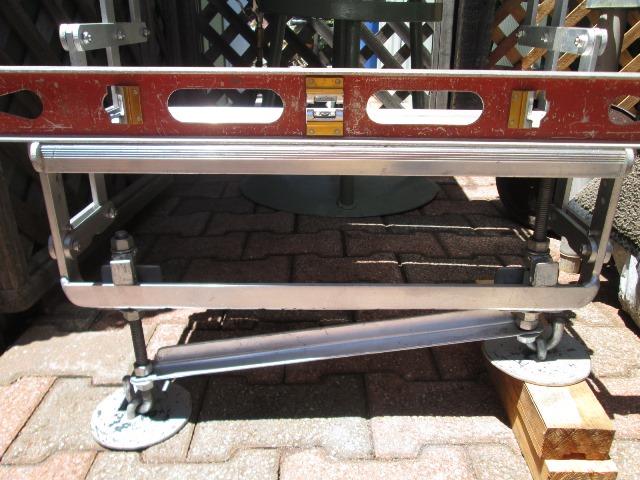
Update-year+ later, I welded on a 1/4"x1" flat bar to hoop bottom edge. No issues or evidence of bottom hoop yielding, I just never really liked that the adjusters were so far from ends of hoop, some leverage. Even though the steel angle pieces keep hoop from bending- just kind of a bug me thing. Always seemed enough vertical load applied 2" from hole, it 'could'. I should have widened the add on landing so adjusters ended up closer to ends. But welding on bar solves, last place to bend would be the hoop.
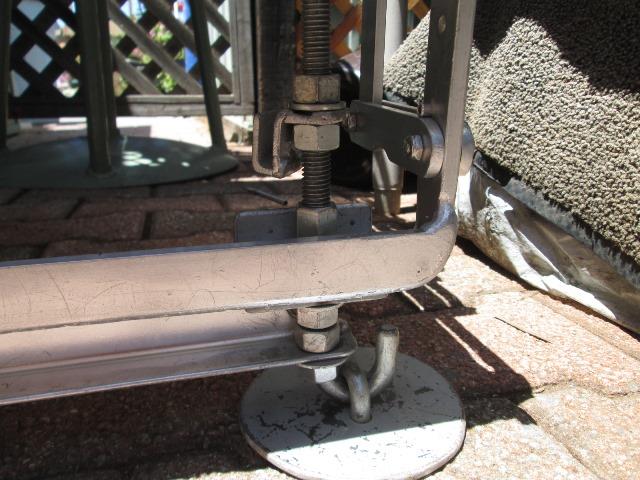
Just close up of adjuster and landing retainer clip (keeps landing from walking away from stairs). Because of the double horizontal bars on the Glow steps I had to weld the cross bar to face of hoop. Lost about an inch of extension, though never had these extended that much. If needed, not using the retainer clip for the landing step (it has it own legs), rotating the clip to rear I could extended another inch. Or just removing I could gain another 2". Just don't see that ever needed or used. At that point I would simply use the drop brackets to top mounts shown below.
Fuzzy pic in use. Ground slopes away and to left. Stairs adjusters are extended bout 2", with about 1" difference side to side. Nice, just keeps the steps in contact with ground and treads level, no more shimming, digging or piling dirt.
Fab an offset brackets for steps
-
Using scissor steps, though will adjust to a degree in length, sometimes they are either too long or too short when camped on un level ground, resulting on treads sloped. Though I can easily increase the steps length due to previous addition of adjustable feet, I cant make shorter. IE when truck parked front downhill and we block to raise front, as pivot point is at rear truck wheels the distance at rear camper bumper becomes quite short. This cause the steps treads to be severely sloped. Decided to see if I could address.
What I came up with was small brackets that bolt to mounts and then the steps mount to them. They will raise top tread approx 2 1/2". If flipped over, though I don't need they also could be use to drop top tread when stairs aren't long enough. But now that I'm done (and NOT redrilling my bumper) a better answer might be to use angle brackets mounted vertically instead of the supplied flat bar that comes with the steps. They could be drilled with a number holes, allowing for various height needs,would be a lot more versatile and actually stronger. Oh well-
But my simple brackets for every great once in awhile use.
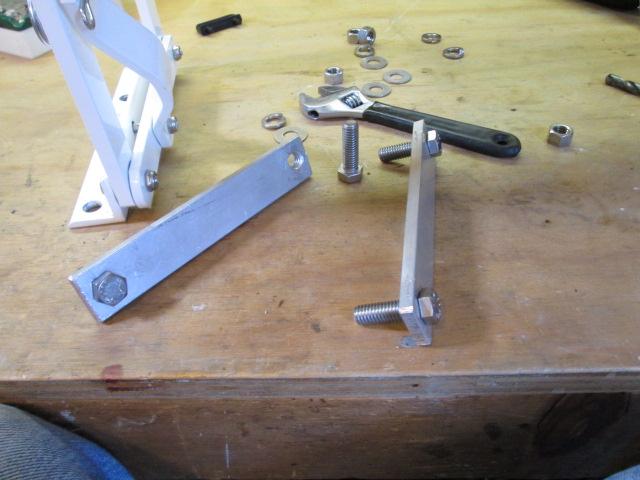
My first proof of concept: FAIL
Simply welded two pieces of overlapping 1/4" flat bar to gether. One end bolts to mount, stairs mount to other end. This offsets the "ear" . Though they worked for raising the steps (to increase length) the brackets can rotate over end outward-fail. They wont rotate toward camper when walking up but stepping out they will rotate out. mostly because there's no flat on mounts to resist the rotation BECAUSE i ground the bumper mount ends all nice and round /smooth earlier. If you look at pic-offset bracket rotates on its bolt-cant go back but can rotate over end. Factory mounts may have enough flat. But simply need support on underside similar to top so when bracket rotates it hits the mount. I could tighten the bolts enough so they wouldn but don't want to rely on that so remade. Basically the same but longer so bottom cut will hit mount, or a notch instead a flat ear.
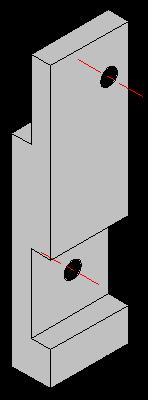
New brackets-I made from a single piece of 1/2", filed down the top ear, and a lower notch instead of lower ear. These do work. So in the spare parts they go.
I did realize my previous fail brackets though not usable to hang steps CAN be used in conjunction with new brackets-cant imagine needing or using but have the option.
For me its all about options and flexibility. If I'm working on it, doesn't usually take much more effort to make stuff easily adaptable to different scenarios, multipurpose ease of use. Id rather spend a few minutes wrenching to make it right than 'dealing' with it.
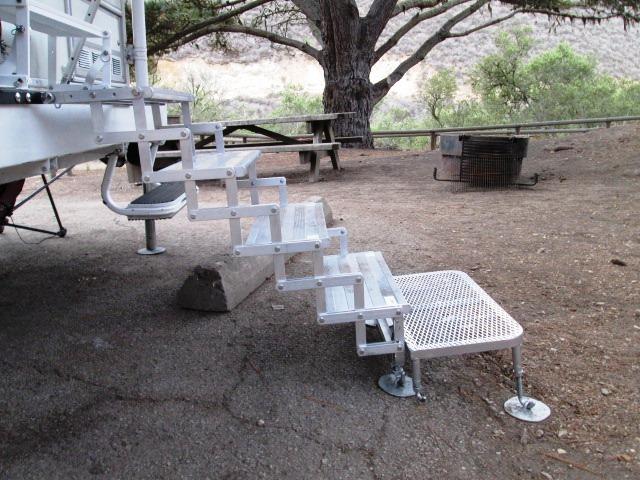
Went camping for a few, the new steps are really nice. Reason for adjustable feet, even here at local park, on pavement they come in handy. The trucks front tires on 3 2x6 blocks, if I hadn't backed just a little too far initially I would have got to use my dandy extensions. You can see the step treads just starting to lean, But as base was off edge where pavement rolled off it was ok. Had I been 6" forward they would have been too long and steps would be sloped.
These steps from Torklift are NICE! My convoluted personal mods may put folks off, hope not. For 98% of the folks they would be a bolt on. I highly recommend them.
Links to Torklift.com and products used
Torklift "GlowSteps
Folding scissor steps
Torklift Basement Step Splitting the difference between bumper and door..
After contacting Torklift about using an 8" tread to replace the 6" on the basement step- Torklift sent me a new 8" Tread for the Basement step!
See swapped the Torklift basement 6" tread for an 8" tread page.
I have a lot of Torklift items on our camper. Only thing equal to or exceeds their products, in my opinion, is their customer relations. Folks are simply amazing.
Back to the top of page
Update: Installed Torklift Stow N Go bracket to store steps on camper bumper. Also using thier Landing Gear adjustable feet for the Scissor steps- a lot simpler to adjust height of steps.
Back to Ourelkhorn Camper Modifications page